
After a big announcement in Dreamforce that Process Builder will be deprecated in 2023. Now, Salesforce flow is the future of automation tools. Salesforce Flow is the most potent declarative automation tool that Salesforce has built. We all know that “with great power comes with great responsibility.” So, it’s essential to learn about Salesforce Flow best practices and Salesforce Flow Design Patterns (what TO do and what NOT to do in Flow).
Here are 10 Salesforce Flow best practices that we talked about in our session Salesforce Flow Design Patterns by Rakesh Gupta. A design captures underlying thought process and logic on which a flow is built. As a result, there is a strong correlation between a robust design and a powerful process.

In this blog, we’ll discuss best practices, ‘gotchas,’ and design tips to make sure your flows scale with your organization.
Top Salesforce Flow Best Practices
Salesforce Flow is a powerful tool that can automate many business processes and save time and effort. However, to get the most out of it, it’s important to follow some best practices:
1. Always! Plan Before You Build
The key to successful project implementation is – to design first and then implement. Salesforce Flow is no different – the same logic applies here, too. I have seen many cases where people start creating Flow(s) when they get requirements. As a result, more often than not, users end up getting some weird error messages.
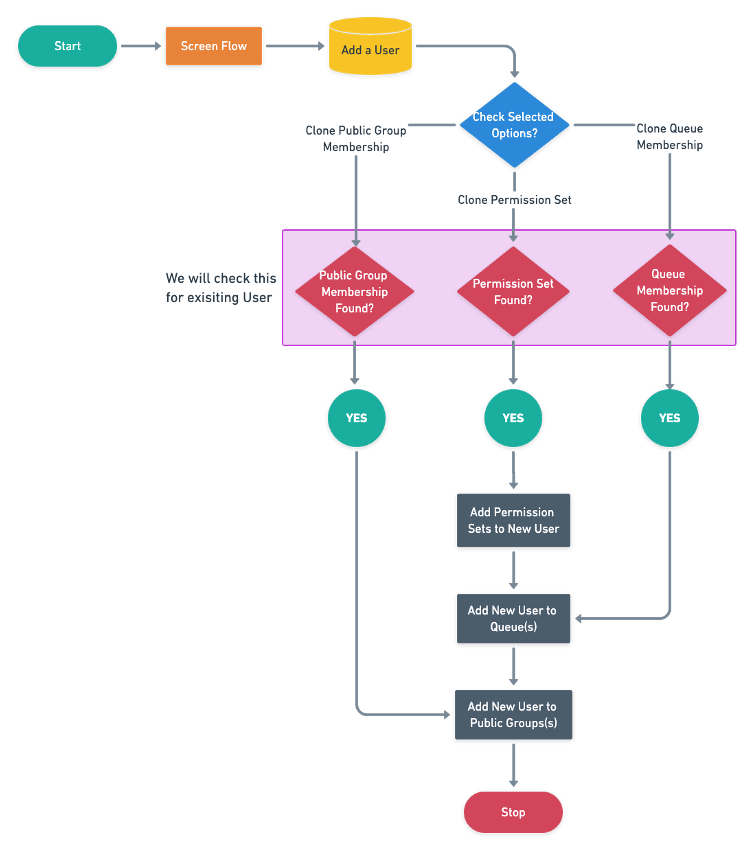
Business Case: Steven Greene, a Lead System Administrator at Universal Containers(UC), received a requirement to create an automation that would allow the System Administrator to quickly create users by cloning an existing user, including public group, queue memberships, and associated permission sets.
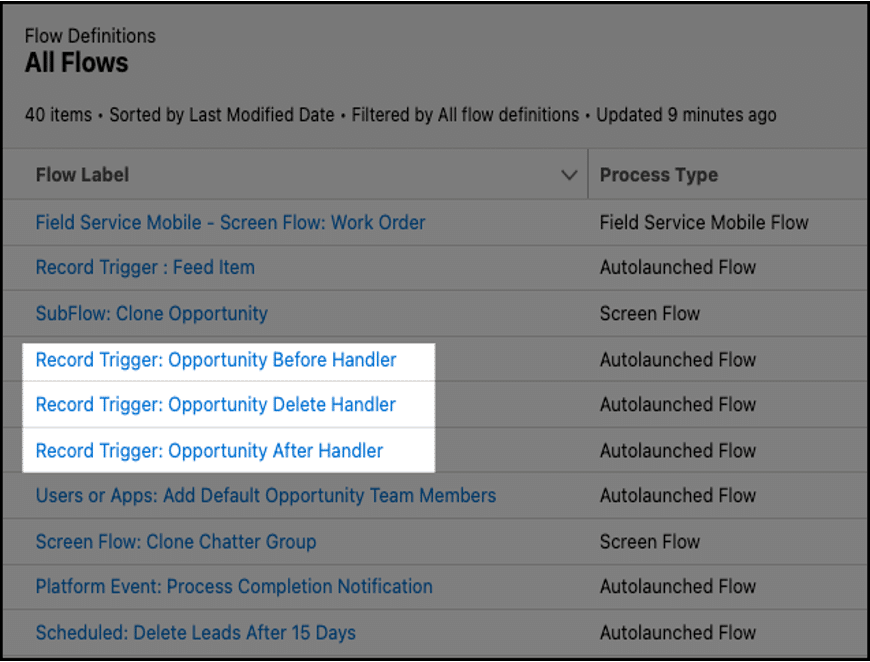
2. “One Record-Triggered Flow” Per Object – Per Type
Once you understand the requirement and create a flow diagram, do not rush to implement it by creating a new Flow. Try to find an existing Flow and see if you can incorporate current requirement(s). Furthermore, to achieve flexibility and create reusable Flows (subflow). Following one record-triggered Flow per object concept will allow you to manage all your flows for a given object in one place.
For, when you have one flow per object, it is less likely to hit limits such as a number of SOQL queries, and, it will also allow you to avoid generating infinite loops.
Learn more here.
Now, do we need one flow per object after Set Trigger Order on Flows is available? We know there is lots of limitation in one flow per object. Please share your experience in the comment.
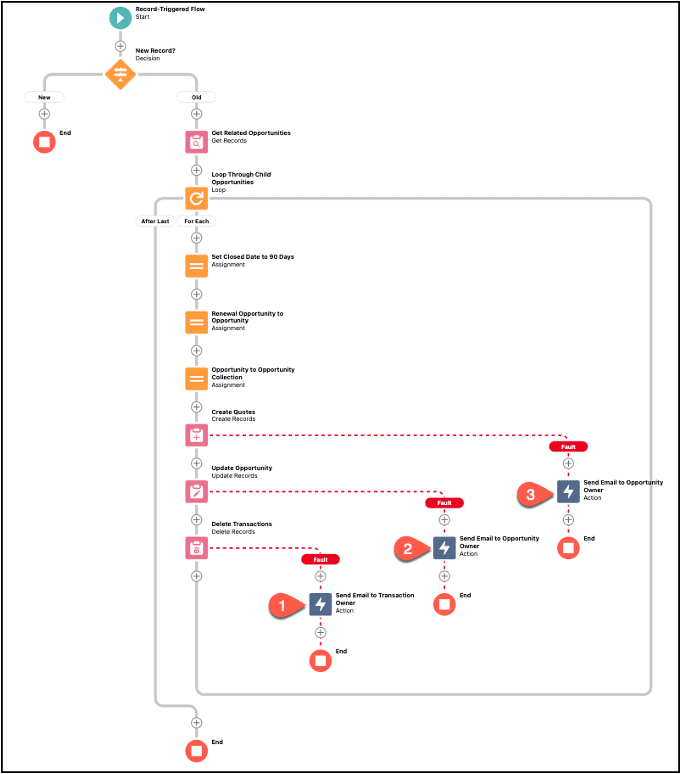
3. No DML Statement in Loops
Never perform a repetitive Get, Update, Create, or Delete inside of a Loop. Similar to Apex, we should always use bulkification wherever we can apply that; otherwise, we will get an SOQL limit exception error.
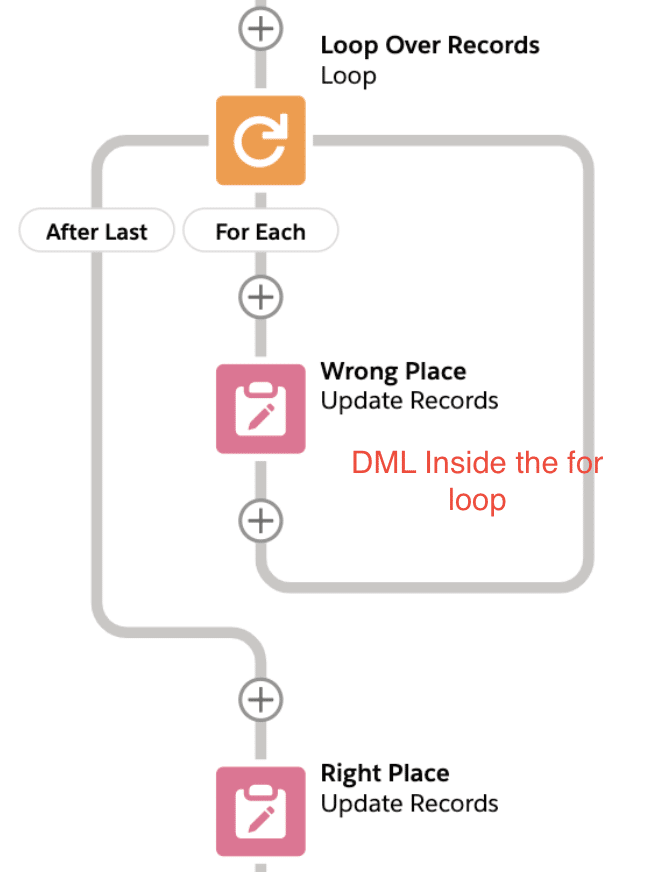
If you have a collection of many records, and you perform an update to each one within the loop, you’re at risk of hitting DML limits if you’ve ever received this message.
Error Occurred During Flow: Too many DML statements: 151Create list variable add a single variable in that list, and update/insert it at last.
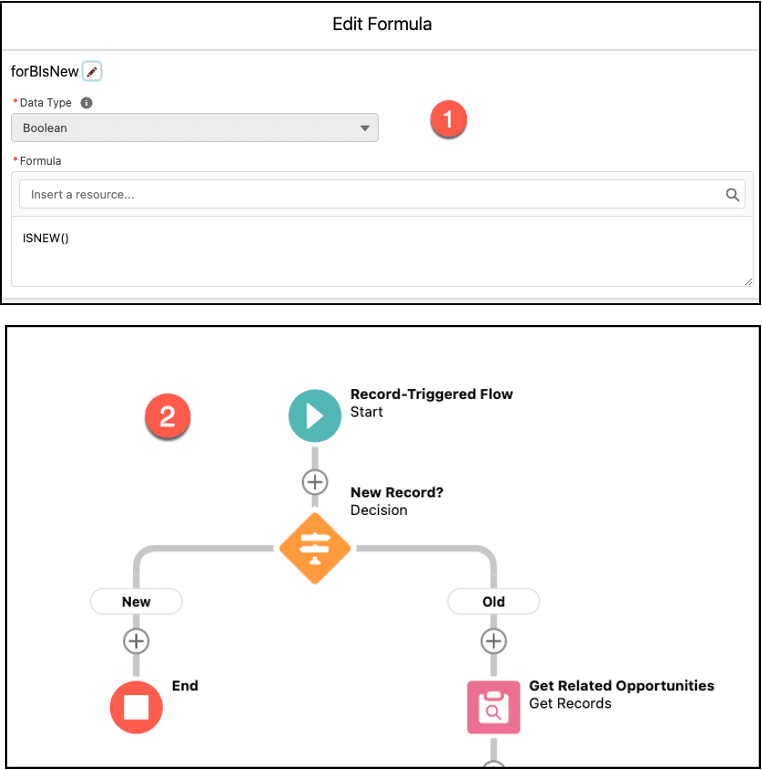
4. Use the Advanced Technique to Merge Decision Node
Once you start thinking about one process per object – you may wonder, how can I handle a process/action that needs to be fired only at the time of creation? The answer is very simple – use a formula ISNEW() while defining the criteria! Similarly, if some automation applies only to cloned records, then use ISCLONE() function.
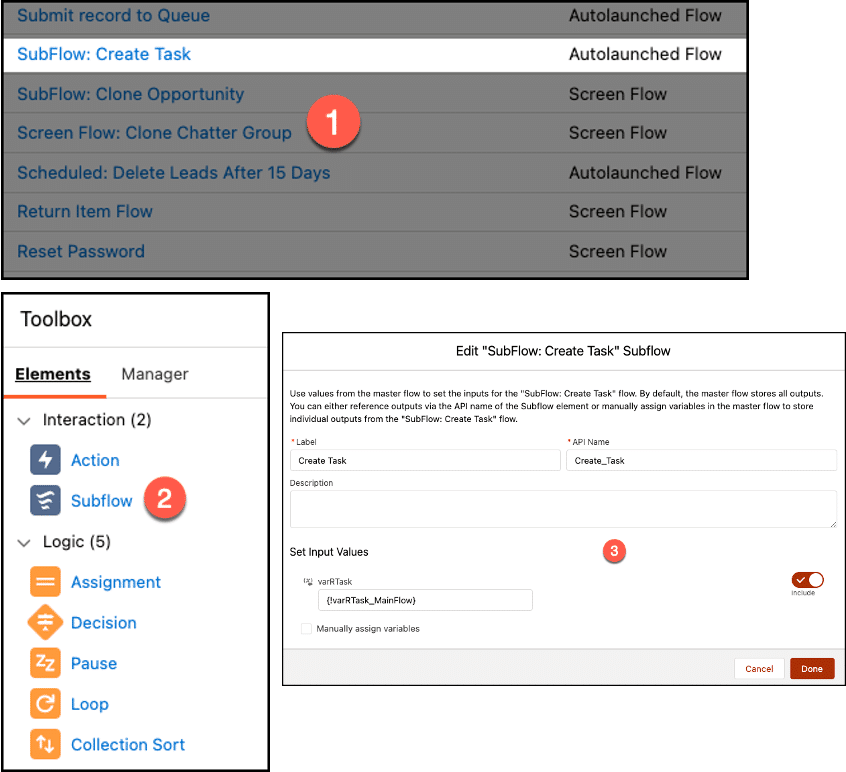
5. Build Reusable Flow(s) – Subflow(s)
Subflows are a sequence of reusable actions to use in a flow. You can create subflows to perform common processes specific to a custom application.
Subflows consist of:
- Subflow inputs to pass variables to the actions in the subflow.
- A sequence of actions, flow logic, and subflows.
- Subflow outputs to create data (variables) for use by other flow actions or subflows.
- Subflow is an Autolaunched Flow.
Learn about Salesforce sub flow.
6. Don’t Create Flow for Everything
If it is possible to achieve a solution through a Formula or a Report, then don’t create automation for it! Use automation sparingly!! For example, if you want to display Account Site on the Contact record, then use the Formula field, not a Record-triggered Flow.
At the same time, if there is something that can be better handled through Apex Trigger, use them, like handling duplicate platform events in the same transaction
7. Build in a test/Sandbox environment
What about if you want to fail the complete transaction? But we have seen that we have a fault connector – the transaction will be a success.
Processes can be created or updated in a production environment – I have seen people make changes directly into production org – don’t!
Without testing into development, creating or editing in a production environment ‘may’ (read, certainly will!) lead to data loss triggering some unwanted emails or end up creating too many test records.
8. Supercharge Flow with Invocable Apex
Flow Builder comes with a lot of functionality, but sometimes, your flow needs to do more than the default elements allow. In that case, call an Apex class from your flow by using an Apex action. For example, •Generate Quote PDF • Find list of Opportunities by passing Account IDs
Define your invocable methods in Apex with the @InvocableMethod annotation
- Limit 1x @InvocableMethod annotation per Apex class
- Supported inputs/outputs: Primitives, SObjects, Apex-defined classes, lists
- It must be bulk safe. Input and output are always lists.
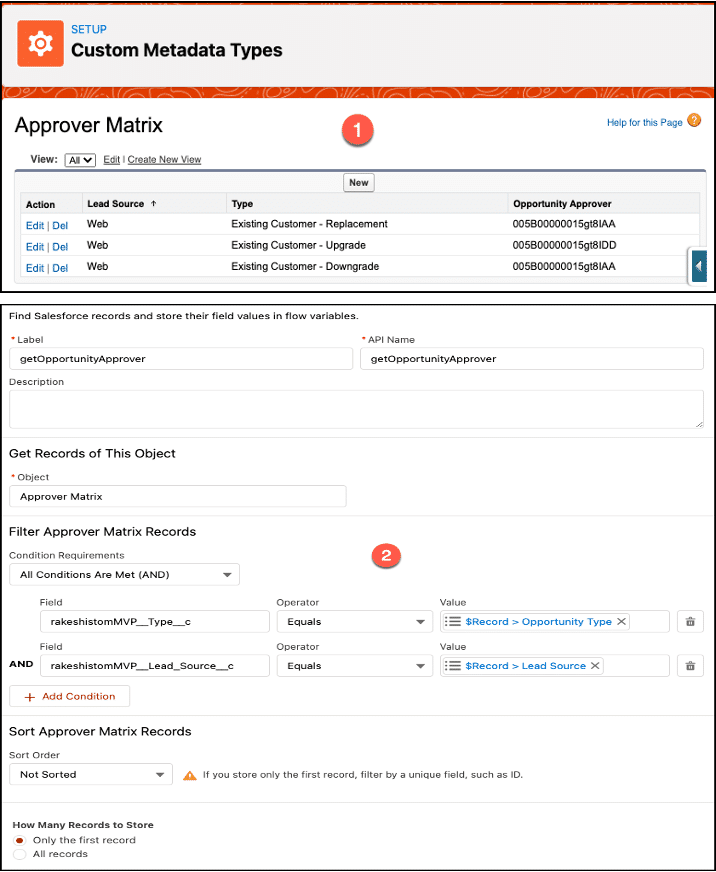
9. Don’t Hardcode IDs; query for them!
So what next? How do you avoid hard coding of IDs in Flows? Some of the ways to avoid hard-coding are as follows.
- Use Get Records to Query them.
- Use Custom Label to store Id
- Use Custom Metadata Types to store IDs
10. Don’t mix Trigger, Process Builder, Flow, and Record Trigger Flow.
Every object should have an automation strategy based on the needs of the business and the Salesforce team supporting it. In general, you should choose one automation tool per object. One of the many inevitable scenarios of older orgs is to have Apex triggers mix in with Autolaunched flows/processes or, more recently, Process Builders mixed in with Record-Triggered flows. This can lead to a variety of issues:
- Poor performance
- Unexpected results due to the inability to control the order of operations in the ‘stack’
- Increase in technical debt with admins/devs not collaborating
- Documentation debt
One common approach is to separate DML activity and offload it to Apex and let declarative tools handle non-DML activities like email and in-app alerts — just be careful and ensure none of your Apex conflicts. We’re still in the ‘wild west’ phase of Record-Triggered flows as architects and admins figure out the best way to incorporate them into their systems.
Check out this Apexhours session to understand the performance considerations for different automation tools.
11. Handle Errors with Fault Paths
From time to time, things don’t work out exactly as you expected in your flow — that’s where error handling comes in. With error handling, you can define any number of steps to run after the failure of an action.
If your flow contains an element that interacts with the Salesforce database—such as an Update Records element or Create Records element – it can fail. You can modify the default behavior by adding fault paths to all elements that can fail.
- Show customized error message for Screen Flow
- Send an email alert containing an error message to a group of people
12. Exception handling in flow using Platform Events
Check this post to learn about Salesforce flow using fault connectors and Platform events framework.
13. Use Debug Log to Check Why a Flow Fails at Runtime
However, with great power comes great responsibility. If a user starts creating a new flow for each requirement – or creating flows without understanding Salesforce limitations – then a user may encounter many issues, either in the future or, while the testing/deployment phase.
Now, once you encounter the error message, don’t panic – you are not the only one who has ever gotten error messages, and this may be your first, but, it certainly will not be the last time you encounter an error message! So, the best thing to do is to learn how to tackle it!
14. Document your flows
Documenting your flow allows the next person, or the forgetful future version of yourself, to understand the overall flow’s objective. Flow designers don’t create solutions out of thin air — we need a business case to solve hard problems, and having those breadcrumbs is critical for maintaining the automation long term.
15. Flow Naming Conventions
Follow Salesforce flow naming conventions while designing the flow in Salesforce.
16. Screen Flow UI Design Tips
We did one session with Andy Engin Utkan to share tips to make your screen flows look better and easier to navigate. Check this post for a quick review of tips such as screen alignment and conditional visibility of components, custom error messages, menu choices, data table components, and different Screen Flow UI Design Tips.
17. Tests for Salesforce Flow
How do you unit test Salesforce Flows? Now, you can create, save, and run flow tests in Flow Builder. Each time you modify the flow, you can run the test and assert the result. This is Conceptually Similar to Apex Test Classes. Flow Tests is a Declarative Framework to Test Salesforce Flows. You can create Flow Tests declaratively and execute with the click of a button. It was beta released in Summer ‘22, GA, from Winter ‘23.
Test the flow thoroughly to ensure that it works as expected. Use debug mode to identify any issues and fix them before deploying the flow.
Check Salesforce Flow Examples and Top 21 Tips.
1. Documented elements and descriptions
2. Null/Empty checks
3. No Hard-coded IDs
4. Avoid nested loops
5. Avoid looping over large data volumes
6. Check record and field security & flow context
7. No DML in a loop
8. Flow errors
9. Automation bypassed by custom metadata.
Summary
Flows are a wonderful way to create automation within your Salesforce org. So it very important to follow the Salesforce best practices to avoid governor limit and design pattern help you to make you configuration as per your company standards. Learn more from Salesforce document. By following these best practices, you can create effective and efficient flows that automate your business processes and improve productivity.


To replace SF Workflows’ “Time-Dependent Workflow Actions” (e.g. send a task 4 hours after trigger date, send an email 90 days after trigger date) – we have to use Flows’ Scheduled Path.
How does “Scheduled Path” fit into the framework proposed in your “Flow Design Patterns” video?
The Handler flow is a Sub-flow, and cannot have Scheduled Path added to it.
Can we have Subflows for ‘Record Triggered Flow’?
Subflow elements are now available for record-triggered flows that run after a record is saved or before a record is deleted. Here we go https://help.salesforce.com/s/articleView?id=release-notes.rn_automate_flow_builder_subflows_record_triggered.htm&release=234&type=5
So, that puts to bed the 1 flow per object per type. You will almost certainly need more ‘before’ flows on an object because we can not utilise a Subflow.
I think having many, simple b4 flows with good entry condition criteria is the way to go.
According to this article on Salesforce Architects, “one record triggered flow per object/type” is no longer considered best practice. This article makes a compelling case for why, and as someone who has worked on over 100 SF projects, I absolutely concur. https://architect.salesforce.com/decision-guides/trigger-automation
I agree session was old when “Set Trigger Order on Flows” was not release. If you see in bottom of same header we added below line.
Now, do we need one flow per object after Set Trigger Order on Flows is available? We know there is lots of limitation in one flow per object.