
In this post we will talk about how to setup continuous integration in Salesforce using Jenkins pipeline and Git for Salesforce Deployment. You can configure and use Jenkins in different ways but we will focus on integrating Salesforce DX into Jenkins multi branch pipelines.
We will use the OAuth JSON Web Token (JWT) bearer flow that’s supported in the Salesforce CLI. The JWT bearer flow supports the RSA SHA256 algorithm, which uses an uploaded certificate as the signing secret
What is Jenkins?
Jenkins is an open-source, extensible automation server for implementing continuous integration and continuous delivery. You can integrate Salesforce DX with Jenkins framework to automate Salesforce deployment.
Jenkins is a widely used application around the world that has around 300k installations and growing day by day. By using Jenkins, software companies can accelerate their software development process, as Jenkins can automate build and test at a rapid rate.
Lean about different deployment tools and deployment process for Salesforce.
What Is Continuous Integration (CI)?
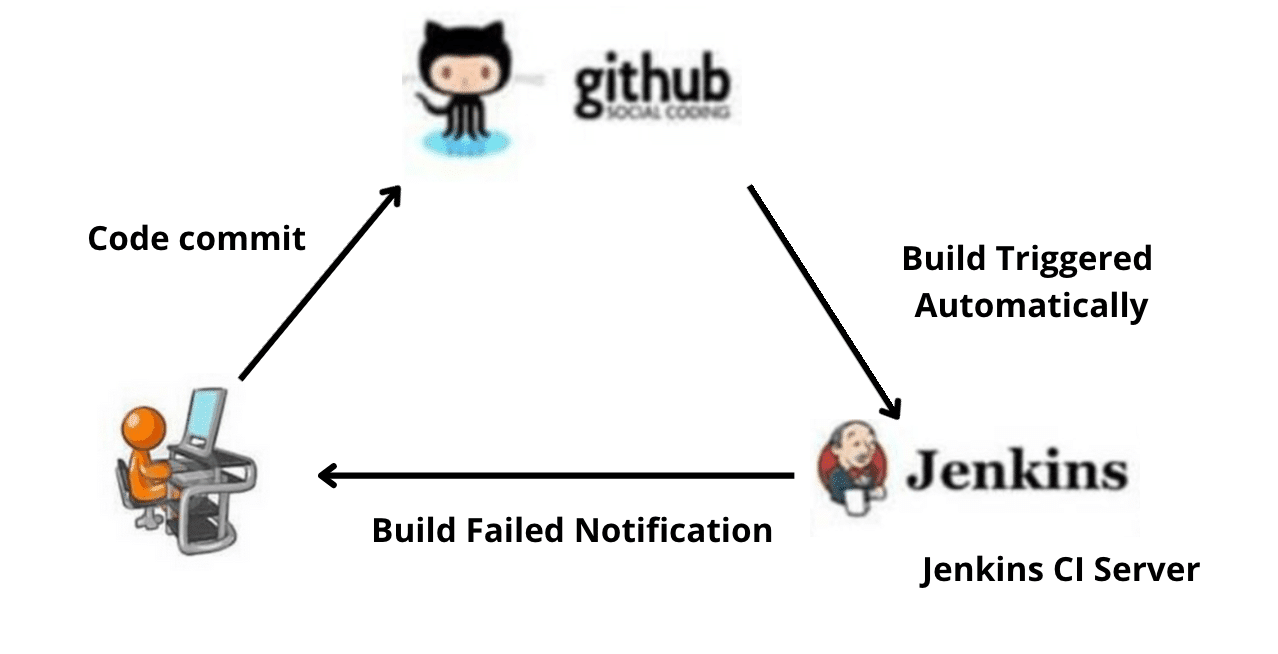
Continuous integration (CI) is a DevOps software development best practice. Where developers regularly merge their code changes into a central repository, after that automated builds and tests are run. This best practice helps development teams to detect problems, identify bugs, and fix those problems and bugs before releasing changes to their customers. Please check our YouTube Recording for step by step process.
Learn more about Salesforce DevOps.
Key Element CI process
Here, are the key elements which you need to perfom the entire CI process:
- Version Control System (VCS): It offers a reliable method to centralize and preserve changes made to your project over time.
- Hosted CI Tool Solutions: To avoid servers or virtual machines, you should go for hosted CI tool solutions. This tool helps in the maintenance of the whole process and offers easier scalability.
- Tools: If you select a self-hosted variant, you will need to install one of the many CI tools like Jenkins, TeamCity, Bamboo, GitLab, etc.
Development without CI vs. Development with CI
| Development without CI | Development with CI |
| Lots of Bugs | Fewer bugs |
| Infrequent commits | Regular commits |
| Infrequent and slow releases | Regular working releases |
| Difficult integration | Easy and Effective Integration |
| Testing happens late | Continuous Integration testing happens early and often |
| Issue raised are harder to fix | Find and fix problems faster and more efficiently. |
| Poor project visibility | Better project visibility |
How Continuous integration work?
The software was built and tested as soon as a developer committed code. If any error is detected, the respective developer can quickly fix the defect.
Tools for CI process
Here, are some most essential CI/CD tools:
Jenkins
Jenkins is an open-source continuous integration software. It is written using the Java programming language. It facilitates real-time testing and reporting on isolated changes in a more massive codebase. This software helps developers to quickly find and solve defects in their codebase & automate testing of their builds.
Bamboo
Bamboo is a continuous integration build server that performs – automatic build, test, and releases in a single place. It works seamlessly with JIRA software and Bitbucket. Bamboo supports many languages and technologies such as CodeDeply, Ducker, Git, SVN, Mercurial, AWS, and Amazon S3 buckets
TeamCity
TeamCity is a Continuous Integration server that supports many powerful features. It maintains a CI server healthy and stable even when no builds are running. It provides better code quality for any project
How to setup Salesforce deployment Using Jenkins
Let see how we can setup Salesforce deployment using Jenkins pipelines.
Step 1) Install Jenkins and Customize Jenkins
First Setup is download Jenkins and installed it on your machine or AWS server where you want to use this.
Step 1.1) Download Jenkins from here.
Step 1.2) Go to download location from local computer and unzip the downloaded package.
Double-click on unzipped jenkins.msi. Then Start installation.
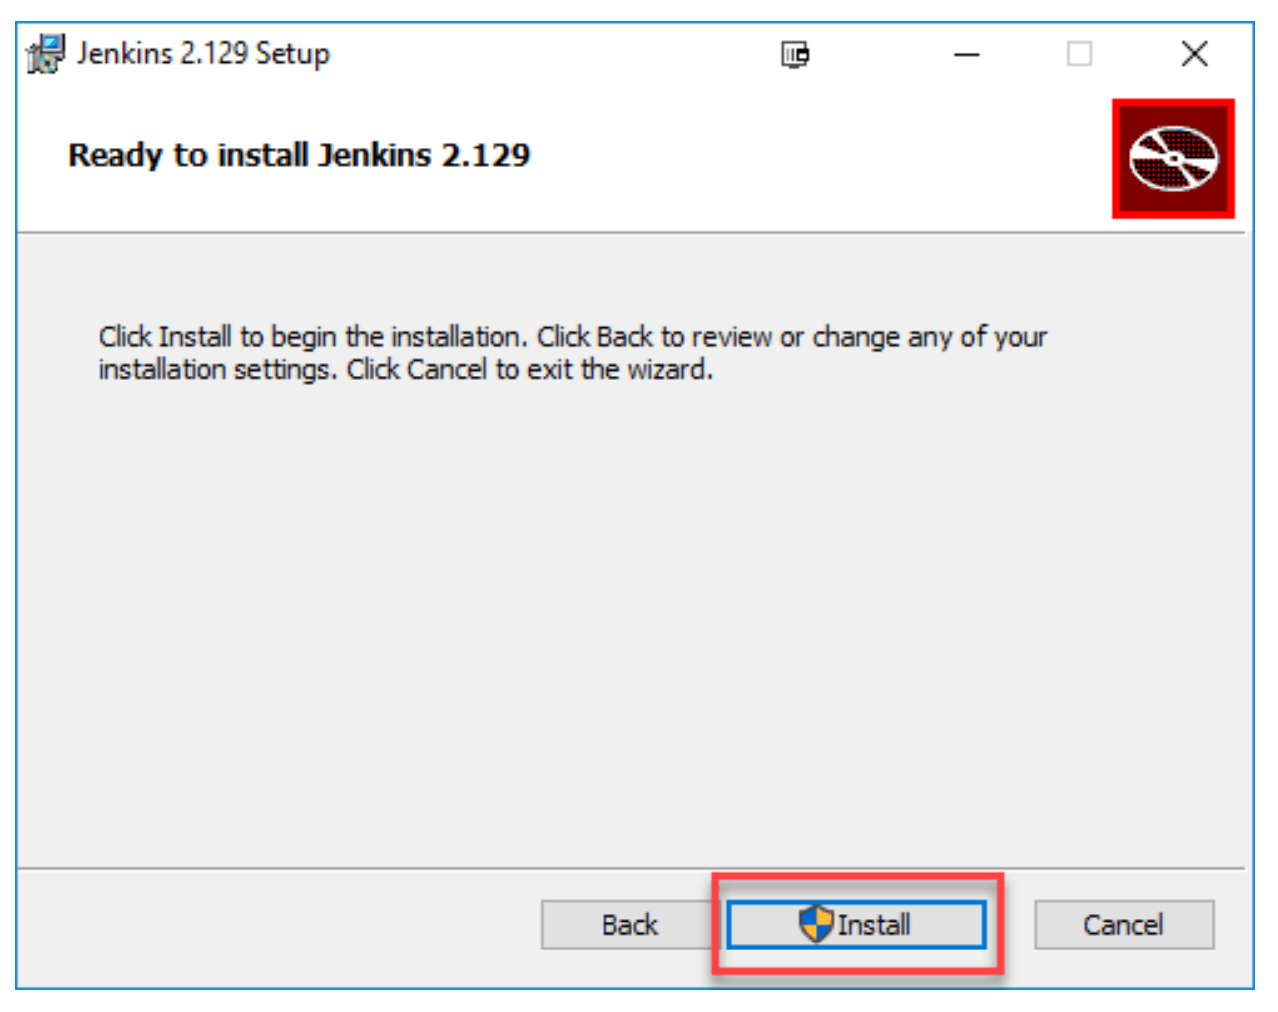
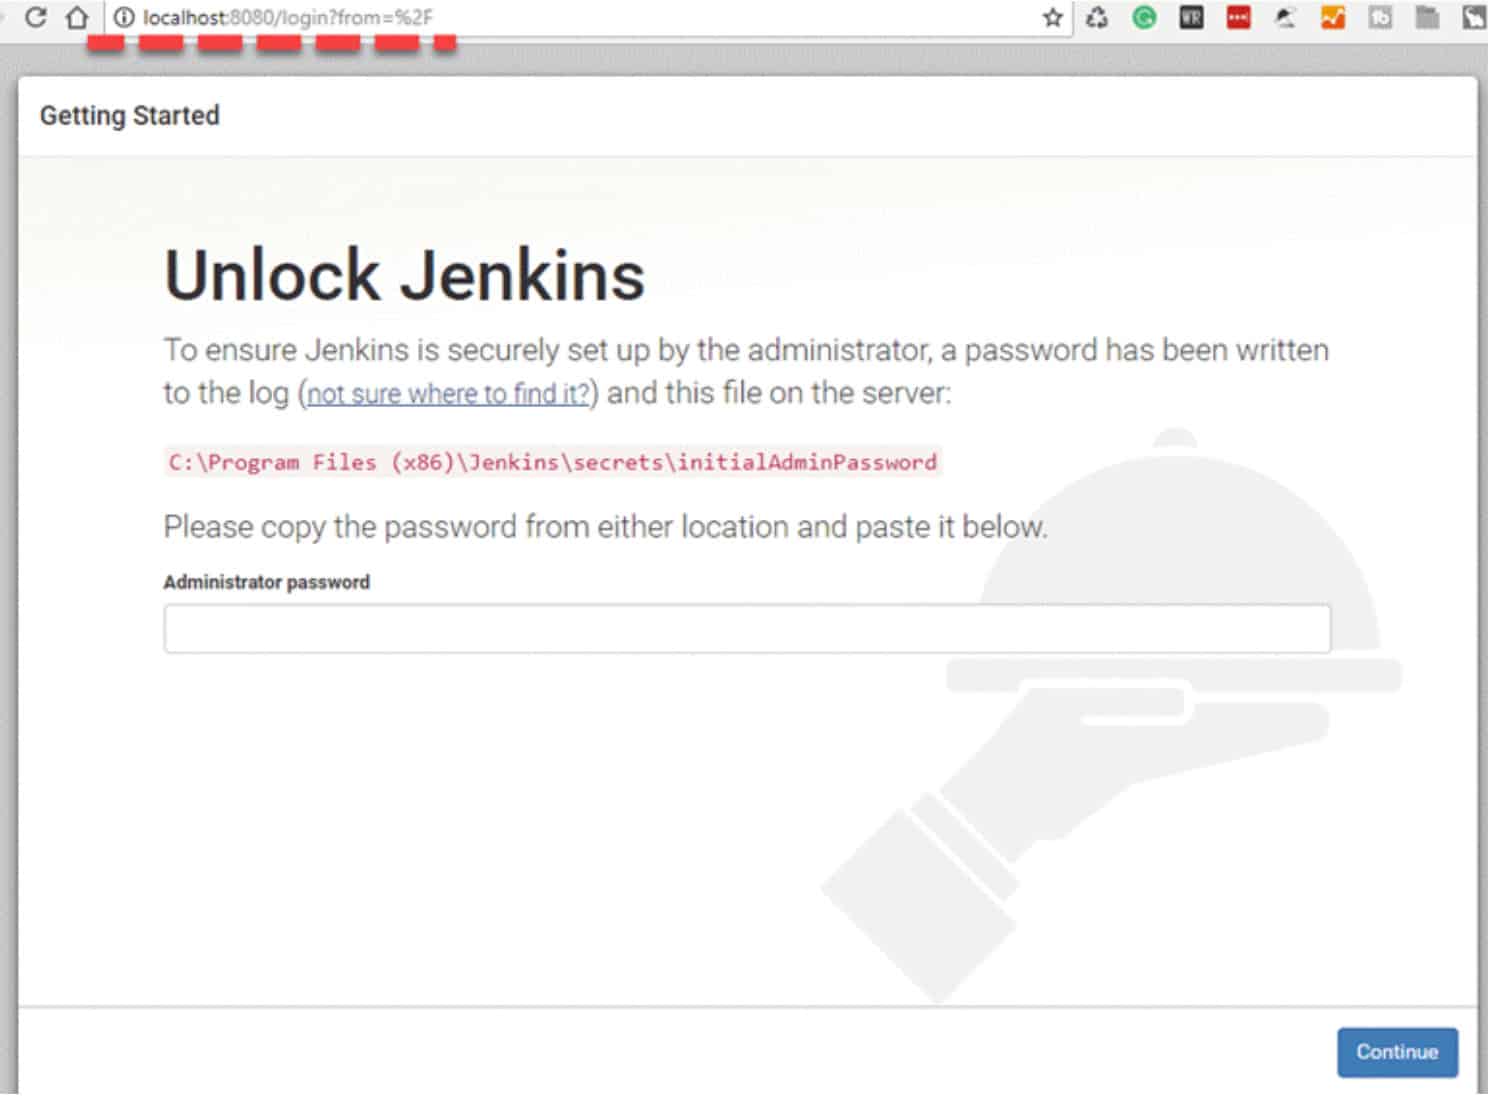
Step 1.3) After completing the Jenkins installation process, a browser tab will pop-up asking for the initial Administrator password. To access Jenkins, you need to go to browse the following path in your web browser. The initial Administrator password should be found under the Jenkins installation path.
Customize Jenkins
You can also customize your Jenkins environment by below-given steps:
Step 1.4) Click on the “Install suggested plugins button” so Jenkins will retrieve and install the essential plugins.
Note: You can choose the Option “Select Plugins to Install” and select the plugins you want to install
Step 1.5) After all suggested plugins were installed, the “Create First Admin User” panel will
show up. Fill all the fields with desired account details and hit the “Save and Finish” button.
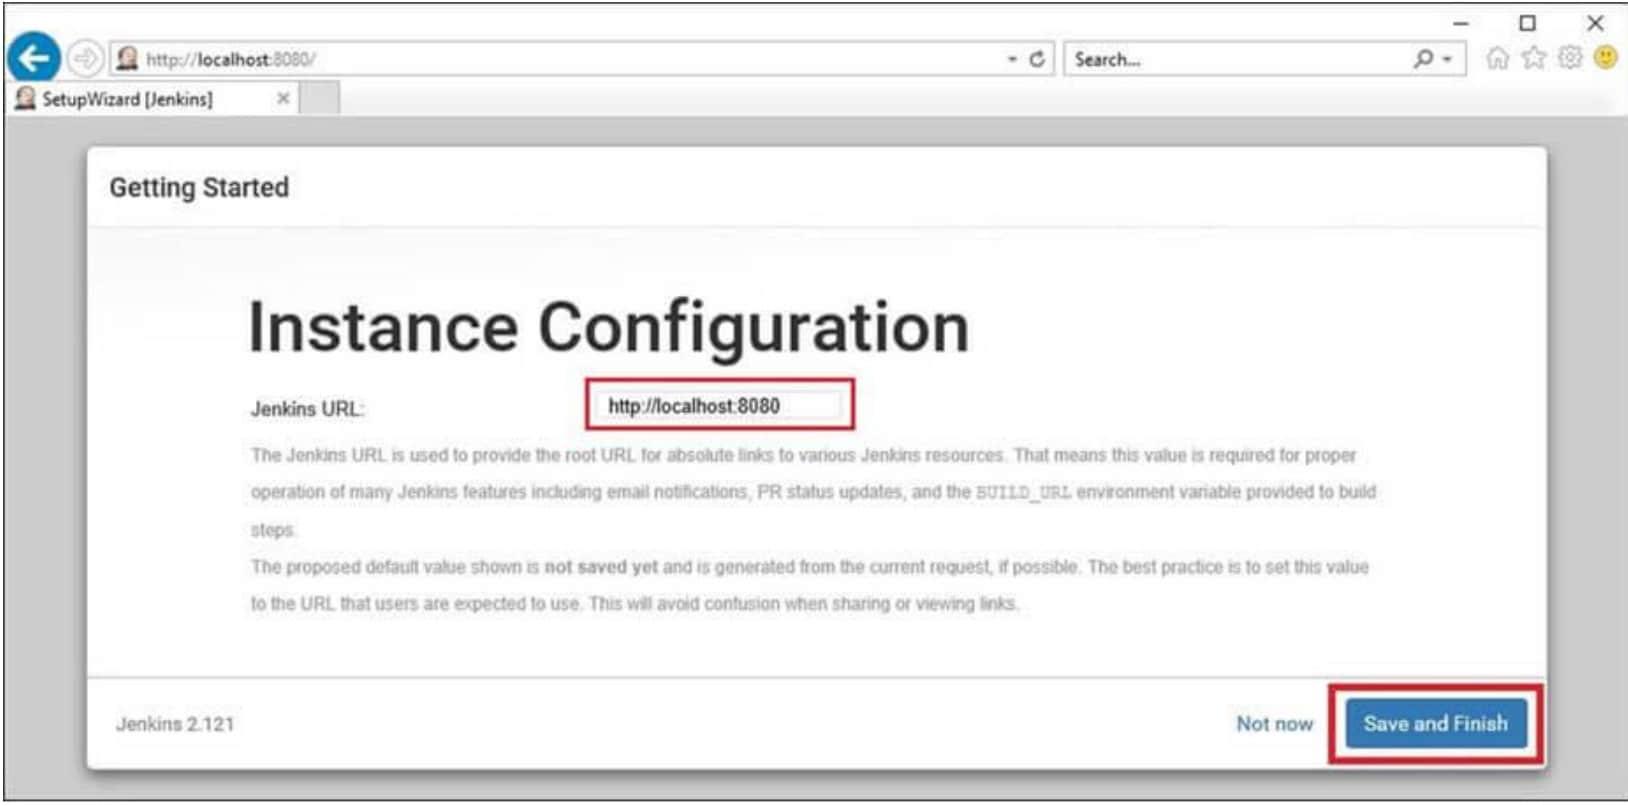
Congratulations! We have successfully installed a new Jenkins Server. Hit the “Start using
Jenkins” button.
Step 2) Installation of Plugins in Jenkins
Jenkins comes with a pretty basic setup, so you will need to install the required plugins to enable respective third-party application support.
GitHub is a web-based repository of code which plays a major role in DevOps. It provides a
common platform for multiple developers working on the same code/project to upload and
retrieve updated code, thereby facilitating continuous integration.
You need not install a GitHub plugin if you have already installed the Git plugin in response to
the prompt during the Jenkins’ installation setup
Following is a step by step process on how to Install Git plugin in Jenkins:
2.1: Click on the Manage Jenkins button on your Jenkins dashboard:
2.2: Click on Manage Plugins:
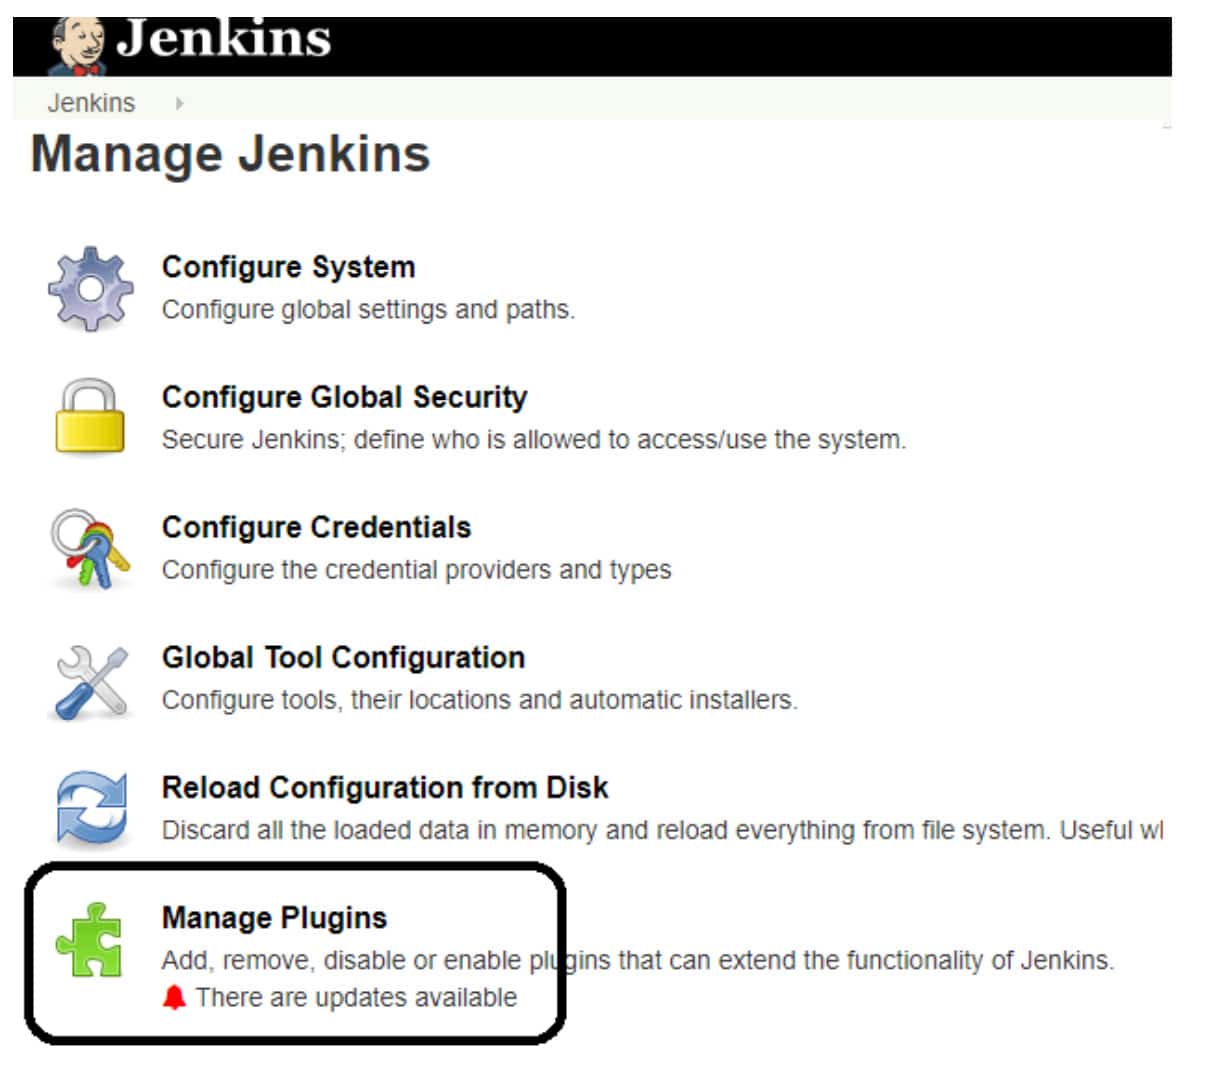
2.3: In the Plugins Page
- Select the GIT Plugin and custom tool plugin.
- Click on Install without restart. The plugin will take a few moments to finish downloading
depending on your internet connection, and will be installed automatically. - You can also select the option Download now and Install after restart button. In which plugin is installed after restart.
- You will be shown a “No updates available” message if you already have the Git plugin installed.
Step 3) Install Salesforce CLI
Now you need decide which tool you want to use for Salesforce Deployment. You can use ANT tool or you can use Salesforce DX for Salesforce Deployment. Here is link to Download the Salesforce CLI.
Step 4) Setup JWT Flow to Integrate Jenkins with Salesforce
Create a Self-Signed SSL Certificate and Private Key to setup the JWT Flow.
Step 4.1) Download the Open SSL
Download the Open SSL from your here.
Step 4.2) Create a private key and self signed certificate
Execute below command to create the a private key and self signed certificate.
- Set OPENSSL_CONF path
set OPENSSL_CONF=C:\openssl\share\openssl.cnf - Generate an RSA private key :
openssl genrsa -des3 -passout pass:x -out server.pass.key 2048 - Create a key file from the server.pass.key file :
openssl rsa -passin pass:x -in server.pass.key -out server.key - Request and generate the certificate :
openssl req -new -key server.key -out server.csr - Generate the SSL certificate:
openssl x509 -req -sha256 -days 365 -in server.csr -signkey server.key -out server.crt
Step 5) Create Connected App for JWT-Based Flow
Now it time to setup the connected app in Salesforce for Jenkine Deployment.
Step 5.1) Created Connected App
- Created Connected App
- Callback URL
http://localhost:1717/OauthRedirect - Use digital signatures To upload your server.crt file.
- Callback URL
- Edit policy and select “Admin approved users are pre-authorized“.
- Assign Connected App to user or System Admin profile.
Step 5.2) Validate Authorize an Org Using the JWT-Based Flow
Execute below command to validate the authorization for an org using JWT-based flow.
sfdx force:auth:jwt:grant --clientid {ADD_YOUR_CLIENT_ID} --jwtkeyfile server.key --username amit.salesforce21@gmail.com --instanceurl https://login.salesforce.com --setdefaultdevhubusername- –clientid :- provide Consumer Key
- –jwtkeyfile :- Absolute path to the location where you generated your OpenSSL server.key file
- –instanceurl :-provide instanceurl if you are using sandbox.
- –setdefaultdevhubusername :- Set Default dev hub User Name.
Once Authentication is successful then you are ready for final configuration.
Check Salesforce OAuth 2.0 JWT Bearer flow post to learn about JWT flow.
Step 6) Configure the Jenkins environment Variable
- Configure the the Server.key in the credential plugins.
- Set Environment variable:-
- HUB_ORG_DH:- The username for the Dev Hub org, such as amit@gmail.com
- SFDC_HOST_DH:- The login URL of the Salesforce instance that is hosting the Dev Hub org. The default is https://login.salesforce.com
- CONNECTED_APP_CONSUMER_KEY_DH :- The consumer key that was returned after you created a connected app in your Dev Hub org.
- JWT_CRED_ID_DH:- The credentials ID for the private key file that you stored in the Jenkins Admin Credentials interface
- Install the Custom Tools Plugin into your Jenkins console, and create a custom tool that references the Salesforce CLI
The names for these environment variables are just suggestions. You can use any name as long as you specify it in the Jenkinsfile.
Step 7) Configure the Jenkins
- Add New Item. Then provide the project name and select type of project as Multibranch.
- Add Source and provide repository URL.You can use URL as sample.https://github.com/amit-salesforce/SFDXProject
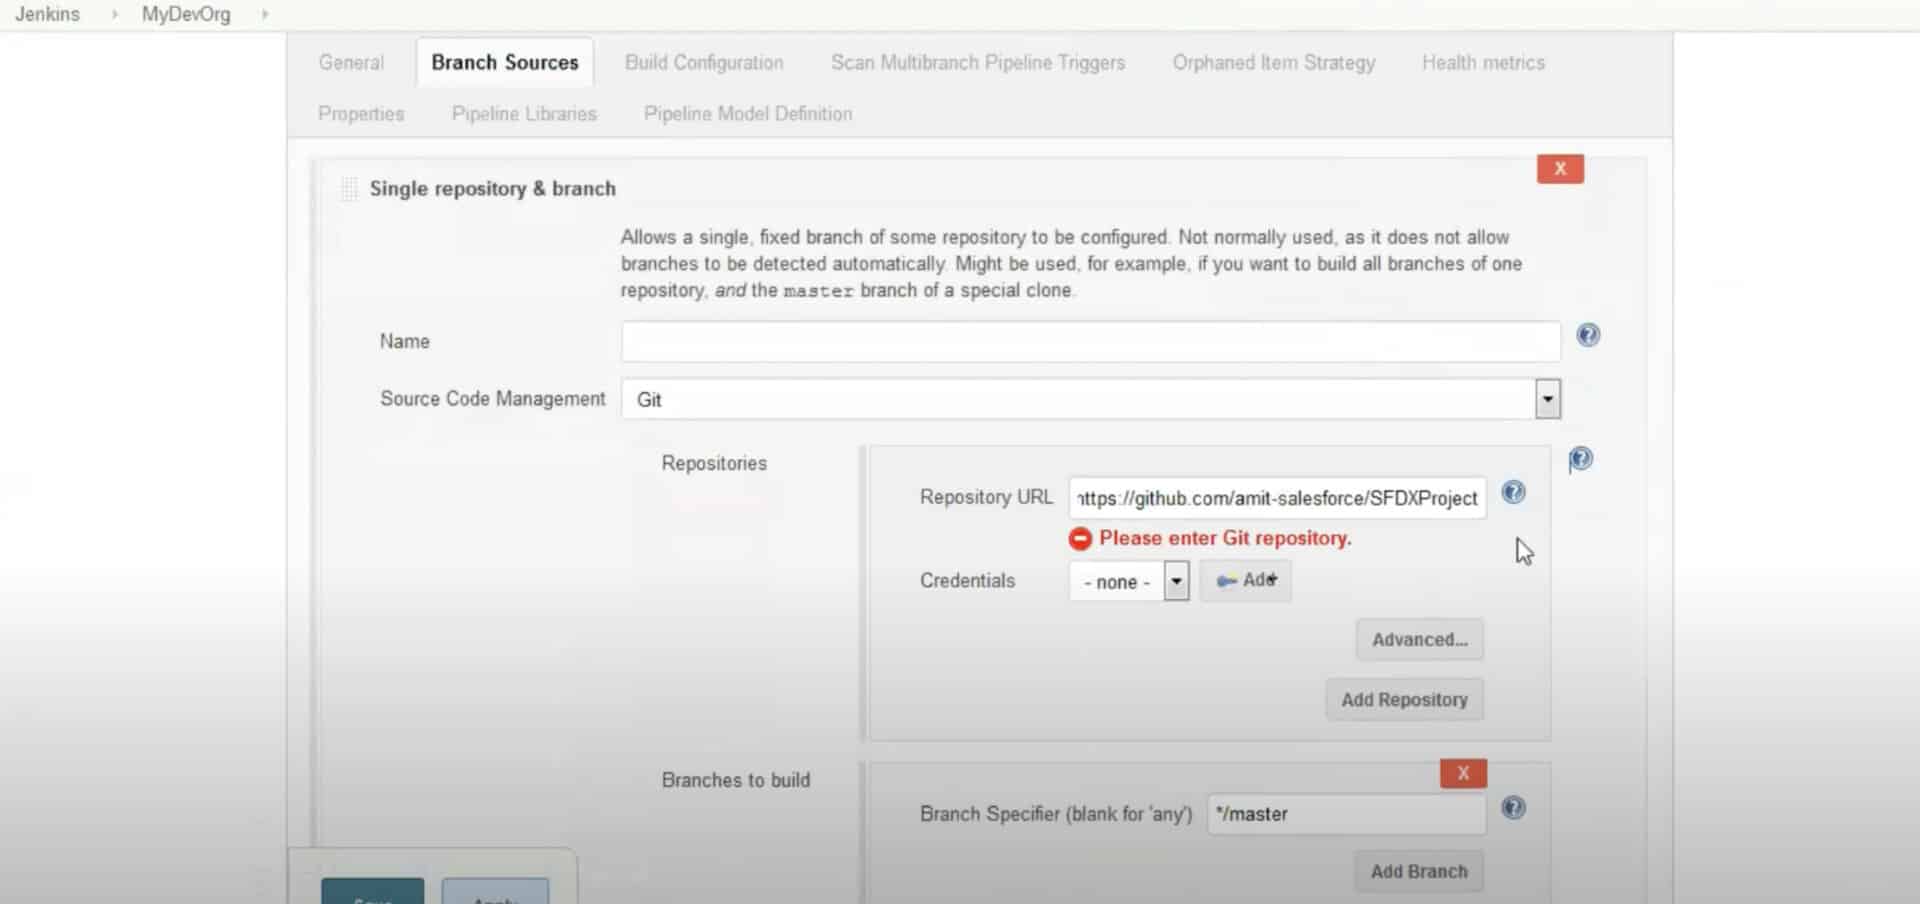
- Start a build
What is a JenkinsFile?
Jenkins pipelines can be defined using a text file called JenkinsFile. You can implement
pipeline as code using JenkinsFile, and this can be defined by using a domain specific language(DSL). With JenkinsFile, you can write the steps needed for running a Jenkins pipeline. Here is sample Jenkinsfile file for you.
Learn more about Salesforce deployment and development process here.
Recording
Check below record for step by step process to configure the Salesforce Deployment using Jenkins.

Summary
CI/CD meaning combination of Continuous Integration and Continuous Delivery or Continuous Deployment. There are different tools available in market to setup continuous integration and deployment in Salesforce. We can setup Salesforce deployment using Jenkins and git.


Hi Amit,
Thanks for sharing such important information. I have tried the same to implement but I am not able to understand how did you configure the “toolbelt”. I have tried to configure that but still getting below error while trying to build the run.
[Pipeline] // node
[Pipeline] End of Pipeline
hudson.remoting.ProxyException: java.net.MalformedURLException: no protocol:
at java.base/java.net.URL.(URL.java:674)
at java.base/java.net.URL.(URL.java:569)
at java.base/java.net.URL.(URL.java:516)
at hudson.tools.ZipExtractionInstaller.performInstallation(ZipExtractionInstaller.java:83)
at hudson.tools.InstallerTranslator.getToolHome(InstallerTranslator.java:70)
at hudson.tools.ToolLocationNodeProperty.getToolHome(ToolLocationNodeProperty.java:109)
You need to setup the toolbelt. Install the Custom Tools Plugin into your Jenkins console, and create a custom tool that references the Salesforce CLI.