
In this post we are going to learn how to implement the Salesforce OAuth 2.0 JWT Bearer flow in Salesforce. OAuth 2.0 JWT Bearer flow is used for server to server integration scenarios. This flow uses a certificate to sign the JWT request and doesn’t require explicit user interaction. However, this flow does require prior approval of the client app.
What is JWT Bearer flow?
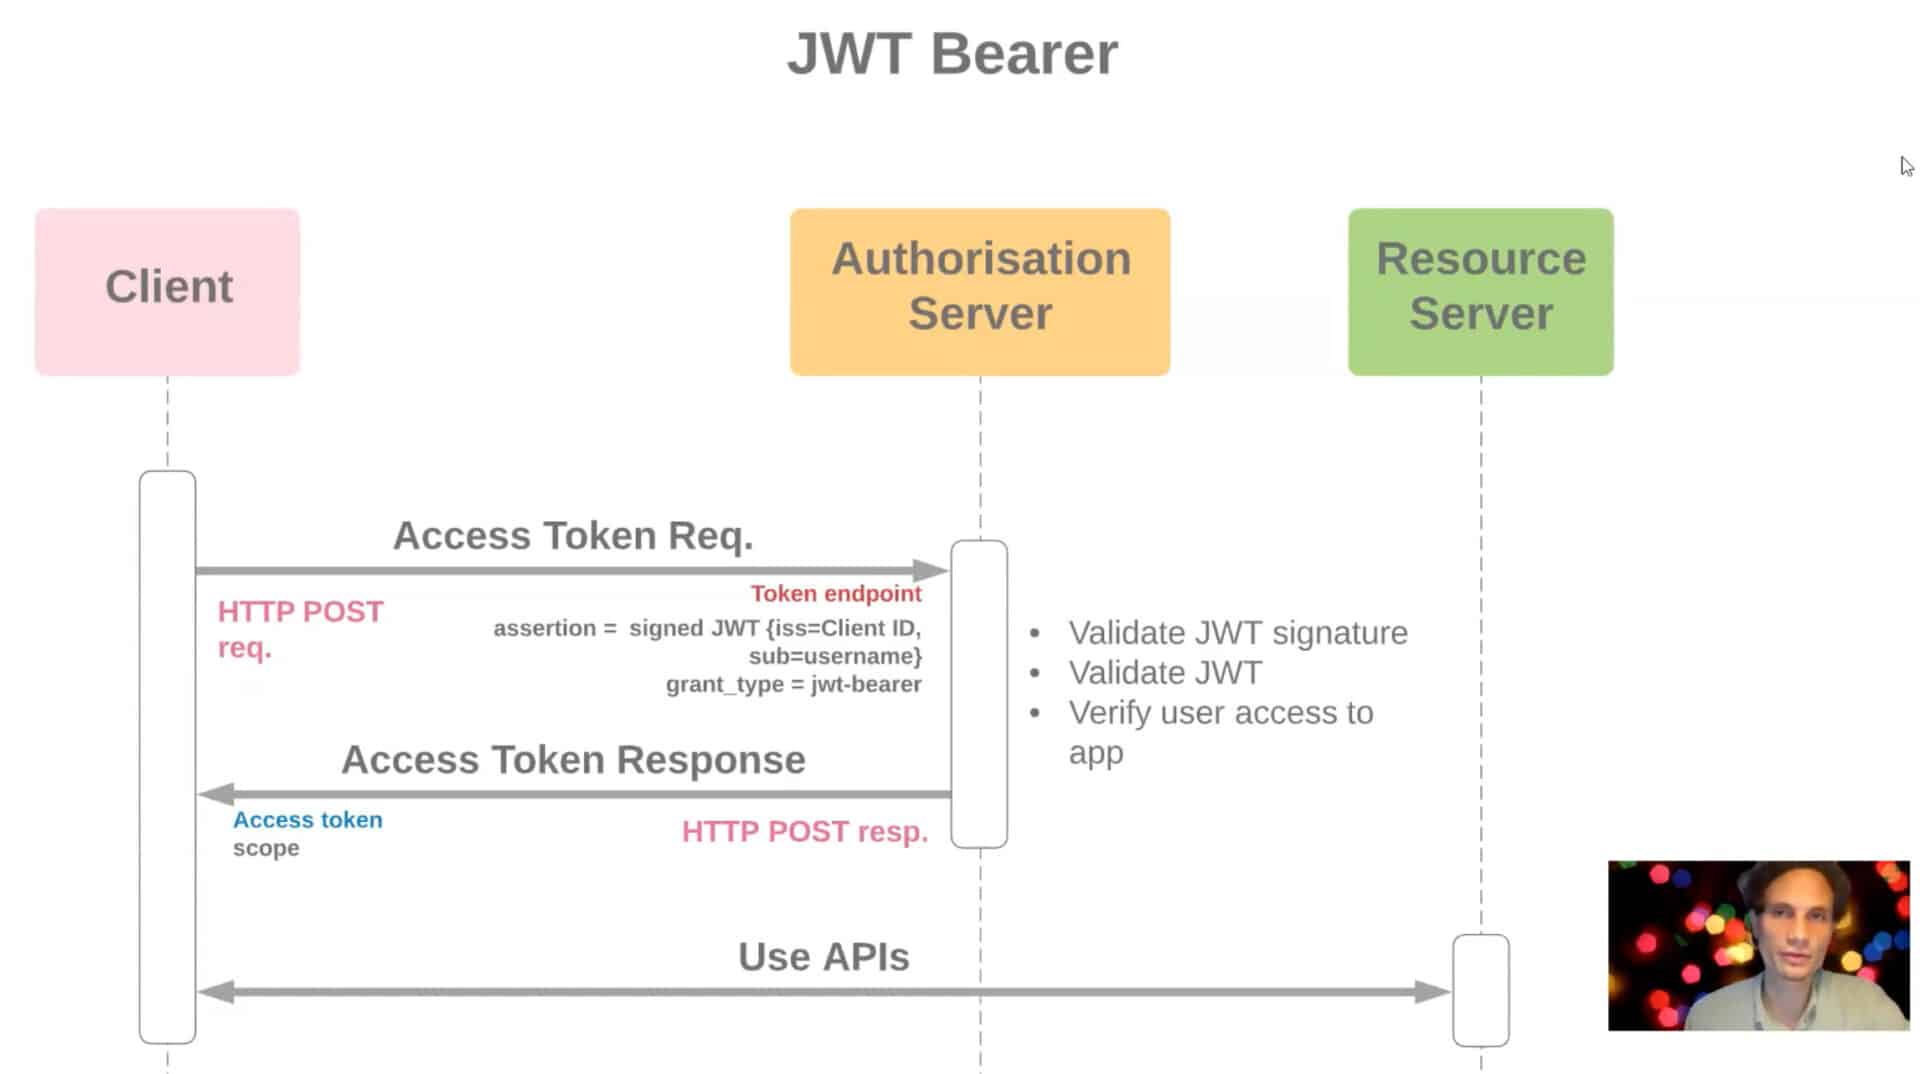
Secure server-to-server integration without real time user involvement. Client specifies user in a JSON web token (JWT) or SAML format XML assertion and proves its own identity by appending a signature. JWT Bearer token flow is Ideal for application which access sfdc only through API as there is no UI involved. For example ETL tools or middleware.
This flow uses a certificate to sign the JWT request and doesn’t require explicit user interaction. However, this flow does require prior approval of the client app.
JWT Structure
When we talk about JSON Web Token, it is consist of 3 parts
- Headers – Which contains the algorithm which will be used to sign the request
{"alg":"RS256"} - Payload – This contains claims information which is an object containing information about user and additional data. Claims are set using parameters-
{"Iss,aud,sub,exp"} - Signature – Signature consists of 3 parts and the structure is given below
<headerbase64encodedurl>.<claimsbase64encodedclaims>.<signature(uses algorithm like RS 256)>JWT flow example in Salesforce
Lets start with JWT uses. In this example we will how we call another Salesforce org API using JWT flow in Salesforce. Let see Salesforce OAuth 2.0 JWT Bearer flow step by step:
Step 1) Creating private key and X509 certificate
First step using OAuth JWT Bearer Token flow is creating the Certificate. To create the certificate you need open SSL. Download it you are using window.
Step 1.1) Set OPENSSL_CONF path
set OPENSSL_CONF=C:\openssl\share\openssl.cnf Step 1.2) Generate an RSA private key
Execute below command and in output it will return your Server.pass.Key file. Server.Key is our private key.
openssl genrsa -des3 -passout pass:x -out server.pass.key 2048Step 1.3) Create a key file from the server.pass.key file
Execute below command and in output it will return your Server.Key file. Server.Key is our RSA private key.
openssl rsa -passin pass:x -in server.pass.key -out server.key
Step 1.4) Request and generate the certificate
Below command will request for certificate.
openssl req -new -key server.key -out server.csrOnce you will execute above command it will ask you some question and information
- Country Name : Provide any value for example : US
- State or province Name [Some-State]: Georgia
- Locality Name( eg. city)[] : Alpharetta
- Organization Name (eg. company) : Apex Hours
- Organization Unit Name : AH
- Comman Name [] : You can keep it blank
- Email Address [] : amit.salesforce21@gmail.com
Step 1.5) Generate the SSL certificate
openssl x509 -req -sha256 -days 365 -in server.csr -signkey server.key -out server.crtStep 2: Create JWT Connected App in Salesforce
Now you have certificate file (server.crt) with you. It time to create a connected app in Salesforce.
Step 2.1) Creating connected app in Salesforce
Go to Setup -> Search for connected app -> then click on New (connected app). Then provide below details.
- Fill Name and Email
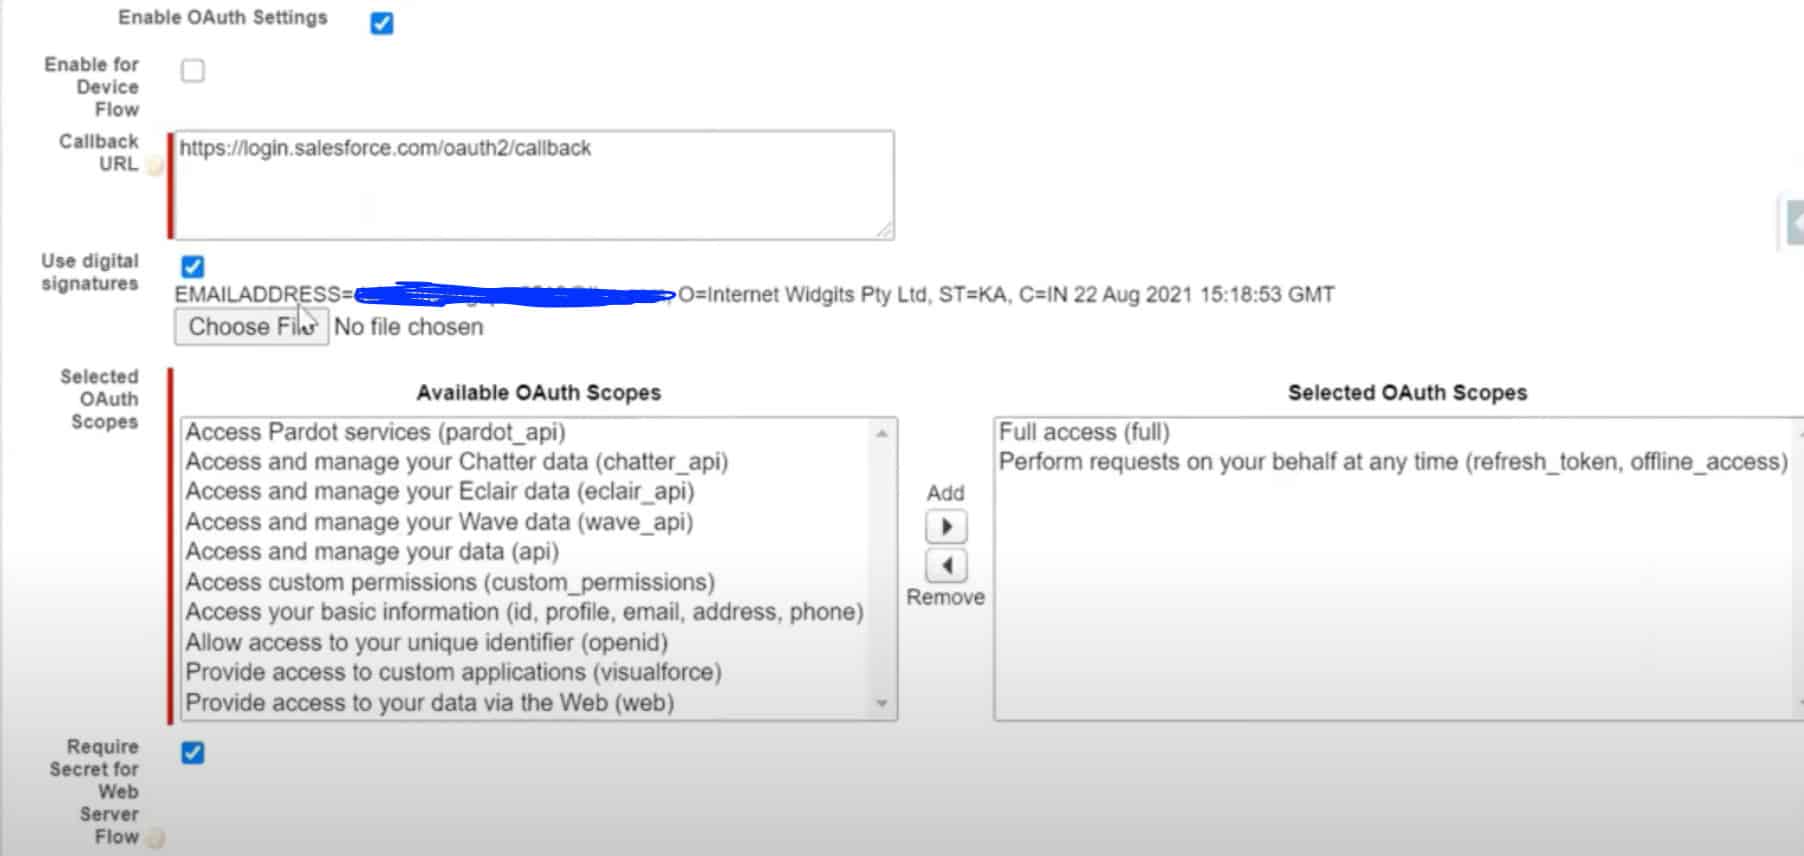
- Click on “Enable OAuth Setting“
- Call back URL “
http://localhost:1717/OauthRedirect“ - Click on “Use Digital Signature” and upload the certificate created in Step 1.5.
- Select the following OAuth Scopes
- Manage user data via APIs (api)
- Manage user data via Web browsers (web)
- Perform requests at any time (refresh_token, offline_access)
- Click on Save
Once you are done you will get Cliend_Id and Client_secret.
Step 2.1) Prior approval of the client app
There are different option to do that.
- Option 1: Admin approves from connected app in Salesforce.
- Option 2: Pre-Approve the connected app with the User-Agent OAuth Flow
- Option 3: Run the auth:jwt:grant CLI command
Why we need this step. If you will not perform it then you will get below error while authenticate the user.
{"error":"invalid_grant","error_description":"user hasn't approved this consumer"}Option 1: Admin approves from connected app in Salesforce
Will use Salesforce console for this.
- Go to Setup -> click on Manage Apps -> Connected Apps
- Click ‘Edit’ against your app
- Click on Permitted Users and select “Admin approved users are pre-authorized“
- Save.
- Now it time to provide access to profile or permission set. Go to setup -> Manage Users -> Profiles
- Select the profile which you want to access for example Integration profile.
Option 2: Pre-Approve the connected app with the User-Agent OAuth Flow
Copy and paste this link in the browser
https://<your instance>.salesforce.com/services/oauth2/authorize?response_type=token&client_id=<consumer key>&redirect_uri=http://localhost:1717/OauthRedirectLogin to Salesforce and authorize the connected app. Click Allow button.
Option 3: Run the auth:jwt:grant CLI command
Specify the client identifier from your connected app (also called the consumer key), the path to the private key file (server.key), and the JWT authentication username. When you authorize a Dev Hub org, set it as the default with the –setdefaultdevhubusername parameter. For example
sfdx auth:jwt:grant --clientid 04580y4051234051 \
--jwtkeyfile /Users/jdoe/JWT/server.key --username jdoe@acdxgs0hub.org \
--setdefaultdevhubusername --setalias my-hub-org
Step 3) Create JWT Token
Now our certificate is ready and uploaded in Salesforce connected App. It time to create a JWT token and test it out. As we discussed early we have three parameter in JWT Structure.
- Headers
- Payload
- Signature
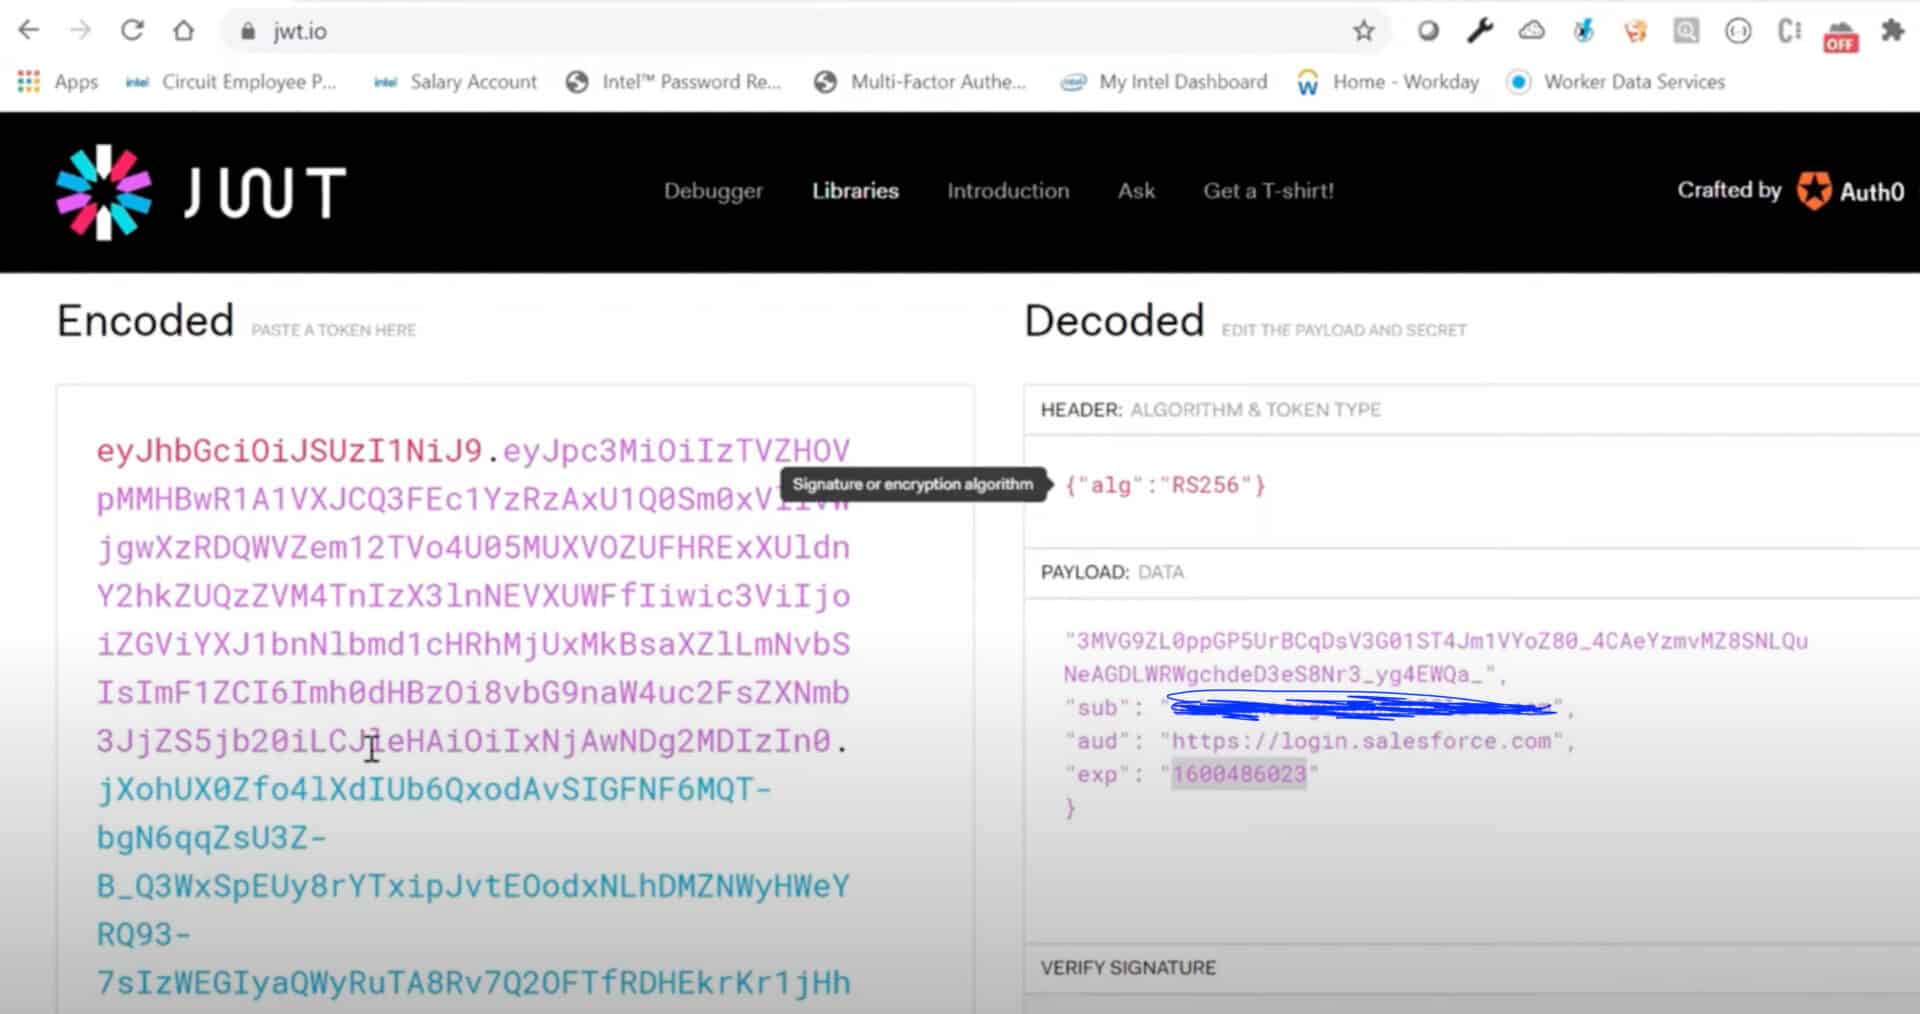
You can use https://jwt.io/ for simple testing. For that you need to provide all above values.
Headers: Algoritham & Token Type
{"alg":"RS256"}Payload: Data
{
"iss" : "Clint_ID From Step 2.1.1",
"sub": "UserName",
"aud": "LoginURL https://login.salesforce.com",
"exp": "CurrentTimeStemp+2min"
}
You can use different website to get timestamp. You can use unixtimestamp.com to get current value.
Signature
Now it time to pass verify signature details.
HMACSHA256(
  base64UrlEncode(header) + "." +
  base64UrlEncode(payload),
  Private Key
)
Copy Private Key value from Server.Key ( Step 1.2). Once all look good you will Signature Verified in bottom of the screen with JWT Token.
Step 4) Get access_token using JWT by POSTMAN
There are different way to test our JWT flow to get access_token. For this demo we will use POSTMAN to get access_token using JWT token which we created in last step 3.
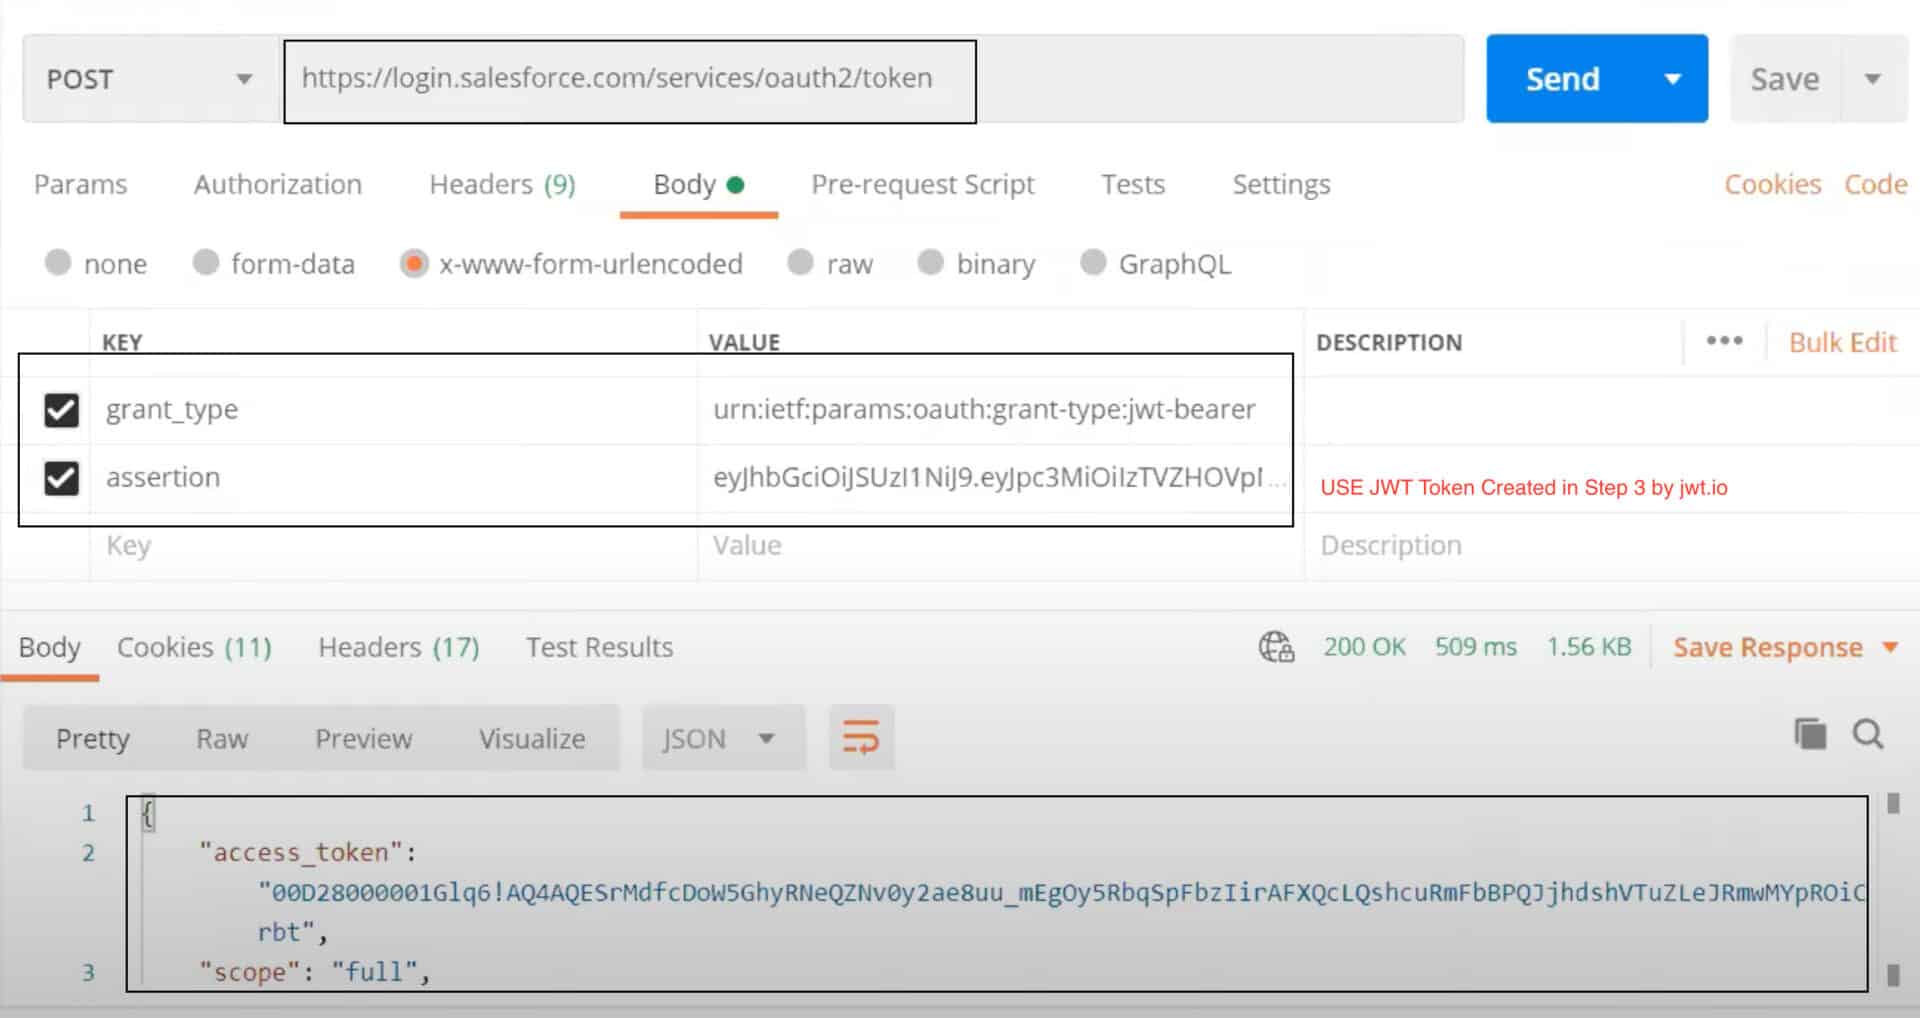
- Method:
POST - URL:
https://login.salesforce.com/services/oauth2/token - Header Param
- grand_type :
urn:ietf:params:oauth:grant-type:jwt-bearer - assertion :
USE JWT TOKEN created in STEP 3 using jwt.io.
- grand_type :
Congratulation now you have access_token to execute any Salesforce API. Learn more about JWT Bearer flow for our old session JWT / SAML Assertion Bearer Flows. This how complete flow will look like.
JWT Flow using Apex
So far we created the JWT flow using jwt.io app. Let see how to use the same with Salesforce Apex class. For example you want to call one salesforce org API from another Salesforce org. For that you need to import the certificate in target org and you need Java Keystore (JKS) file format.
Generate a Java Keystore (JKS) which is importable in Salesforce
Salesforce only supports the Java Keystore (JKS) format for importing private key pairs in a Salesforce org.
Convert .CRT to Salesforce Keystore JKS file
We already have sever.crt file by using our step1. Let see how we can convert the same
- Go to same folder where you created server.key file(By using step 1). Clone the server.key file and save as server.pem.
- Now execute this command :
openssl pkcs12 -export -in server.crt -inkey server.pem -out testkeystore.p12 - Now execute keytool command to create jks file.
keytool -importkeystore -srckeystoretestkeystore- It will ask you to create password. remember it we will it soon.
- Now Salesforce dont support default alias 1. So change the alias name with this command
keytool -keystore /servercert.jks -changealias -alias 1 -destalias salesforcetest
Import the Java Keystore (JKS) in
Now it time to import the Certificate in Salesforce
- Go to setup-> Search for Certificate and Key management
- Then Click on Import From Keystore.
- Then upload the
servercert.jksfile and provide the password which you to create the “servercert.jks” file.
Create a Apex class to execute the JWT Flow
Here Is JWT Apex Class without named credential.
Auth.JWT jwt = new Auth.JWT();
jwt.setSub('amit.salesforce21@gmail.com');
jwt.setAud('https://login.salesforce.com');
jwt.setIss('connected app client id');

//Create the object that signs the JWT bearer token
Auth.JWS jws = new Auth.JWS(jwt,’Certificate keystore name’);
String token = jws.getCompactSerialization();
String tokenEndpoint ='https://login.salesforce.com/services/oauth2/token';

Auth.JWTBearerTokenExchange bearer = new Auth.JWTBearerTokenExchange(tokenEndpoint, jws);

//Get the access token
String accessToken = bearer.getAccessToken();
system.debug('Access Token-->'+accessToken);
APEX CODE WITHOUT NAMED CREDENTIALS
We know above class is not secure and having all securite details in apex. Which is not a best practice in Salesforce. For same we recommend use named credentials like below
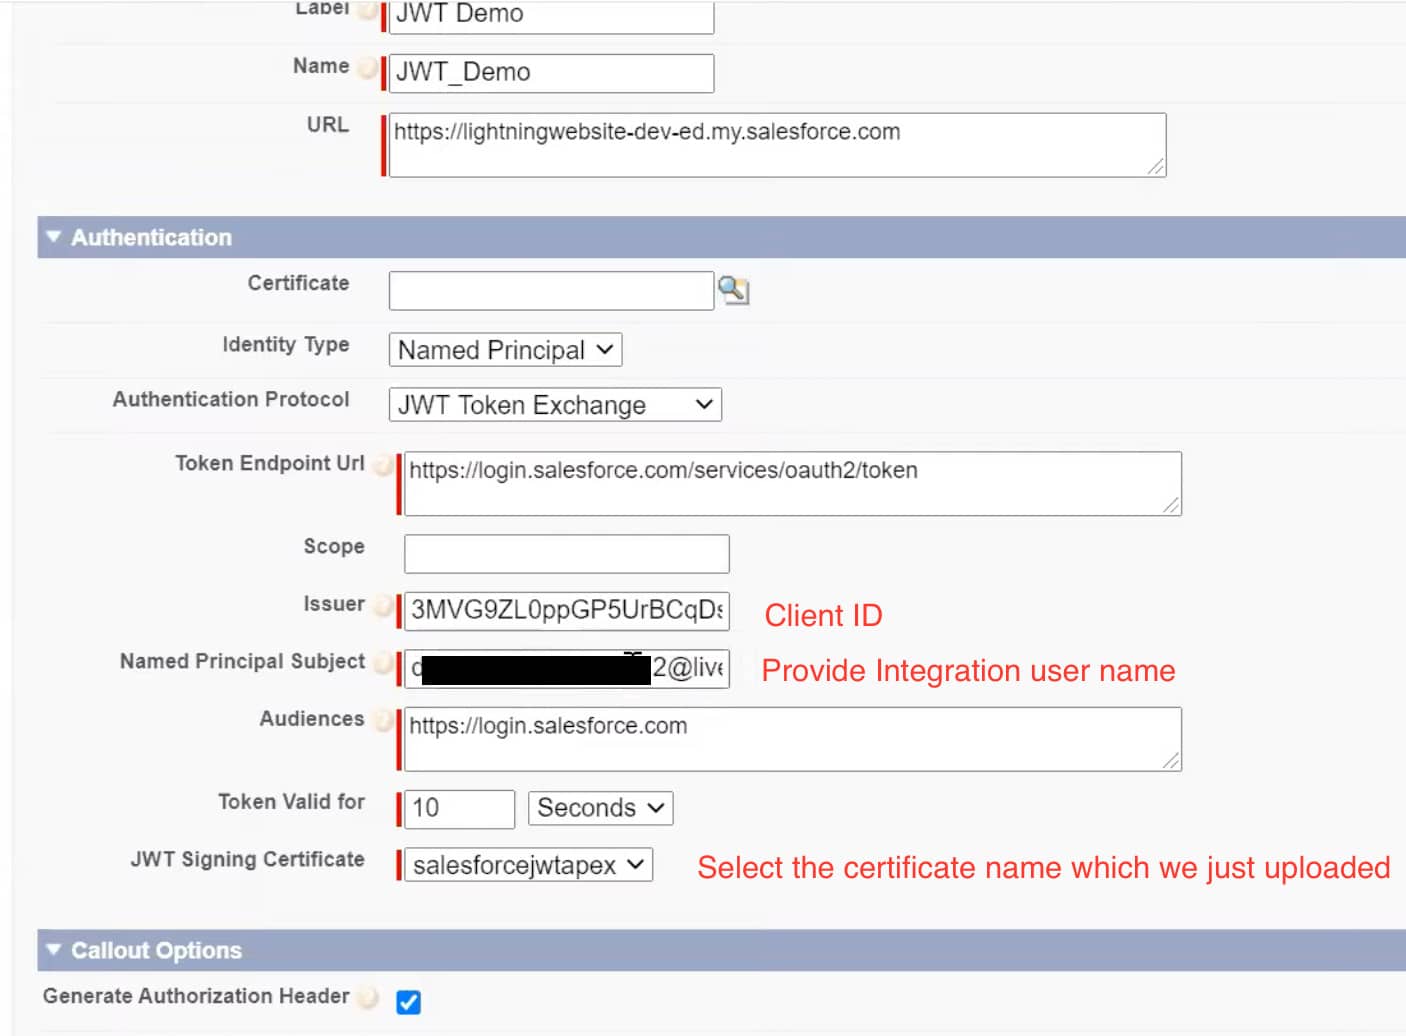
And update your apex class like below.
String service_limits='/services/data/v48.0/sobjects/Account/listviews/';

HttpRequest req = new HttpRequest();
req.setEndpoint('callout:JWT_Demo'+service_limits);
req.setMethod('GET');

Http http = new Http();
HTTPResponse res = http.send(req);
System.debug(res.getBody());
System.debug(res.getstatuscode());
Salesforce OAuth 2.0 JWT Bearer flow Video
Check below recording to learn complete JWT flow in Salesforce using video.

Summary
OAuth JWT Bearer token flow is Ideal for application which access sfdc only through API as there is no UI involved. For example ETL tools or middleware. Digital certificates are required in this flow. Upload certificate (X509 ) to connected app which will be used to authenticate JSON web tokens. No refresh token is returned in this flow. So if access token expires then send request to generate access token again.


You use JWT.io when you are requesting for access token. Is it possible that we directly upload our certificate and key in postman and get the token?
I am getting the unsupported grant type error in Postman , I tried even setting the header with Content-Type : application/x-www-form-urlencoded , no luck
{
“error”: “unsupported_grant_type”,
“error_description”: “grant type not supported”
}
Any suggestions , pls ?
Please try grant_type as “urn:ietf:params:oauth:grant-type:jwt-bearer”
Getting the unsupported grant type error in Postman/code with the same steps.
{
“error”: “unsupported_grant_type”,
“error_description”: “grant type not supported”
}
Any suggestions pls
Make sure the grant_type has complete value as “urn:ietf:params:oauth:grant-type:jwt-bearer”
Thanks for helping. Let us know if this helped you
@JB
I have the correct grant type and got my key, but I still get the same error.
{
“error”: “unsupported_grant_type”,
“error_description”: “grant type not supported”
}
I’m also using the end point: https://test.salesforce.com/services/oauth2/token
Do you have any other additional setup on your postman post request?
Hi, Did you find any solution for this ?
This is working
This blog is really helpful for setup OAuth flow.
We’re an ISV provider and we’ve coded in our managed package which creates the Static Resource file on the user’s Salesforce environment. Recently Salesforce security team asked us to not use the UserInfo.getSessionId() to create a Static Resource file and suggested using the OAuth, (try JWT flows and look into admin pre-authorization).
If we follow the steps above using JWT flow and creating Connected Apps in our developer org, can it be part of the managed package and does the end user also need to do all the above steps in their Salesforce environment?
Very useful blog. Thanks a lot. There are two typos in this blog and due to that I got couple of errors while testing it in Postman.
In Payload, it should be “iss” (lower case i), not “Iss. (double quotes is also missing)
In the Postman testing example, the param should be grant_type, not grand_type
Thanks for sharing
Hi Amit,
If I use the Named Credential and HttpRequest process to get an Access token for one of my experience sites, I get the response body in html format and the entire site html format body is returned.
How do we get the Access token using Named Credential and HttpRequest process?
Thanks
Which system you are connecting with?
I am trying to connect 2 experience cloud sites. Once I get the Access Token, I want to use that and redirect user to 1 experience cloud site from another one.
This is awesome, thanks!
I am getting the unsupported grant type error as well.
Does this work against a developer org?
{
“error”: “invalid_grant”,
“error_description”: “expired authorization code”
}
I am getting invalid client id error but I have followed the exact steps given above. I tried everything but no luck. Pls help
In the Payload ” is missing for the Iss. Which is throwing invalid signature error in JWT.io. Please make sure to edit it. It is minute but still time wasting part.
{
“Iss” : “Clint_ID From Step 2.1.1”,
“sub”: “UserName”,
“aud”: “LoginURL https://login.salesforce.com“,
“exp”: “CurrentTimeStemp+2min”
}
Thanks for sharing I will update the same
There is ” missing in the Payload part.
Just fixed the payload in post
To verify the signature using RS256 I need public and private keys, how can I get the public key?
got any help, i have the same issue?
Public key is the text version of Server.crt
Do you able to resolve this issue?
Hi Sir, Thank you for the detailed steps. Can you please resolve my doubt, is there any reason to create two key files using openssl as both commands Step 1.2: ‘openssl genrsa -des3 -passout pass:x -out server.pass.key 2048’ and Step 1.3: ‘openssl rsa -passin pass:x -in server.pass.key -out server.key’ creates a key file. Also, Step 1.2 step is good due to des3 encryption as compared to step 1.3 as it creates a plain key with no encryption?
Can we skip step 1.3?
Thanks.
Best Regards.
Hi Amit,
I have a use case to implement. On the third-party portal, we have a button. When clicking the button, it should redirect to the Salesforce Community portal without requiring a username and password. It should log in directly to the SF Community portal. How can we achieve this using JWT Tokens/Headless?
Note: Our third-party portal will not support SAML.
I am getting below error in Postman,, I verified all the steps mentioned above but still getting the below error —
{
“error”: “invalid_client_id”,
“error_description”: “client identifier invalid”
}
Error on User Record – Remote Access 2.0 Failed: Missing Consumer Key Parameter
I was getting below error in Postman,, I verified all the steps mentioned above but still getting the below error —
{
“error”: “invalid_client_id”,
“error_description”: “client identifier invalid”
}
Error on User Record – Remote Access 2.0 Failed: Missing Consumer Key Parameter
I read the comments in this blogs and figure it out what mistake is was doing …
In Payload, it should be “iss” (lower case i), not “Iss. (double quotes is also missing)
but when I am passing sandbox domain name in “aud” , I am getting error – Failed: Audience Invalid
But when I am passing “aud”:”https://test.salesforce.com”, its is working fine… Kindly let me know why I can’t pass my domain URL here
When I am trying to Import the servercert.jks in Certificate and Key management I am getting the following error
Data Not Available
The data you were trying to access could not be found. It may be due to another user deleting the data or a system error. If you know the data is not deleted but cannot access it, please look at our support page.
pls help.
Hi Siva, I followed directions on this post to resolve this “Data Not Available” issue: https://trailhead.salesforce.com/trailblazer-community/feed/0D54V00007T4Ax4SAF. In summary:
>>create a self-signed cert in keys and cert management.
>>Enable Identity Provider and assigning the self-signed cert to it.
>>Then you would be able to import certificates/JKS.
Payload is wrong “Iss” : “Clint_ID From Step 2.1.1” should be “iss” : “Clint_ID From Step 2.1.1”
Also please update the description, you can get the public cert from your server.crt file in order to generate valid signature. This time more it will be lot faster for your readers.
Curious if this tutorial is accurate in algorithm selection for this guide. It says RS256 but RS256 doesn’t have a selection in jwt.io to put just the private key under signature. For me when I select RS256 I get 2 text boxes one asking for:
Public Key in SPKI, PKCS #1, X.509 Certificate, or JWK String format
Second text box is asking for:
Private Key in PKCS #8, PKCS #1 or JWK String format.
Any help would be appreciated I only get the option to enter the private key if I select hs256.
I am getting below error in Postman
{
“error”: “invalid_grant”,
“error_description”: “expired authorization code”
}
Amit Please help me.It is urgent…
HI SFDCDK,
In https://www.unixtimestamp.com/
Convert date and time to time stamp manually, and use the outcome and it will work.
How to get Refresh Token in JWT Bearer flow
Will create one more post for same
Amit,
First thanks for the document, appreciate it
There is Typo error in the post “I” in the payload, and i have copy paste it and trust me it took me more than an hour to figure out the root cause of error.
{
“Iss” : “Clint_ID From Step 2.1.1”,
“sub”: “UserName”,
“aud”: “LoginURL https://login.salesforce.com“,
“exp”: “CurrentTimeStemp+2min”
}
Please update the document.
Thanks for letting us know.
Great post.
But please correct Iss to iss urgently and also grant_type. Lost 2 hours of sleep, its 2:16 am now. Finally figured this out. Dont want anyone to feel what i’m feeling.
Hi Team,
We have a requirement to get pass client_assertion (token) along with other headers (grant_type). For postman we can use jwt.io to get this generated but in real time how this can be generated on the fly. Any help will be appreciated.
Thanks,
Somesh
I am getting below error in Postman. Could you please suggest what could be the reason
{
“error”: “invalid_grant”,
“error_description”: “invalid assertion”
}
I am getting below error in postman.Could you please suggest the reason
{
“error”: “invalid_grant”,
“error_description”: “invalid assertion”
}
This is awesome. Explained and executed very well. Thanks.
Thanks for posting this, it’s very helpful.
I’m not able to understand one thing – it works for me for the 1st time(the JWT token gets generated) and I’m able to generate the access token. But, after sometime I start getting the below error –
{
“error”: “invalid_grant”,
“error_description”: “expired authorization code”
}
does it mean that I’ll need to generate the JWT token every time and cannot generate it once and reuse it to generate the access token?
Also how can we set the exp in payload dynamically?
Thanks again for you help on this.