

In today’s digital landscape, seamless payment integration is crucial for businesses looking to enhance their customer experience and streamline transactions. Integrating the Stripe payment gateway with Salesforce Lightning Web Components (LWC) offers a powerful solution for developers and organizations alike. This integration not only simplifies the payment process within Salesforce but also leverages the robust capabilities of both platforms to create a more efficient workflow. In this post, we will explore the step-by-step approach to integrating Stripe with Salesforce LWC, highlighting best practices, potential challenges, and the benefits of achieving a unified system for managing payments and customer data.
What is Stripe?
Stripe is an online payment processing platform that helps businesses accept payments via credit/debit cards, digital wallets (Apple Pay, Google Pay), and other methods. It’s known for being developer-friendly and supports global payments.
Key Features:
- Payment Methods: Accepts cards, Apple Pay, Google Pay, ACH transfers, and more
- Global Reach: Available in over 40 countries and supports 135+ currencies
- Billing & Invoicing: Includes tools for subscriptions, invoicing, and recurring payments.
- Fraud Protection: Advanced tools like Radar to detect and block fraud.
- Scalable: Suitable for businesses of all sizes, from startups to enterprises.
- Developer-Friendly: Easy integration with APIs and SDKs.
- Stripe API: A powerful and flexible REST API that allows businesses to create custom payment flows, such as custom forms or subscription models.
- Stripe Checkout: A ready-to-use, hosted checkout page that simplifies the integration process with built-in features like payment method support, localization, and mobile responsiveness.
- Plugins & Extensions: Stripe also offers ready-to-use integrations for popular platforms like Shopify, WordPress, WooCommerce, and others.
Integrating payment solutions into Salesforce applications is a common requirement, especially when dealing with products, opportunities, and customer transactions. One of the most widely used payment gateways is Stripe, which provides easy-to-use APIs for handling payments online.
Overview of the Stripe Integration(What we built here):
In this blog post, we will walk through the integration of Stripe with Salesforce Lightning Web Components (LWC). We’ll discuss the entire process step by step, covering the LWC component for displaying products, Apex classes for creating payment links, and handling the email notifications for payments.
The payment flow for this integration consists of the following steps:
- Fetch Opportunity Line Items: Retrieve the products and their details from a specific Opportunity record in Salesforce.
- Create Prices for Products: Use Stripe’s Prices API to create prices based on the product information.
- Generate Payment Link: Use Stripe’s Payment Links API to generate a link that customers can click to complete the payment.
- Send Payment Link: Email the generated payment link to the Opportunity owner or the customer for them to complete the payment.
Step 1: Creating a Stripe Account and API Keys
Before you can integrate Stripe with Salesforce, you need to create a Stripe account. Here’s how to get started:
- Go to Stripe’s website(Stripe.com) and sign up.
- Once you’ve signed up, you’ll be directed to your dashboard.
- Navigate to the API Section: From the Dashboard, click on the “Developers” tab in the left sidebar.
- Click on “API keys”: Here, you will find your Publishable Key and Secret Key as shown in the screenshot below.

Publishable Key: This key is used on the client-side (browser) to identify your Stripe account and make public API requests.
Secret Key: This key is used on the server-side to make private API requests and handle sensitive information like payment processing.
You will use these keys to integrate Stripe with Salesforce.
Test Mode: Initially, you will have Test mode to simulate payments. When you’re ready to start accepting real payments, you’ll switch to Live by Toggle Test Mode Button.

Step 2: Storing API Keys in Salesforce Custom Metadata Types
It’s a good practice to store sensitive information, like Stripe’s API keys, in Salesforce Custom Metadata Types. This makes the keys easily accessible from Apex while ensuring they are not exposed in the code itself.
Steps to Create Custom Metadata Types:
- Go to Setup > Custom Metadata Types.
- Create a new metadata type called Stripe_Credentials
- Add Secret Key (Text) and Public Key (Text) fields to store your Stripe keys.
- Create a record under Stripe_Credentials to store your actual API keys.

Now, in your Apex code, you can retrieve these values securely like so:
Stripe_Credential__mdt credentials = Stripe_Credential__mdt.getInstance('Stripe_Credentials');
secretKey = credentials.secretKey__c;
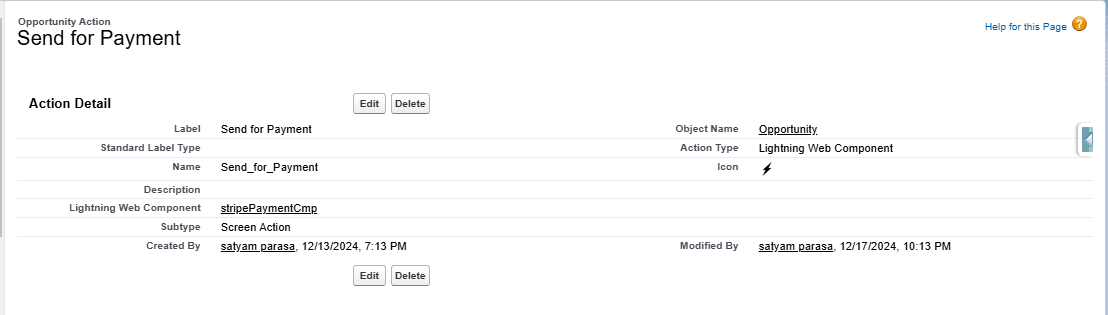
publicKey = credentials.publicKey__c;Step 3: Opportunity Action: “Send for Payment” Button
Create an Opportunity Action called “Send for Payment,” which triggers the “stripePaymentCmp”.

Step 4: Building the Frontend: stripePaymentCmp
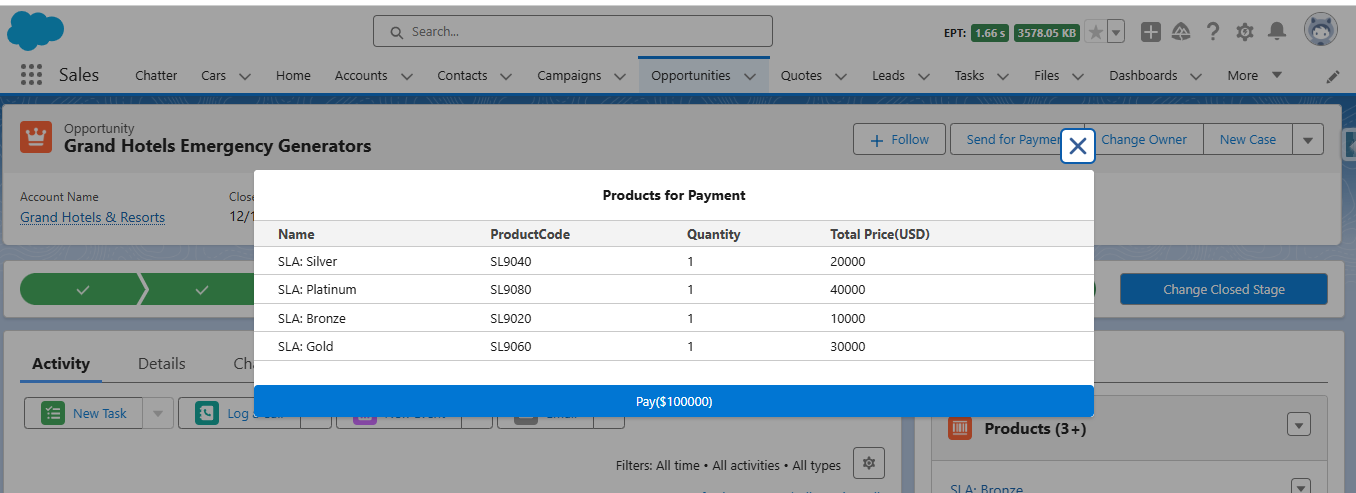
The frontend of this integration is built using Lightning Web Components (LWC). Specifically, we have the stripePaymentCmp component, which displays the Opportunity products and provides a button for users to initiate the payment process.
LWC HTML Template:
Here’s the template of the LWC, which will display the products on the Opportunity and allow users to click the Pay button:
<template>
    <div class="slds-card">
        <div class="slds-grid slds-wrap">
            <div class="slds-col slds-size_12-of-12 slds-text-align_center">
                <h1 class="slds-text-heading_medium slds-text-title_bold">Products for Payment</h1>
            </div>
        </div>
        <table class="slds-table slds-table_bordered">
            <thead>
                <tr>
                    <th>Name</th>
                    <th>ProductCode</th>
                    <th>Quantity</th>
                    <th>Total Price(USD)</th>
                </tr>
            </thead>
            <tbody>
                <template for:each={records} for:item="rec">
    <tr key={rec.id}>
                        <td>{rec.Product2.Name}</td>
                        <td>{rec.ProductCode}</td>
                        <td>{rec.Quantity}</td>
                        <td>{rec.TotalPrice}</td>
                    </tr>
                </template>
            </tbody>
        </table>
        <button type="button" disabled={isDisabled} onclick={handlePay} class="slds-button slds-button_brand">{totalPrice}</button>
    </div>
</template>
This HTML template is responsible for rendering the list of products with details such as product name, code, quantity, and total price.
LWC JavaScript Logic (stripePaymentCmp.js)
import { LightningElement, wire, track, api } from 'lwc';
import { CurrentPageReference } from 'lightning/navigation';
import { ShowToastEvent } from 'lightning/platformShowToastEvent';
import getProducts from '@salesforce/apex/StripePaymentHelper.getOpportunityLineItems';
import sendPaymentRequest from '@salesforce/apex/StripePaymentHelper.sendPaymentRequest';

export default class StripeProductListCmp extends LightningElement {
    error;
    records;
    totalPrice = 0;
    recordId;
    isProcess = false;
    isDisabled = false;

    @wire(CurrentPageReference)
 getStateParameters(currentPageReference) {
        if (currentPageReference) {
            this.recordId = currentPageReference.state.recordId;
            getProducts({ parentId: this.recordId })
                .then((result) => {
                    this.records = result;
                    this.totalPrice = 'Pay($' + result.reduce((sum, rec) => sum + rec.TotalPrice, 0) + ')';
                })
                .catch((error) => {
                    console.error('Error: ', error);
                });
        }
    }

    handlePay() {
        this.isProcess = true;
        this.isDisabled = true;
        const dataJson = JSON.stringify(this.records);
        sendPaymentRequest({ productsJson: dataJson })
            .then((result) => {
                this.isProcess = false;
                this.showToast('Success', 'Payment request successfully sent', 'success');
            })
            .catch((error) => {
                this.isProcess = false;
                this.isDisabled = false;
                this.showToast('Error', 'Something went wrong: ' + error, 'error');
            });
    }

    showToast(title, message, variant) {
        const evt = new ShowToastEvent({
            title: title,
            message: message,
            variant: variant,
            mode: 'dismissable'
        });
        this.dispatchEvent(evt);
    }
}
Fetching Opportunity Products: The component uses getProducts (Apex method) to fetch the products related to the Opportunity.
Triggering Payment Request: The handlePay method triggers the payment process by sending the product details to the sendPaymentRequest() Apex method.
Step 5: Creating the Payment Request with Stripe API
The payment logic resides in the StripePaymentHelper Apex class. This class interacts with the Stripe API to create prices and generate payment links.
Creating Prices with the Stripe API:
Stripe’s Prices API is used to create price entries for each product.
Requirements for Creating a Price in Stripe:
When creating a new price for an existing product in Stripe, there are a few key elements to define, depending on whether the price is recurring or one-time:
- Currency: Required field.Must be the three-letter ISO currency code in lowercase (e.g., “usd” for U.S. dollars).
- Product: Required unless product_data is provided.This is the unique ID of the product to which the price will be linked.
- Unit Amount: Required unless using unit_amount_decimal or custom_unit_amount.This is the price amount in cents (e.g., 1000 = $10.00 USD). A value of 0 can be used for free products.
By providing the necessary details for these fields, you can successfully create a price in Stripe for both one-time and recurring payments.
Example of the Price Object Response:
{
  "id": "price_1MoBy5LkdIwHu7ixZhnattbh",
  "object": "price",
  "active": true,
  "billing_scheme": "per_unit",
  "created": 1679431181,
  "currency": "usd",
  "custom_unit_amount": null,
  "livemode": false,
  "lookup_key": null,
  "metadata": {},
  "nickname": null,
  "product": "prod_NZKdYqrwEYx6iK",
  "recurring": {
    "aggregate_usage": null,
    "interval": "month",
    "interval_count": 1,
    "trial_period_days": null,
    "usage_type": "licensed"
  },
  "tax_behavior": "unspecified",
  "tiers_mode": null,
  "transform_quantity": null,
  "type": "recurring",
  "unit_amount": 1000,
  "unit_amount_decimal": "1000"
}
The following apex method generates a price for each Opportunity Line Item.
Note: full source available in github.
public static String createPrice(OpportunityLineItem product) {
String apiURL = baseURL + '/v1/prices'; // Endpoint URL
String requestBody = 'unit_amount_decimal=' + EncodingUtil.urlEncode(String.valueOf(product.TotalPrice), 'UTF-8') +
'¤cy=' + EncodingUtil.urlEncode(String.valueOf(product.CurrencyIsoCode), 'UTF-8') +
'&product_data[name]=' + EncodingUtil.urlEncode(product.Product2.Name, 'UTF-8');
// Sending HTTP request to Stripe API
}Step 6: Generating Payment Links with Stripe API:
Once prices are created for each product, the next step is to generate a payment link using the Payment Links API.
A payment link is a shareable URL that will take your customers to a hosted payment page. A payment link can be shared and used multiple times.
Create a payment link:
When creating a payment link in Stripe, you must provide the line items representing what is being sold. Each line item has two key attributes:
price: The ID of the price (e.g., price_1ABCXYZ).
quantity: The number of items being sold.
You can include up to 20 line items in a payment link. This structure allows you to specify multiple products or quantities in a single transaction.
Example for paymentlink response:
{
 "id": "plink_1MoC3ULkdIwHu7ixZjtGpVl2",
 "object": "payment_link",
 "active": true,
 "after_completion": {
   "hosted_confirmation": {
     "custom_message": null
   },
   "type": "hosted_confirmation"
 },
 "allow_promotion_codes": false,
 "application_fee_amount": null,
 "application_fee_percent": null,
 "automatic_tax": {
   "enabled": false,
   "liability": null
 },
 "billing_address_collection": "auto",
 "consent_collection": null,
 "currency": "usd",
 "custom_fields": [],
 "custom_text": {
   "shipping_address": null,
   "submit": null
 },
 "customer_creation": "if_required",
 "invoice_creation": {
   "enabled": false,
   "invoice_data": {
     "account_tax_ids": null,
     "custom_fields": null,
     "description": null,
     "footer": null,
     "issuer": null,
     "metadata": {},
     "rendering_options": null
   }
 },
 "livemode": false,
 "metadata": {},
 "on_behalf_of": null,
 "payment_intent_data": null,
 "payment_method_collection": "always",
 "payment_method_types": null,
 "phone_number_collection": {
   "enabled": false
 },
 "shipping_address_collection": null,
 "shipping_options": [],
 "submit_type": "auto",
 "subscription_data": {
   "description": null,
   "invoice_settings": {
     "issuer": {
       "type": "self"
     }
   },
   "trial_period_days": null
 },
 "tax_id_collection": {
   "enabled": false
 },
 "transfer_data": null,
 "url": "https://buy.stripe.com/test_cN25nr0iZ7bUa7meUY"
}
Apex code for creating PaymenLink:
public static String createPayementLink() {
    String apiURL = baseURL + '/v1/payment_links'; // Endpoint URL
    // Construct line items from product prices
    HttpRequest request = new HttpRequest();
    request.setBody(requestBody); // Body containing line items and other data
    HttpResponse response = new Http().send(request);
    // Verifying response
}
Step 7: Sending Payment Link and Email Notifications
After the payment link is generated, the sendEmailToCustomerForPayment method sends an email to the Opportunity owner (or customer) with the payment link.
Messaging.SingleEmailMessage email = new Messaging.SingleEmailMessage();
email.setTargetObjectId(opportunity.OwnerId);
email.setSubject('Payment Request for: ' + opportunity.Name);
email.setPlainTextBody('Dear ' + opportunity.Account.Name + ',\n\nClick on this link ' + paymentURL + ' to make a payment.');
Messaging.sendEmail(new List<Messaging.SingleEmailMessage>{ email });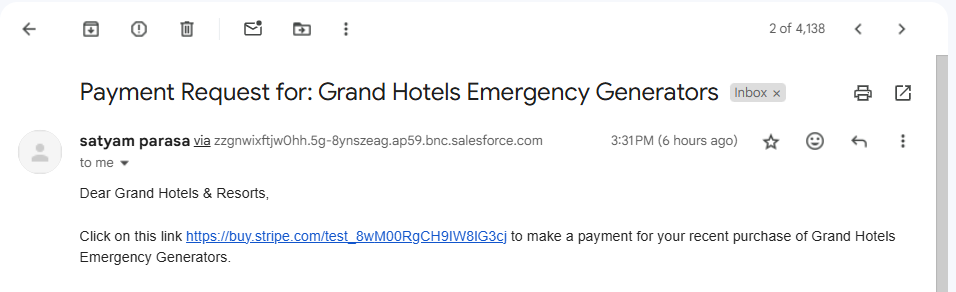
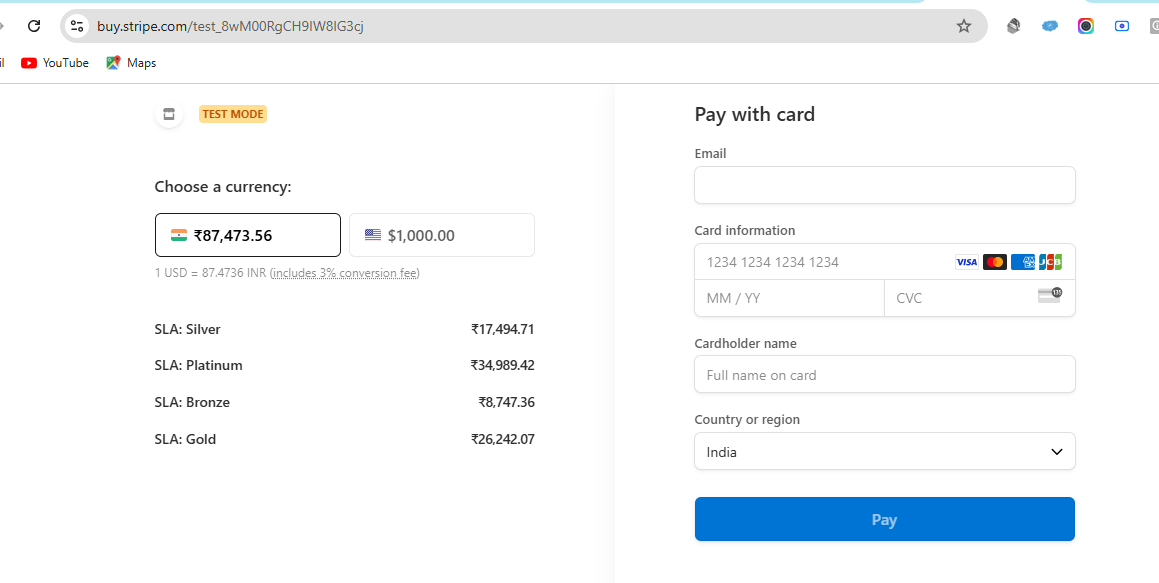
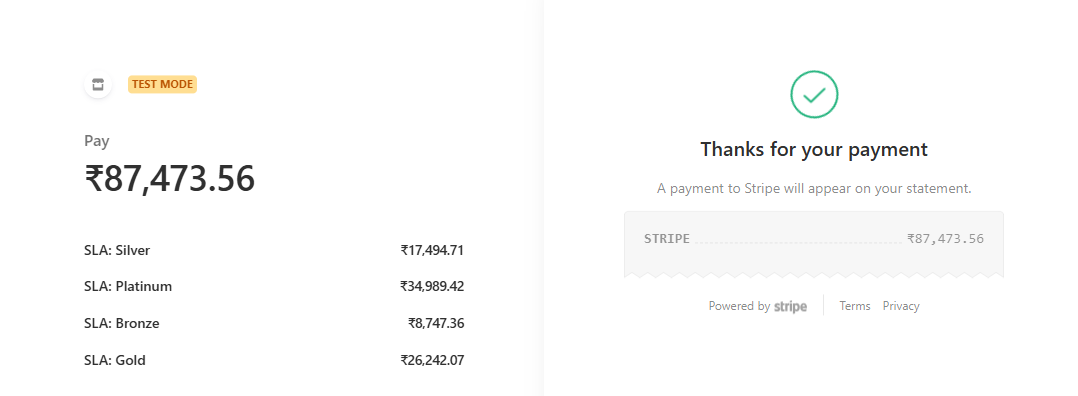
Once the customer clicks the payment link, they will be redirected to Stripe’s payment checkout interface to enter their card details and complete the payment. The page will display the product details, including the price, and you can customize this page to match your branding and design preferences.
Once the payment is done, we will get the following success screen.
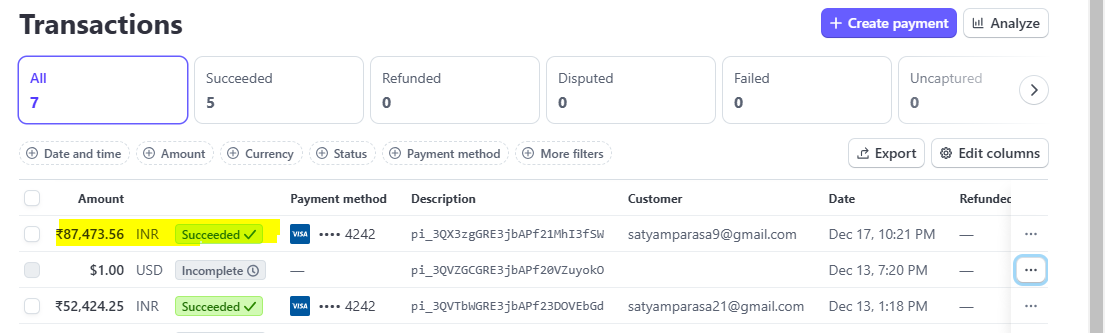
Success Transactions from Stripe Dashboard as below snap.
Analyzing the Apex Code
Key Methods in StripePaymentHelper Class:
- createPrice(): This method constructs and sends a request to the Stripe API to create a price for each product based on its details from the Opportunity Line Items.
- createPaymentLink(): This method generates a payment link using the prices created earlier. The link is then sent to the customer.
- sendEmailToCustomerForPayment(): This method sends an email to the Opportunity owner or customer, providing them with the payment link to complete their transaction..
Full Source code: https://github.com/satyamparasa15/salesforce-stripe-integration

Conclusion
Integrating Stripe with Salesforce provides a seamless way for businesses to process payments directly from the Opportunity record. By using Lightning Web Components (LWC) for the frontend and Apex for server-side logic, we can easily create products, generate prices, and initiate payment links. Additionally, using Custom Metadata Types to securely store API keys ensures that our integration is secure and maintainable.
This setup improves user experience by automating the payment process and ensures that payments are processed directly from Salesforce, offering convenience and efficiency.


Hi Satyam,
Could you please upload a similar blog or reference where the same functionality has been implemented using Cybersource via Wire ACH payments/Bank transfers?
Thanks
I’m interested in trying this, but the steps seem out of order. How can we complete Step 3: Opportunity Action: “Send for Payment” Button if we haven’t created the LWC stripePaymentCmp yet? Shouldn’t the LWC be created first so it can be referenced when creating the Action on the Opportunity?