
Visual Studio Code is recommended IDE for Salesforce development. In this post, we will learn about how to setup Visual Studio Code for Salesforce development. We’ll explore the features of VS Code, configure it, and customize it to use it as a powerful tool for Salesforce Development.
1. Download and Install VsCode
Download vscode (Visual Studio Code) from here and install on your computer. Follow setup instructions will installation.

2. Install Salesforce DX CLI
To connect the VsCode with Salesforce Org, we need SalesforceDX CLI. Download the Salesforce CLI from here.
| Operating System | Link to Installer |
| macOS | https://sfdc.co/sfdx_cli_osx |
| Windows 32-bit | https://sfdc.co/sfdx_cli_win |
| Windows 64-bit | https://sfdc.co/sfdx_cli_win64 |

Once Salesforce CLI is installed. You can validate the same with sfdx command on command line terminal. Check this post if you want to learn more about Salesforce CLI
3. Install Salesforce Extension Pack for Visual Studio Code
We are almost there. Open your VsCode and Click on Extensions icon on left hand side or press CTRL+SHIFT+X. Then, search for “Salesforce Extension Pack” and click on the install button

With the Salesforce Extension pack, all the extensions below will install automatically.
- Apex
- Salesforce CLI Integration
- Apex Interactive Debugger
- Apex Replay Debugger
- Visualforce
- Aura Components
- Lightning Web Component
- Salesforce Lightning Design System (SLDS) Validator
Check Top 10 Vs Code Extensions that can make your life easy for day-to-day development.
4. Create Salesforce DX Project
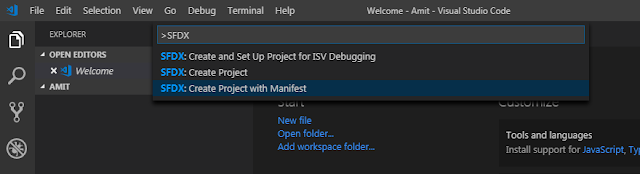
Congratulation. Till this step your software setup is completed. Now its time to create your first project in VsCode. To Create the project open Command Palette or press Ctrl + Shift + P. Then type SFDX: Create Project with Manifest .
Then, provide your project name and select the location where you want to save your project.
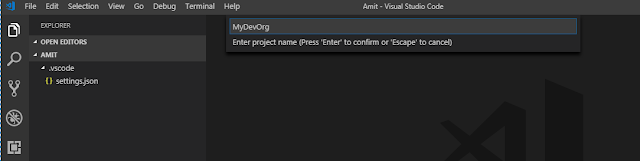

Till this point, you will able to see a blank folder structure in VsCode. Let see how we can connect our VsCode with Salesforce.
5. Connect with your Salesforce Org : Authorize an Org
Our project is ready on our local machine, Its time to connect our VsCode with Salesforce. Again open Command Palette or press Ctrl + Shift + P. This time we need to type or Select “SFDX: Authorize an Org“.

Then it will ask you which environment we need to connect to

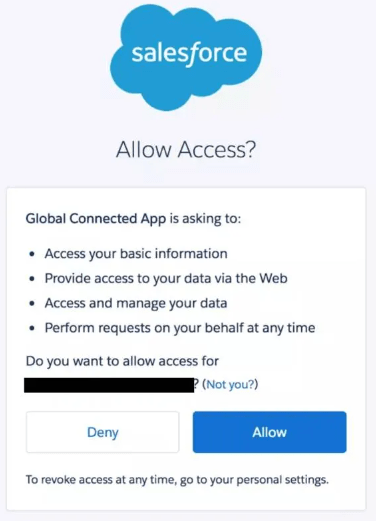
In the last step you need to provide the org alias name. Then it will take you to your default browser and ask you for org credentials. If prompted to allow access, click Allow
Till this point your Salesforce org is connected with VsCode. Now its time for Development. You can also use command line interface for same.
6. Retrieve Component from Salesforce Org using VsCode
Now you want to extract all your Salesforce component in your VsCode? Open Package.xml file from Manifest folder. Then Modify your Package.xml file to add and remove component. Finally Click on Package.xml and select “SFDX: Retrieve This Source from Org” option
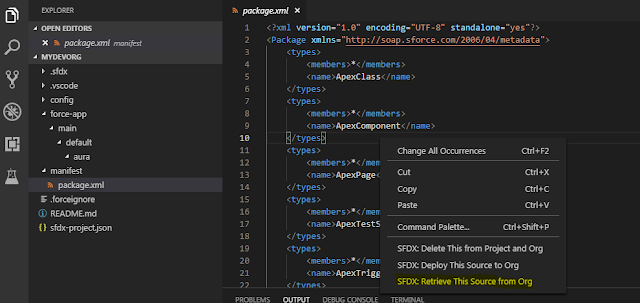
SFDX: Retrieve This Source from Org
It’ll retrieve all the metadata from your org which is specified in your package.xml file
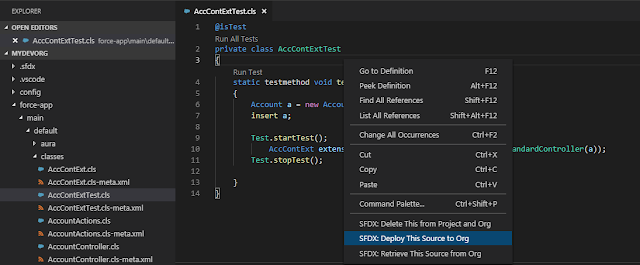
7. Deploy component using Visual Studio Code
Open any file and work on your component. If you want to learn about how to create Lightning Web Component then check this post. Now do your changes in VSCode and then select the file which you want to deploy in your org. Then Right click on VsCode and select the “SFDC: Deploy This Source to Org” option for deployment.
Learn about Salesforce Code Builder The web IDE for Salesforce Application Development.
How to Setup Visual Studio Code for Salesforce Video
Learn how to set up Visual Studio Code for Salesforce and how to use vs code for creating a project with non-Scratch Org. We will also learn Execute Test Class, Execute Code, SOQL, and Debug log in VsCode.

If you want to learn about how to use VsCode on cloud check this post.
If you are new to Salesforce? Check our How to become a Salesforce Developer in 2023.
What Next?
- Top 10 VsCode Extensions for Salesforce
- Top 10 VS Code Extensions
- Top Salesforce Chrome Extensions in 2025.
- Learn How to Improve Salesforce Code Quality
- Learn Git Command for Salesforce.

Summary
I hope this post helped you to understand how to set up vsCode in Salesforce. Check out the Top 10 VsCode Extensions for Salesforce to increase your productivity for Salesforce Development.


How to connect & work with GIT from VSCODE.
Best if a blog post that explains the process with example scenario @Amit
Soon
I would also like to request a video blog on ‘How to connect and work with GIT from VSCODE for SF’
Thankful for the wonderful learning you and your team have been imparting to the SF Community.
Soon we can plan
Doesn’t work.
Whenever I want to deploy something, nothing happenes. I see the loading bar moving, but nothing happens even after minutes of waiting.
I hope you are already connected with Salesforce org. Are you getting any errors? You can check the quick status in salesforce deployment as well
Whenever I am trying to retrieve the elements from SF Org, only static resource is retrieved and retrieve not working for other elements. There are no errors also of failed retrieve. Please help.
Are you using project with manifest?
Amit – You can add this section as well.. Some features, particularly Apex support, in Salesforce Extensions for Visual Studio Code depend on the Java Platform, Standard Edition Development Kit (JDK). It requires an installation of either JDK version 17 (Recommended), JDK version 11, or JDK version 8. If you have another version of Java installed, you need to also install JDK 17, JDK 11, or JDK 8.
Thanks for sharing
Thank you Sandip, that is the missing link in this article!
In Step 2) Install Salesforce DX CLI, when I click the link for win64 and I get Error AccessDenied.
Looks like I was able to get it from here: https://developer.salesforce.com/tools/sfdxcli
Thanks for sharing the link
Thank you So much Juha, this worked to link Salesforce in VS code for me.
when I tried to deploy or retrieve the code I am getting like this => request to https://mysite-dev-ed.develop.my.salesforce.com/services/data failed, reason: connect ETIMEDOUT 101.53.169.117:443
Hi Amit,
I’m getting this error when I’m running pipeline
$ openssl aes-256-cbc -d -md md5 -in assets/server.key.enc -out assets/server.key -k $SERVER_KEY_PASSWORD
Can’t open “assets/server.key.enc” for reading, No such file or directory
40478F36327F0000:error:80000002:system library:BIO_new_file:No such file or directory:../crypto/bio/bss_file.c:67:calling fopen(assets/server.key.enc, rb)
40478F36327F0000:error:10000080:BIO routines:BIO_new_file:no such file:../crypto/bio/bss_file.c:75:
Hi Amit
I’m getting this error when I run pipeline
$ openssl aes-256-cbc -d -md md5 -in assets/server.key.enc -out assets/server.key -k $SERVER_KEY_PASSWORD
Can’t open “assets/server.key.enc” for reading, No such file or directory
40478F36327F0000:error:80000002:system library:BIO_new_file:No such file or directory:../crypto/bio/bss_file.c:67:calling fopen(assets/server.key.enc, rb)
40478F36327F0000:error:10000080:BIO routines:BIO_new_file:no such file:../crypto/bio/bss_file.c:75:
There’s a misspelling in the command keys on step 5. 🙂
fixed
Very helpfull. Thank you for this knowledgeable article.
I had been trying to retrieve source in Manifest from Org but was unsuccessful
I get the following msg
19:42:21.969 Starting SFDX: Retrieve This Source from Org
19:42:23.254 ended SFDX: Retrieve This Source from Org
Start and end msgs are being displayed but nothing is being retrieved. Authentication is successful but no retrieval. Can someone throw some light on what is going on wrong?