In this post we will talk about Single Sign on Between Two Salesforce Org. Single sign-on (SSO) is an authentication method that enables users to access multiple applications with one login and one set of credentials.
What is Single Sign-on in Salesforce?
Single sign-on is a process that allows network users to access all authorized network resources without having to log in separately to each resource. Single sign-on allows you to validate usernames and passwords against your corporate user database or other client application rather than having separate user passwords managed by Salesforce.
Different way to implement Single Sign-on in Salesforce
There are three mechanisms which can be used to achieve this in Salesforce.
- Delegated authentication
- Federated Authentication
- SP-Initiated SAML
- IDP-Initiated SAML
- OpenID Connect
Learn more about then in details in Salesforce Single Sign on Flows and Decision Guide for Single Sign-on in Salesforce.
Setup Single Sign on Between Two Salesforce Org
To setup Single sign on between two Salesforce Org we need to setup one Salesforce Org as Service provider and other one as Identify provider.
- Identify provider (IDP) :- An identity provider is a trusted provider that lets you use single sign-on (SSO) to access other websites
- Service provider (SP):- A service provider is a website that hosts apps.
Step to setup Single sign-on between two Salesforce
Step to setup Single sign-on between two Salesforce org:-
- Enable My Domain in both Salesforce Orgs. (Both Org)
- Enable Identity providers ( IDP Org )
- Download Certificate
- Download Metadata
- Single Sign-On Setting (SP Org)
- Enable SAML
- SAML Sigle Sign on Setting and upload Metadata File.
- Upload Identity Provider Certificate
- Create connected app (IDP Org)
- Update Authentication Configuration for my Domain in SP Org
- Test your configuration
- Setup Users in both SP and IDP
In this Demo we will use SAML login flows using SSO in Salesforce.
#1. Enable My Domain in both Salesforce Orgs
By default my domain should be already activate in new Salesforce orgs. If not then enable it from “My Domain“.
#2. Enable Identity providers in IDP Org
Enable Identity providers and create Certificate. Login to your IDP org and Navigate to Identity provider. Setup-> Security Controls -> Identity Provider.
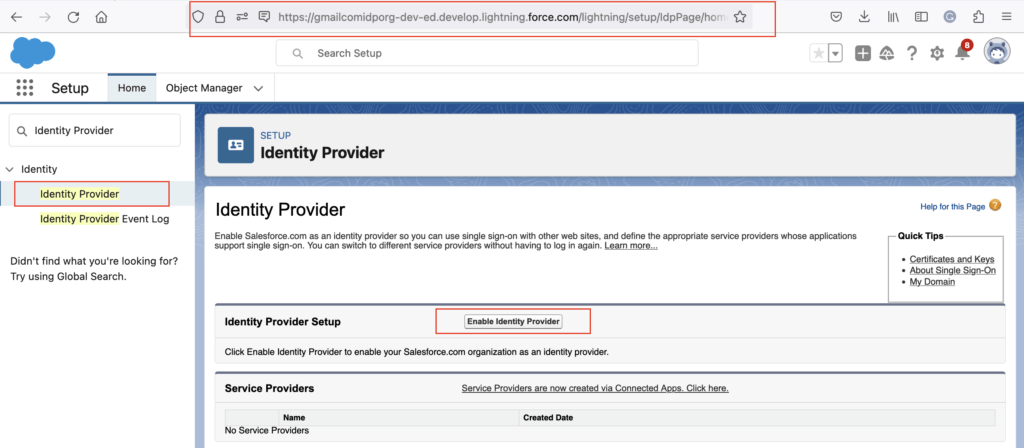
Then click on “Enable Identity providers” button. Then choose the certificate that Salesforce.com uses when communicating with service providers.

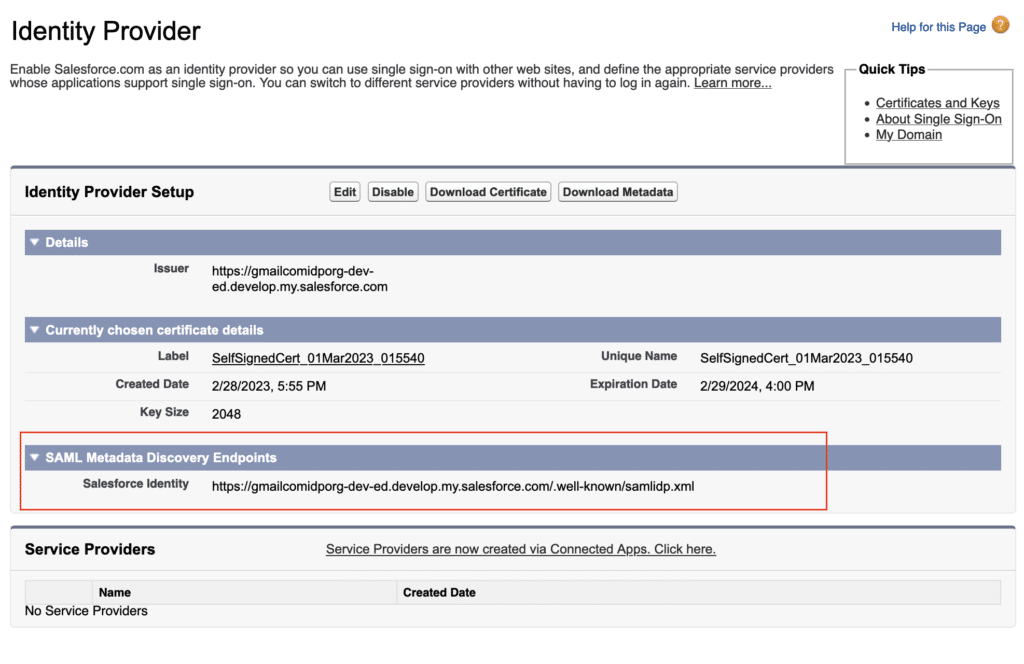
2.1 Download Certificate
Download the certificate from “Download Certificate” button.
2.2 Download Metadata
Download the certificate from “Download Metadata” button.
#3. Single Sign-On Setting in SP Org
3.1. Enable SAML
Enable Single Sign on. Navigate to “Setup > Identity > Single Sign-On Settings” and check “SAML Enabled” option.

3.2. SAML Single Sign on Setting and upload Metadata File.
Now provide SAML Single Sign on Setting detail. You can use Metadata file from step 2.2 and upload here with “New from Metadata File” button.

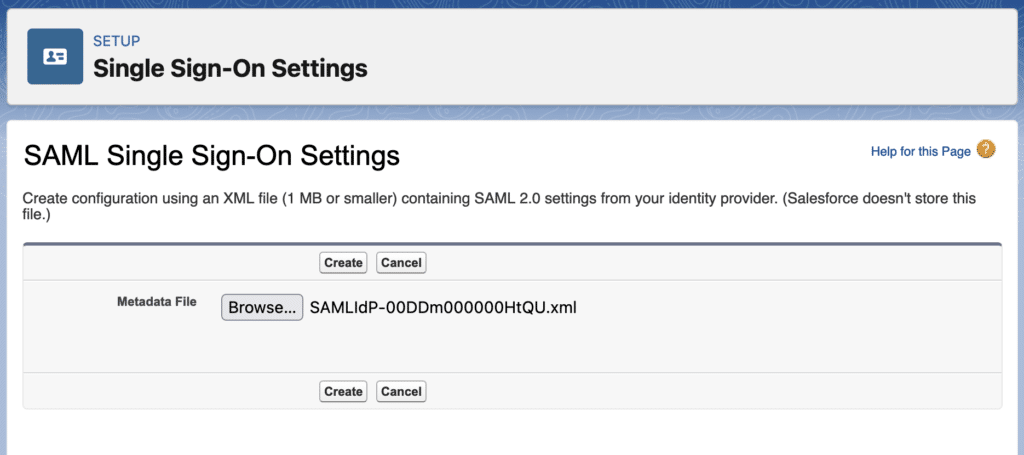
3.3. Upload Identity Provider Certificate and update setting
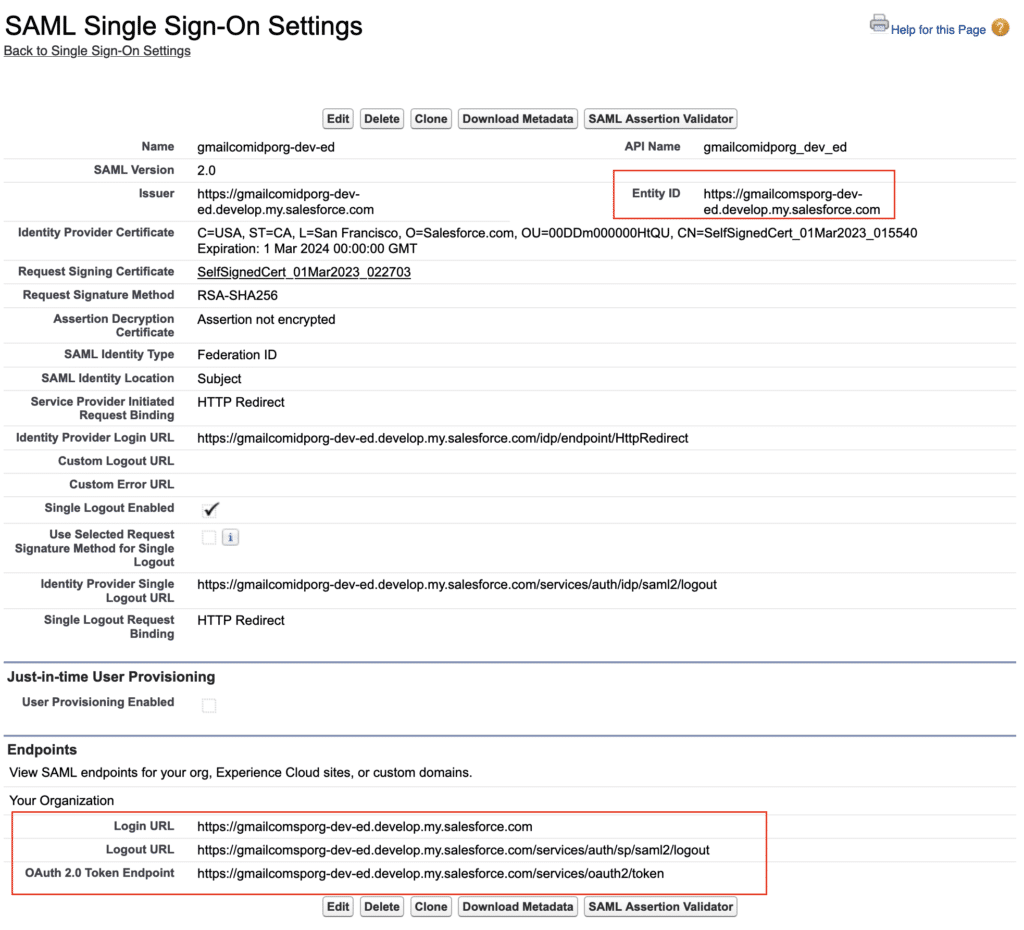
Update SAML Single Sign-On Settings and upload the Identity Provider Certificate (which we download from 2.1) and select the “Assertion contains the Federation ID from the User object“.
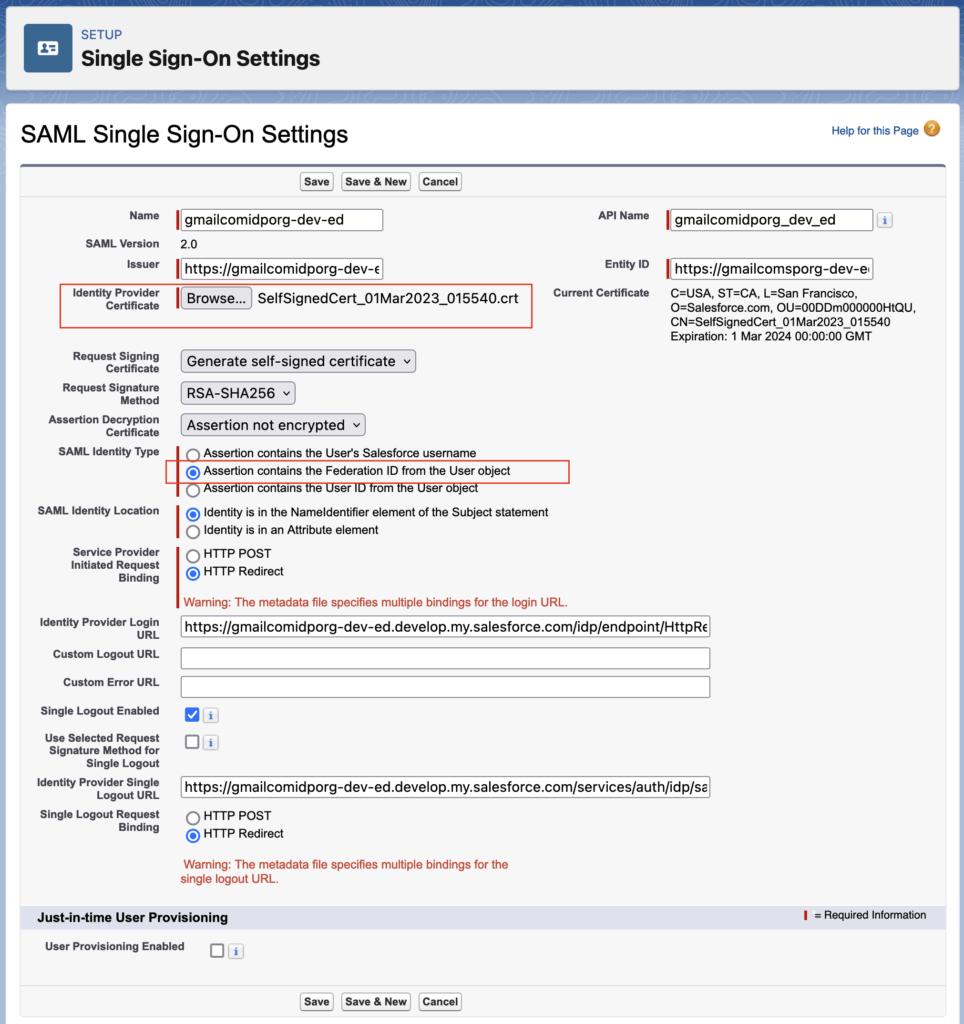
Make a note of Entity ID and Login URL from here. We will use same in IDP org Connected App
#4. Create connected app (IDP Org)
Now go back in your IDP org. And create one connected app with below step
- Create connected app, Setup -> App Manager -> New Connected App
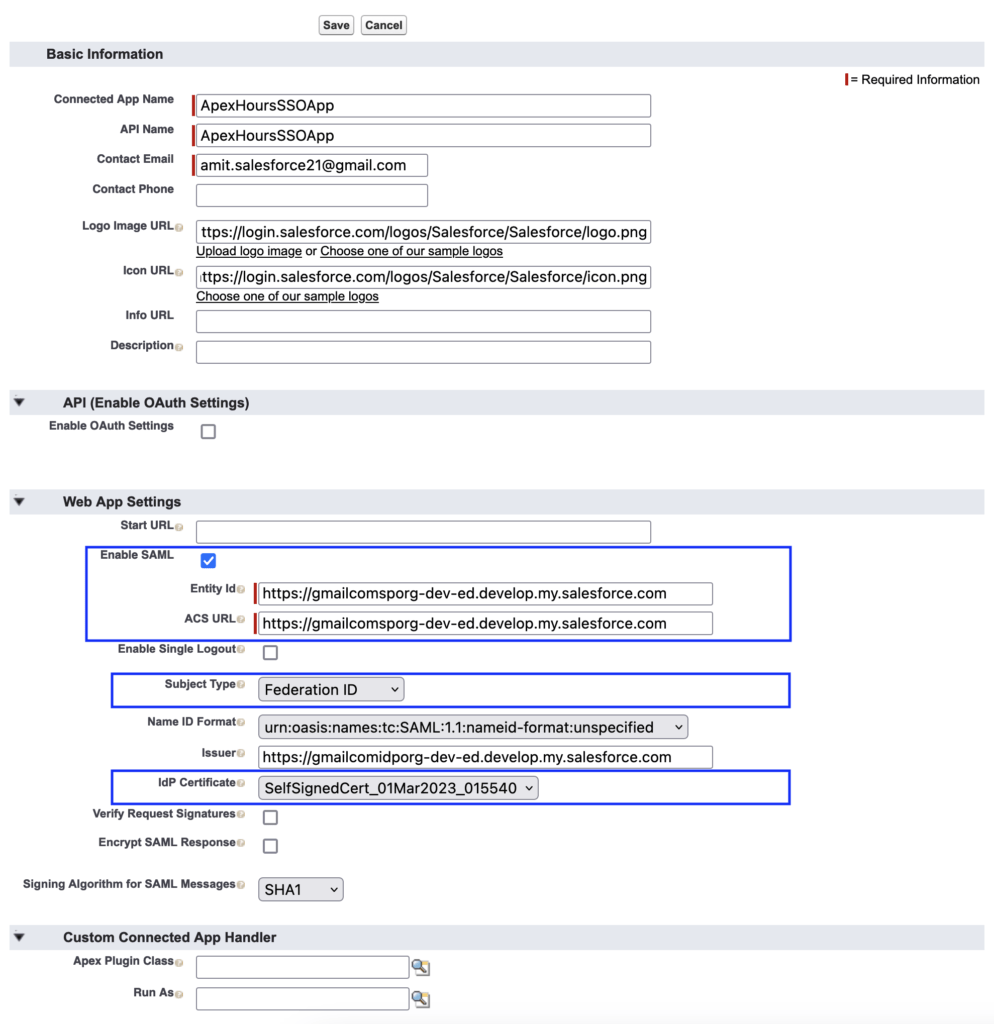
- Now provide all required detail. Make sure on your connected App you need to perform below step
- Enable SAML
- Provide Entity Id (Use Entity ID from Step 3)
- ACS URL (Login URL from Step 3)
- Subject type should be Federation Id.
- IDP Certificate as Identity Provider Label name
- Now once Connected app is ready. Click on Manage Button. Then Add the profile from related list.
#5. Update Authentication Configuration for my Domain in SP Org
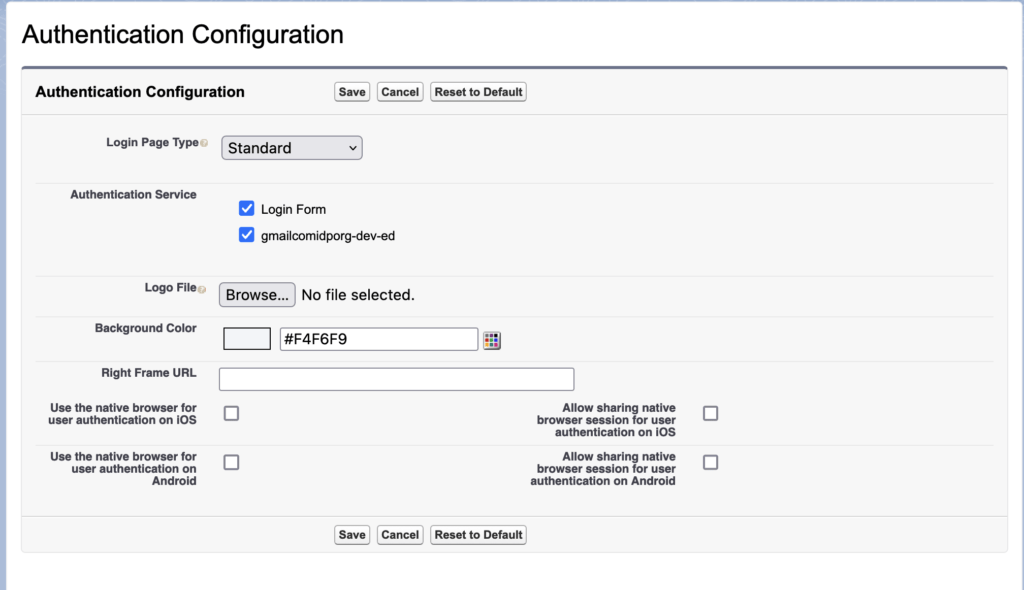
Now go to SP org the navigate to My Domain (Setup -> My Domain). Then edit the Authentication configuration setting and select the IDP org in Authentication service.
#6. Test your configuration
Create a user in both org with same “Federation ID“.
6.1 Service Provider-Initiated SAML Flow Testing
go to your Service provider org and click one “Log in with IDP-org” button
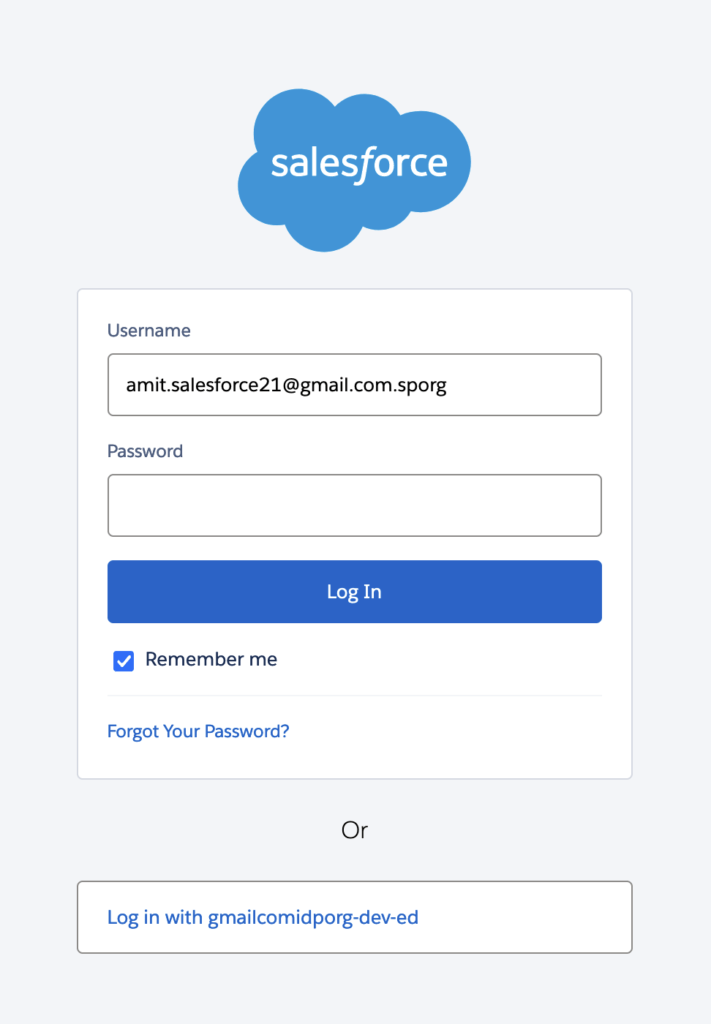
It will take you to IDP org for validation. Your username and password.
6.2 IdP-Initiated Login URL
Copy the IdP-Initiated Login URL from Identity provider org. And open in different tab. It will take you to SP org.

SAML Flow in Salesforce Video
Single Sign-On Terminology
These terms apply to SSO enabled with SAML.
- Security Assertion Markup Language (SAML) – Provides an open standard for XML-based confirmation of identity and transfer of identity attributes between an Identity Provider and Service Provider
- Identity Provider (IDP) – An application with the capability to authenticate a user’s identity (i.e. allow the user to login), and confirm authentication and identity attributes to a Service Provider
- Service Provider (SP) – An application which defers to an Identity Provider for authentication of a user, and allows this user access to protected resources or capabilities based on this authentication
- SAML Assertion – The portion of the SAML Response which confirms identity attributes of the authenticated user.
- SAML Request – The structured XML message sent by the Service Provider to an Identity Provider, identifying itself and requesting authentication of the user.
- SAML Response – The XML message sent by the Identity Provider to the Service Provider identifying itself as the issuer, indicating the status of the authentication attempt, and including the SAML Assertion if this can be issued (typically signed with the Identity Provider’s certificate).
How to debug SSO Issue
You can use Salesforce Chrome Extension called “SAML-Tracer”. You can also use SAML Assertion Validator in Salesforce.

