
In this post we will talk about How to Setup Okta Single Sign-On (SSO) with Salesforce. Okta connects any person with any application on any device. Okta enables you to provide Single Sign On (SSO) access to cloud, on-premises, and mobile applications. You sign into Okta and you can then launch any of your web apps without having to re-enter your credentials
Why use Okta?
Okta provides a central portal of applications which lets users to access the applications in an easy way
- Provides secure integration
- Multi–tenant solution
- Time constraint because of its integrated cloud platform
Setup Okta Single Sign-On (SSO) with Salesforce
Let see how to setup Single sign on with Okta and Salesforce.
1. Setting up my domain in Salesforce
Setup the my domain in Salesforce for SP Initiated flow.
2. Setting up a free Okta developer org
You need to perform the below step to setup your Okta developer org.
- Need to create Okta account. Please sign-up here.
- Need to install Okta Verify app either in Apple or Android or Windows platform
- Sign into Okta account using the credentials received to the email id given while sign up.
3. How to setup the Salesforce App in Okta
- Now at this point you are on your Dashboard page. Click on Application menu then click on Add Application button in Okta.

- Now search Salesforce application in Search box. Then Select the Salesforce.com

- After selecting the Salesforce.com, click on Add Button to add Salesforce Application.
- Then it will ask all below information
- Application label : Provide app name “Salesforce PROD”
- Instance Type : Select base on your Salesforce org. In my case it production.
- Custom Domain: Enter your custom domain name.
- User Profile & Type : “Standard Salesforce User”

- then click on Next Button.
4. Setting up Single Sign-On setting in Salesforce
- Once you click on Next button it will take you to Sign-On Option page.
- Select SAML 2.0 for SSO. To learn about how to setup SSO in Salesforce Click on “View Setup Instructions” button.
- Enable SSO in Salesforce. Setup > Identity > Single Sign-On Settings. Click edit and make sure SAML Enabled box is checked then click save
- Now Click on New Button and provide the following details
- Name : Enter the a name of your choice.
- SAML Version : Set as 2.0
- Issuer : Copy the value provided by Okta (Click on View setup Instruction button to get value).
- Identity Provider Certificate: Download from OKTA, then upload the following certificate into this field
- Identity Provider Login URL: Copy and paste from Okta page
- Custom Logout URL : Copy and paste from OKTA.
- Entity ID:
- If you have a custom domain setup, use https://[customDomain].my.salesforce.com
- If you do not have a custom domain setup, use https://saml.salesforce.com
- Click Save

- Once you click Save. Salesforce will generate login URL. In my case it is “https://cloud-opportunity-52328.my.salesforce.com”
- Go back to Okta and add Login URL under Advanced Sign-on Setting like below screen shot.

Setting up User Provisioning in Okta
1. Enable User Provisioning in Okta
- Click on Import Provisioning Tab and then click on “Configure API Integration” button.

- Then click on “Enable API Integration” Checkbox and provide your
- There are two option to enable Api Integration. One by providing username and password.
- 2nd option is by Configure OAuth and REST integration.
- For our demo we will use connected App option. Created your connected with “Configure OAuth and REST integration” like below.

- Once saved, get your Consumer Key and Consumer Secret under API (Enable OAuth Settings) section. They will be used to configure your Provisioning.
- Add Consumer Key and Consumer Secret and then click on “Authenticate With Salesforce.com” button.

- Click Save.
- Once Integration is setup successfully you enable Create user and Deactivate Users in OKTA.

- Then click on Save.
2. Import User in Okta from Salesforce (Optional)
- To import the Salesforce user in OKTA. You need to click on Import Tab then need to click on “Import Now” button.

3. Create user & assign user to Application
- Click on Directory & click on “Add Person button” then provided all required details.

- once user is created click on user record and assign the application
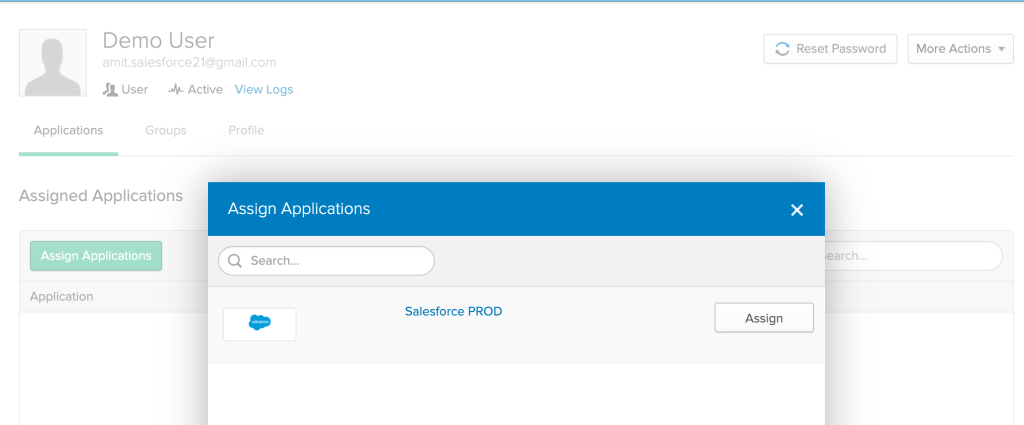
- Once you click on assign button, it will ask you all below salesforce related details.
- profile & Role
- Name and Address
- Permission Sets
- Feature Licenses
- public group

- Then click on Done.
Demo Of Idp Initiated Authentication
Till this point all set for Salesforce and OKTA Single sign on. Now try to login with newly created user. Once all set you will see our Salesforce Application on dashboard like below.

Click on app to see single sign on.
Setup Okta Single Sign-On with Salesforce Video
Please share your feedback if you like this post.


Nice one
Glad you like it
Does Okta support multiple salesforce org from same instance ?
If yes what is the deployment strategy for Okta
Yes you can do that.
Can a system admin login to a Community using Okta Integration?
Do you means grand login access?
Can i continue to use SF password for OKTA login as well for my community users? If Yes, how can we do it? I’m exploring options like OKTA Password inline hook solution. Can you throw some light here?
You can disable password login and enforce only SSO login.
After everything is done, I am getting the below error not able to sign in . Can you please help.
“We can’t log you in because of an issue with single sign-on. Contact your Salesforce admin for help”
Can you setup an Okta dedicated user with no View All/Modify All access? If yes, what permissions are required?
Wow, this was a really helpful guide! I was struggling to get SSO working between Okta and Salesforce, but your instructions made it a breeze. Thank you so much for sharing your expertise!
I follow all the steps, and I was able to log into OKTA and i see the salesforce application, but when I try to click it I get a Salesforce Single Sign-on Error, what to do here?