This command reference contains information about the Salesforce CLI commands and their parameters. The first section contains commands for the sfdx executable and the second for the sf executable. Let’s Check Salesforce DX Useful CLI Commands to increase your development productivity.
1. Install Salesforce CLI
Install the CLI from https://developer.salesforce.com/tools/sfdxcli.
SFDX Version
Execute any of below command to check the version of SFDX.
sfdx --version
or
sfdx -v
Update SFDX
Use the below command to update the SFDX.
sfdx update
2. Authentication Command
2.1. Log In to the Dev Hub
sfdx auth:web:login -d -a DevHub

or

sfdx force:auth:web:login --setalias DXDemo --instanceurl https://login.salesforce.com --setdefaultusername- -d: Set the authenticated org as the default dev hub org for scratch org creation.
- -a: Set an alias for the authenticated org.
2.2. Login to Sandbox
sfdx auth:web:login -r https://MyDomainName--SandboxName.my.salesforce.com -a FullSandbox2.3. List of all Authorize Org
sfdx auth:list
2.4. Log out from authorized orgs.
sfdx auth:logout -u [email protected]2.5. Authorize an org using the JWT flow.
sfdx auth:jwt:grant -u [email protected] -f <path to jwt key file> -i <OAuth client id>Learn more about JWT flow in Salesforce here.
3. Open org
Open existing authorized org.
sfdx force:org:open -u DevHub4. Create a Salesforce DX Project
4.1. Salesforce DX project
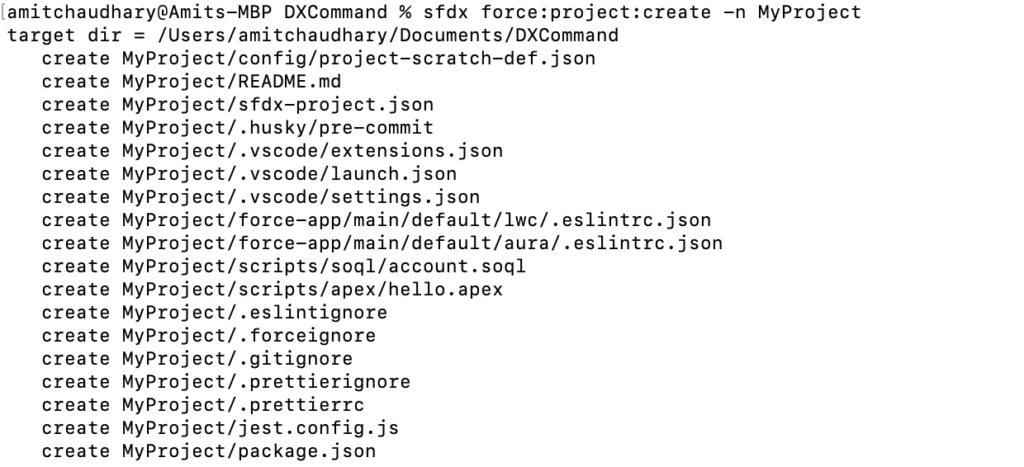
How to create a new local project using Salesforce DX.
sfdx force:project:create -n MyProject
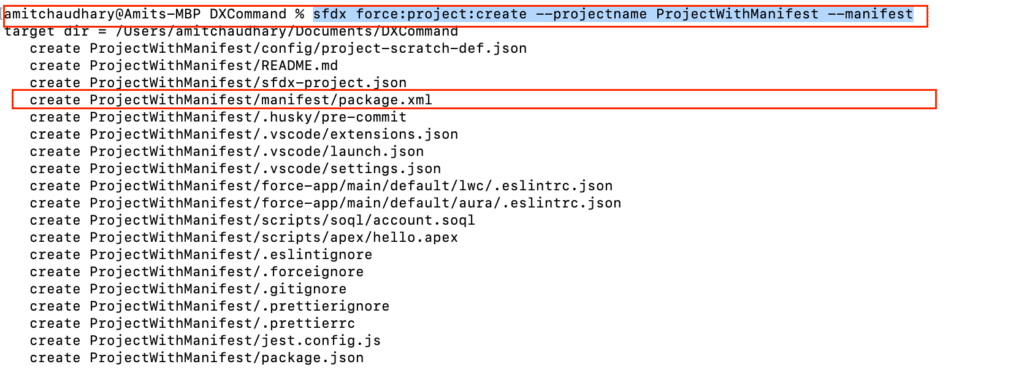
4.2. Salesforce DX project with manifest
sfdx force:project:create --projectname ProjectWithManifest --manifest
Now you can Authorize your Developer Hub Org using the below command ( Step: 2.1 )
sfdx force:auth:web:login --setalias MyOrg --instanceurl https://login.salesforce.com --setdefaultusername5. Retrieve Code in Local Project
Execute the below command to get the code in the local machine using the SFDX command.
sfdx force:source:retrieve --manifest manifest/package.xmlUse this command to retrieve the source (metadata that’s in source format) from an org. To retrieve metadata that’s in metadata format, use “sfdx force:mdapi:retrieve”.
6. Scratch Org
6.1 Create Scratch Org
To create a scratch org we need to specify in a configuration file (project-scratch-def.json). “project-scratch-def.json” file is created automatically when you create a project with manifest.
sfdx force:org:create --setdefaultusername -f config/project-scratch-def.json --setalias MyScratchOrg -v DevHubHere is sample “project-scratch-def.json”.
{
  "orgName": "ApexHOurs company",
  "edition": "Developer",
  "features": ["EnableSetPasswordInApi"],
  "settings": {
    "lightningExperienceSettings": {
      "enableS1DesktopEnabled": true
    },
    "mobileSettings": {
      "enableS1EncryptedStoragePref2": false
    }
  }
}

6.2. Open Scratch org
sfdx force:org:open -u DevHubMyScratchOrg6.3 Push Source Metadata to Scratch Org
Now we have our initial code in local folder. How to push code into scratch org?
sfdx force:source:push --targetusername MyScratchOrgsfdx-project.json which contains the path of the source code needed to be pushed.
{
  "packageDirectories": [
    {
      "path": "force-app",
      "default": true
    }
  ],
  "name": "ProjectWithManifest",
  "namespace": "",
  "sfdcLoginUrl": "https://login.salesforce.com",
  "sourceApiVersion": "55.0"
}
6.4 Pull metadata changes from Scratch Org
sfdx force:source:pull --targetusername MyScratchOrg
6.5. Password for Scratch org
sfdx force:user:password:generate -u MyScratchOrg7. Retrieve and Deploy code in Sandbox
We can use “force:source:pull” or “force:source:push” commands to Retrieve and Deploy code in scratch org or sandbox where source tracking is enabled. What about Sandbox or Production org?
7.1 Difference between SalesforceDX source code and Metadata
A Salesforce DX project has a specific project structure and source format. Source format uses a different set of files and file extensions from what you’re accustomed when using Metadata API.
- Object Model : custom objects and custom object translations in intuitive subdirectories. Source format makes it much easier to find what you want to change or update. And you can say goodbye to messy merges.Some parts of the custom objects are extracted into in these subdirectories:
- businessProcesses
- compactLayouts
- fields
- fieldSets
- listViews
- recordTypes
- sharingReasons
- validationRules
- webLinks
- Static Resources : Static Resources are uncompressed in DX so one can edit it
- Documents : Documents must be inside the directories of their parent document folder. The parent document folder must be in a directory called documents. Each document has a corresponding metadata XML file that you can view with an XML editor.
Check our old session on Salesforce DX for Non-Scratch Org to learn more.
7.2. Source Format
If you want to pull the content in source formate then use below command
Retrieve
$ sfdx force:source:retrieve -x path/to/package.xml
$ sfdx force:source:retrieve -m CustomObject,ApexClass
Deploy
$ sfdx force:source:deploy -x path/to/package.xml
$ sfdx force:source:deploy -m ApexClass:MyApexClass
7.3. Old mdAPI
If you want to pull the content in mdAPI then use the below command
Retrieve
sfdx force:mdapi:retrieve -r path/to/retrieve/dirDeploy
sfdx force:mdapi:deploy -d some/path -w 1000 -c --testlevel RunAllTestsInOrg8. Create a new Unlocked Package
The unlocked package is a good fit for internal business apps and allowed customers to do modular application development. An unlocked package is the right package type for enterprise customers, Unless they plan to distribute an app on AppExchange. They can use unlocked packages to organize their existing metadata, package an app, extend an app that they’ve purchased from AppExchange, or package new metadata.
8.1. Create Unlocked package
sfdx force:package:create --name <name> --description <description> --packagetype Unlocked --path force-app --nonamespace --targetdevhubusername <Devhubalias>8.2. Create a package version
sfdx force:package:version:create -p <packagename> -d force-app --wait 10 -v <Devhubalias>8.3. Publishing and Installing Unlocked packages
sfdx-project.json defines the Version Name and version number. Installing can be using the Subscriber Package Version Id. Installation can also be done via the Salesforce CLI.
sfdx force:package:install --wait 10 --publishwait 10 --package <packagename>@1.0.0-1 -r -u <alias>By Default a BETA package is generated . We can promote a package using below
sfdx force:package:version:promote -p <packagename>@1.0.0-1 -v <DevHubalias>Learn more here.
Summary
I hope this Salesforce DX Useful CLI Commands will help you in your day-to-day Salesforce Development work.


