Salesforce Industries CPQ is one of the best quoting tools for the telco and utilities industries. It leverages the Salesforce Customer 360 Platform and provides industry-specific functionality to support asset and order management. Let see How To Create An Attribute Assignment Rule In Industries CPQ.
This tutorial will cover how to create an advanced rule in Salesforce Industries CPQ which assigns an attribute picklist value based on a controlling attribute’s selected value located on the same product.
The components of this rule involve product relationships, entity filters, and Vlocity rules. We will use the product relationship to define the action parameters on the target product we want to constrain the attribute values.
Entity filters will be used to determine when the action parameters should be executed. Vlocity rules are used to associate the product relationships and entity filters so the rule can be executed the way it is intended.
How To Create An Attribute Assignment Rule In Industries CPQ
We will begin by defining the picklists and attributes we will need, then create a product to assign these newly created attributes. From there we will create the product relationships and entity filters.
Once those have been defined, we can create an advanced rule using these components. Finally, we will see what the functionality looks like in the cart.
Create Picklists
Picklist 1
We will first need to begin by creating 2 picklists which will be assigned to the 2 attributes needed for this solution. From the product console click the ‘+’ icon beside the Picklist name.

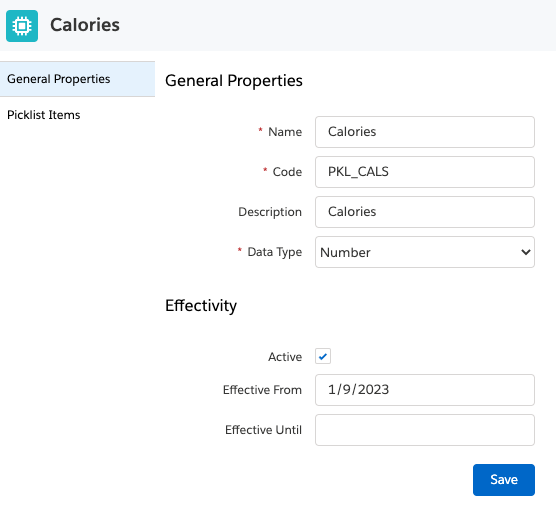
Configure the picklist as shown below.

Click “Save”.
Click “Picklist Items” on the left sidebar.
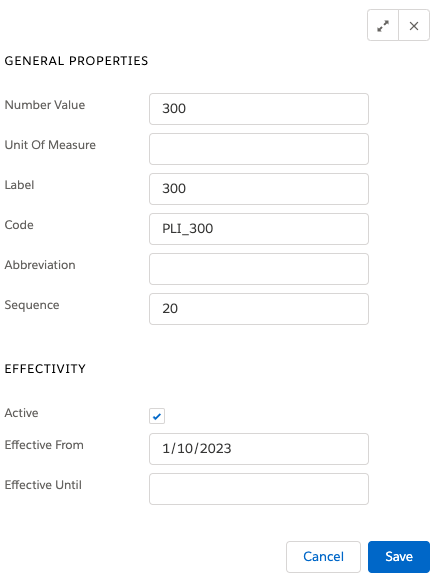
Add 3 values, as per the configurations below.
Picklist Value 1

Picklist Value 2

Picklist Value 3

Picklist 2
Configure the second picklist as shown below.
Click “Save”.
Click “Picklist Items” on the left sidebar.
Add 2 values, as per the configurations below.
Picklist Value 1

Picklist Value 2
Once the picklists and picklist values are configured, they should look the following:
Drink Picklist

Calories Picklist

Create Attributes
Once the picklists have been configured we can create the associated attributes.
Create Attribute Category
Click the app launcher and search “Vlocity Attribute Categories”
Click the “New” button at the top left of the screen.
Configure the attribute category as shown below.
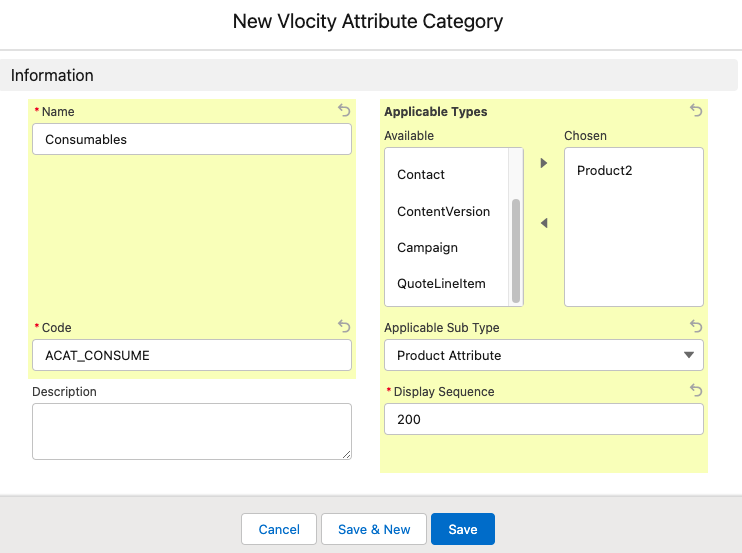
Click “Save”.
Create Attribute 1
From the product console click the ‘+’ icon beside the Attribute name.

Configure the first attribute as depicted below.

Create Attribute 2
Configure the first attribute as depicted below.

Create A New Object Type
From the Product Console, click the search icon next to “Object”.
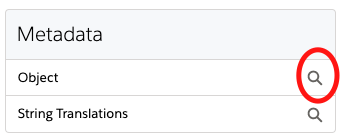
When the search bar appears, leave the text field blank and click the search icon again.
Select the Product2 Object from the list view.
Click the Object Types item from the facet.
Click the New Object Type Button.
Configure the New Object type as depicted below. Here I will choose the OOTB BASE Product Spec Type for the Parent Object Type.

Click “Save”.
Add Attributes To Product Spec
Click Your Desired Product Spec to open the configuration options.
Select the Attributes and Fields facet.
Click Assign Attributes/Fields.

Select the attributes you want to assign then click “Assign”.
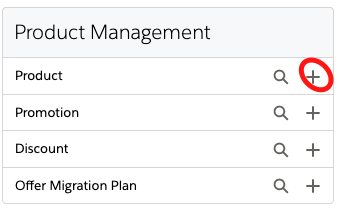
Create A Product
Click the ‘+’ icon next to the “Product” menu item.
Configure the new product’s details as depicted below.

Click “Save”.
Continue to add more product general property configurations as depicted below.

Click “Save”.
Product Pricing
Click the Pricing facet within the product configuration view.

Click “New”.
Configure the price as needed. As an example, see below for a sample configuration.

Product Attributes
Click the “Attributes and Fields” facet.
Select the Drink attribute created earlier and mark it as required.

Click “Save”.
Select the Calories attribute created earlier and mark it as Read Only.

Click “Save”.
Create Product Relationships
We will need to create 3 product relationships, each involving one product.
From the app launcher, search for “Product Rel”.
Select “Product Relationships”.

In the top right corner, click the “New” button.
Configure the first product relationship as depicted below.
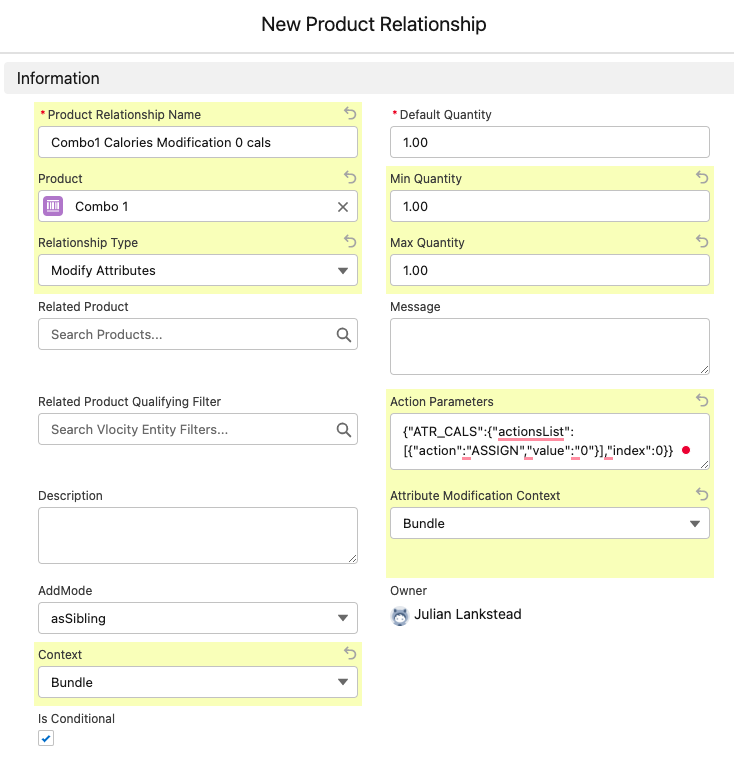
Click “Save & New”.
Configure the second product relationship as depicted below.

Click “Save”.
Create Entity Filters
We will now create the entity filters needed to identify what attribute value is assigned to ‘Drink’.
Open the App Launcher and search “enti”.
Click on the “Vlocity Entity Filters” item.

Evaluation Entity Filter 1
On the top right of the screen click “New”.
Configure the evaluation first entity filter as depicted in the image below.
Attribute Lookup Field Name = vlocity_cmt__JSONAttribute__c

Click ‘Save’.
Under Filter Conditions, click “Add”.
Configure the Filter Condition as shown below.
Select the ATR_DRINK attribute.

Click “Save”.
Qualification Entity Filter 1
Configure the first qualification entity filter as depicted in the image below.
Attribute Lookup Field Name = vlocity_cmt__JSONAttribute__c

Click “Save”.
Under Filter Conditions, click “Add”.

Configure the Filter Condition as shown below.
The type should be function, and the value should be the Drink Is Coke Evaluation filter.

Click “Save”.
Evaluation Entity Filter 2
Configure the third evaluation entity filter as depicted in the image below.
Attribute Lookup Field Name = vlocity_cmt__JSONAttribute__c

Click ‘Save’.
Under Filter Conditions, click ‘Add’.
Configure the Filter Condition as shown below.
Select the ATR_DRINK attribute.

Click “Save”.
Qualification Entity Filter 2
Configure the second qualification entity filter as depicted in the image below.
Attribute Lookup Field Name = vlocity_cmt__JSONAttribute__c

Click “Save”.
Under Filter Conditions, click “Add”.
Configure the Filter Condition as shown below.
The type should be function, and the value should be the Drink Is Water Evaluation filter.
Evaluation Entity Filter 3
Configure the third evaluation entity filter as depicted in the image below.
Attribute Lookup Field Name = vlocity_cmt__JSONAttribute__c

Click “Save”.
Under Filter Conditions, click ‘Add’.
Configure the Filter Condition as shown below.
Select the ATR_DRINK attribute.
Click ‘Save’.
Qualification Entity Filter 3
Configure the third qualification entity filter as depicted in the image below.
Attribute Lookup Field Name = vlocity_cmt__JSONAttribute__c

Click “Save”.
Under Filter Conditions, click “Add”.
Configure the Filter Condition as shown below.
The type should be function, and the value should be the Drink Is Diet Coke Evaluation filter.

Create Vlocity Rule
We will now create the vlocity rule needed to execute the product relationship action parameters when the entity filter conditions are met.
Open the App Launcher and search “vlocity rules”.
Click on the ‘Vlocity Rules’ item.

On the top right of the screen click “New”.
Configure the filter condition as shown below using the qualification entity filters and product relationships created in previous steps.

Click “Save”.
Results
Before testing the new auto attribute assignment functionality, ensure you run the following jobs:
From the Vlocity CMT Administration Tab:
- Clear Managed Platform Cache
- Refresh Platform Cache
From an execute anonymous window:
Map<Id,Product2> products = new Map<Id,Product2>([SELECT Id FROM Product2]);
List<Id> productIds = new List<Id>(products.keySet());
Database.executeBatch(new vlocity_cmt.EPCProductAttribJSONBatchJob (productIds), 1);
Create an order and add the “Combo 1” product to the cart.
Click the configure menu item from the dropdown menu.
You will initially see the Drink attribute not selected and the Calories attribute not selected.

When the Coke attribute value is selected, the Calories attribute is auto-populated to 300.

When the Water attribute value is selected, the Calories attribute is auto-populated to 0.

When the Diet Coke attribute value is selected, the Calories remain at 0.

Final Thoughts
In this tutorial, we covered how to create an advanced rule to automatically assign an attribute value based on another attribute’s configuration. I hope this helped you to How To Create An Attribute Assignment Rule In Industries CPQ.
To do this we created a product relationship defining the action parameters, entity filters to identify which value was selected from the controlling attribute, and a vlocity rule to execute the action parameters when entity filter conditions were met.
Advanced rules can be a very useful tool for configuring logic in the product catalog without the use of APEX code. This promotes less maintenance and a lower barrier to entry for product administrators without APEX development experience.