

Join us to learn about Salesforce Library Migration process. We will learn about Content management in Salesforce and discuss the steps for migrating the library contents of one Salesforce Org to another.
What are Salesforce Libraries?
In Salesforce, a library is defined as a repository or workspace to store files relevant to a project organized in customized folder structure. Through this blog, I will share simple steps following which you can migrate an entire Library from an org (henceforth referred to as the “Source Org”) and save it to another org (referred to as the “Target Org”), while preserving the version history, folder associations, and user permissions.
It was a challenging task for me to migrate Salesforce libraries from multiple legacy Salesforce instances to a new unified Salesforce instance. Neither could I find a comprehensive reference depicting the end-to-end process of library migration nor any utility to automate the said process.
The intended audience for this blog should have basic knowledge on Salesforce Data Architecture and SOQL (Salesforce Object Query Language).
Libraries, also known as Content Libraries are used to organize files with versioning within Salesforce. The users can store all types of text and binary files in a library, maintain multiple versions, and organize files within folders and subfolders. Within the Salesforce data model, libraries are referred to as Workspaces.
Content management in Salesforce
Salesforce provides its own flavour of a Content Management System (CMS). This capability is known as Salesforce CRM Content. Salesforce CRM Content is a feature within Salesforce that allows you to manage and share documents, files, and content with your team and customers. It helps you organize and collaborate on content related to your sales and marketing efforts. Here’s a diagrammatic description of how Salesforce CRM Content works:
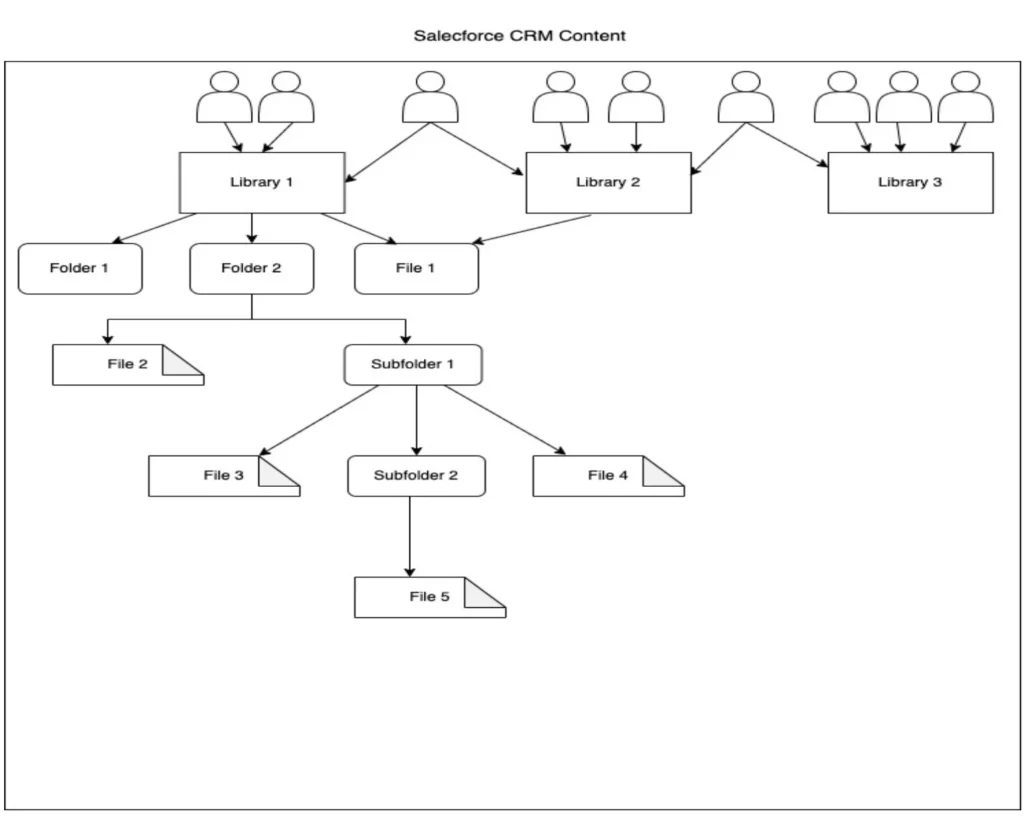
- One library can be shared among multiple users and one user can have access to multiple libraries. One file can be shared across multiple libraries.Within a library, there can be multiple nested folders.
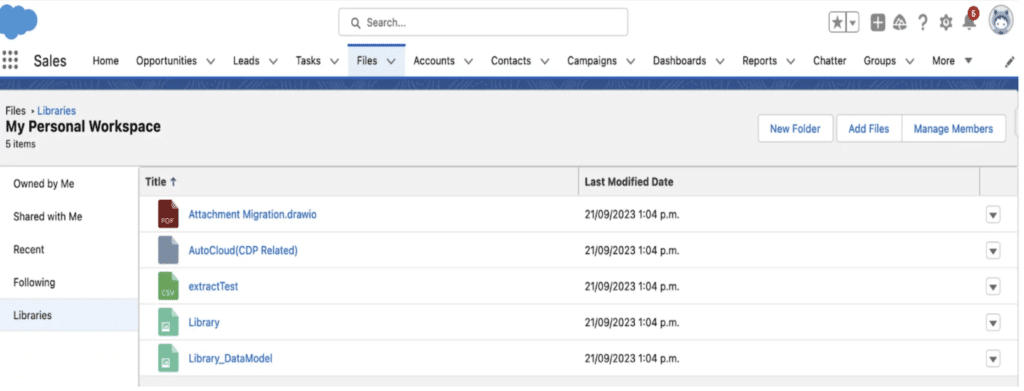
How to access Salesforce Content Libraries
- From the App Launcher in your Salesforce Org, open Sales app. Click File Tab, Select Libraries from the menu in left side of the web page
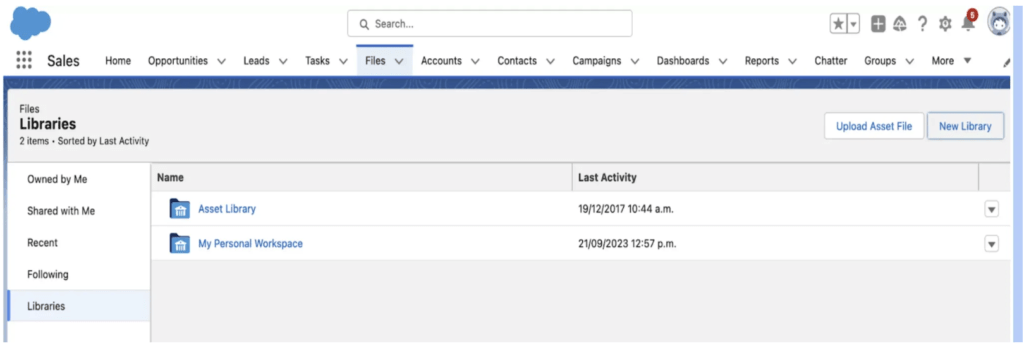
Find your library from the list of libraries and double click on the name to see its contents.
Library Data Model
Before we discuss the steps of Library migration, it is important to understand how the Content Libraries are modelled in Salesforce.
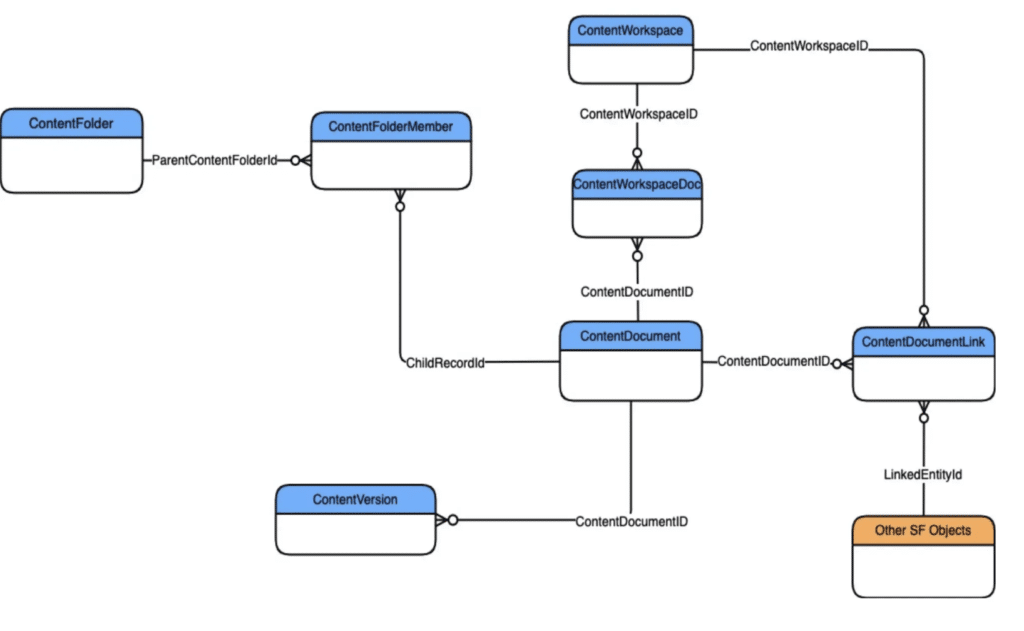
ContentDocument
Represents a document in a Content Library or Salesforce Files.
ContentVersion
Represents a specific version of a document in Salesforce CRM Content or Salesforce Files.
ContentWorkspace
Represents a content library.
ContentWorkspaceDoc
Represents a link between a document and a Content Library.
ContentDocumentLink
Represents a link between a Salesforce CRM Content document, Salesforce File, or ContentNote and where it’s shared. A file can be shared with users, groups, records, and Salesforce CRM Content libraries.
ContentFolder
Represents a folder in a content library for adding files.
ContentFolderMember
Defines the association between a file and a folder in a Content Library.
Migrating Contents of a Library
Migrating contents of a library is a multi-step process and it involves exporting the content files and metadata from a source Salesforce Org and transforming the metadata before importing the files to a target Salesforce Org. The process outlined uses Salesforce utilities like Data Export Service and Data Loader.
Step 1: Download binary files from source Salesforce org
Step 1.1
Use the Data Export feature in Salesforce to export binary files.
Follow these steps
- From Setup, enter Data Export in the Quick Find box, then select Data Export and Export Now or Schedule Export.
- The Export Now option prepares your files for export immediately. This option is only available if enough time has passed since your last export.
- The Schedule Export option allows you to schedule the export process for weekly or monthly intervals.
- Check the box ‘Include Salesforce Files and Salesforce CRM Content document version’.
- Select “ContentVersion” object from the list of objects

Step 1.2
- This creates one or more zip files. When you extract them, look out for the following:
- ContentVersion folder (contains the Files so there may be more than one folder)
- ContentVersion.csv (contains the ID of each File)
- Extract the ContentVersion folder(s) into a single ContentVersion folder on your local drive.
Note: Appexchange apps like FileExporter may be considered for exporting the binary library files.
Step 2: Configure the Library in the target Salesforce Org
- From the My Libraries section of the Libraries tab home page, click New.
- Enter a unique library name and a description; it is a best practice to describe your metadata in SF. Even though optional, ensure you provide a good description of what your library is meant to contain, for which roles it will most likely be used, and in what context (e.g., SF objects) the Library’s content will be used.
- Click Save and Add Members.
- On the Libraries tab, click the library name if the library isn’t already open.
- In the Members section, click Add Members.
- If the member you want to add isn’t listed, type their first name in the search box and click Find.
- Select members from the Available Members box. Members can include individual Salesforce CRM Content users or public groups.
- To add the members to the library, click Add.
- Click Next.
- Select a library permission for each user or public group and click Save.
For more details, refer to the help article.
Step 3: Migrate Content Version data
In this step, you will migrate all the versions of the library files. You can achieve this in two simple passes.
Reference SOQL:
SELECT Id, Title, Description, ReasonForChange, VersionNumber, RecordTypeId,  OwnerId, ContentDocumentId,FileExtension <Custom fields>
FROM ContentVersion
WHERE ContentDocumentId in (
	SELECT ContentDocumentId
	FROM ContentWorkspaceDoc
	WHERE contentworkspace.name = <library name>)
Prerequisite:
The ID field in the output dataset of the SOQL will match with the extracted binary file names. Rename all the binary files by adding the extensions from the FileExtension field.
For example, if, in a record,
ID= 0685e000004YaZIZA0 and FileExtension=docx
Rename the file from 0685e000004YaZIZA0 to 0685e000004YaZIZA0.docx
Pass 1:
You will migrate the first version of all the content documents in the library.
- Using the reference SOQL above, export records from object ContentVersion in the source Salesforce Org to a csv file and apply a transformation as follows:
| Source Object | Source Filter | Field Name | Transformation Logic | Target Object | Field Name |
| ContentVersion | Version Number = ‘1 ‘ | Title | Direct Map | ContentVersion | Title |
| ContentVersion | Description | Direct Map | ContentVersion | Description | |
| ContentVersion | ReasonForChange | Direct Map | ContentVersion | ReasonForChange | |
| ContentVersion | Complete path to the file you’re uploading from your local machine or drive | ContentVersion | VersionData | ||
| ContentVersion | Complete path to the file you’re uploading from your local machine or drive. | ContentVersion | PathOnClient | ||
| ContentVersion | OwnerID | Map the ID of the equivalent User record in the target Salesforce Org | ContentVersion | OwnerID | |
| ContentVersion | RecordTypeId | Find the matching Record Type in target Salesforce Org by Name with RecordType.name sObjectType with ‘ContentVersion’ Return ID | ContentVersion | RecordTypeId | |
| ContentVersion | N/A | Find the record ID of the ContentWorkspace in target Salesforce Org by matching Name | ContentVersion | FirstPublishLocationID | |
| ContentVersion | ContentDocumentId | Direct Map | ContentVersion | <Custom ExternalID field> |
- Add Custom fields, if needed.
- Launch and Configure Data Loader to use a ‘Batch Size’ of 1.
- Select Insert and select ’Show all Salesforce objects’.
- Select ContentVersion.
- Browse to your CSV file.
- Click Create or Edit a Map, then select Auto-Match fields to columns.
- Click OK -> Next -> Finish.
Note: When you upload a record in ContentVersion object, a record gets created automatically in each of the following objects – ContentDocument, ContentDocumentLink and ContentWorkspaceDoc.
Pass 2:
The second pass will migrate all the higher versions of all files in the library. This pass will lookup from the ContentVersion object in the target Salesforce Org to retrieve the ContentDocument reference.
- Using the reference SOQL, export records from object ContentVersion from source org to a csv file and apply the transformation as follows.
| Source Object | Source Filter | Sort Criteria | Field Name | Transformation Logic | Target Object | Field Name |
| ContentVersion | Version Number > ‘1 ‘ | Ascending:ContentDocumentID VersionNumber | Title | Direct Map | ContentVersion | Title |
| ContentVersion | Description | Direct Map | ContentVersion | Description | ||
| ContentVersion | ReasonForChange | Direct Map | ContentVersion | ReasonForChange | ||
| ContentVersion | Complete path to the file you’re uploading from your local machine or drive. | ContentVersion | VersionData | |||
| ContentVersion | Complete path to the file you’re uploading from your local machine or drive. | ContentVersion | PathOnClient | |||
| ContentVersion | OwnerID | Map the ID of The equivalent User record in target Salesforce Org | ContentVersion | OwnerID | ||
| ContentVersion | RecordTypeId | Find the matching Record Type in target Salesforce Org by Name with RecordType.name sObjectType with ‘ContentVersion’ Return ID | ContentVersion | RecordTypeId | ||
| ContentVersion | ContentDocumentId | Lookup ContentVersion (Target Salesforce Org) Match <External ID> with ContentDocumentID VersionNumber with “1” Return ContentDocumentID | ContentVersion | ContentDocumentId |
- Add Custom fields, if needed.
- Launch and Configure Data Loader to use a ‘Batch Size’ of 1.
- Select Insert and select ’Show all Salesforce objects’.
- Select ContentVersion.
- Browse to your CSV file.
- Click Create or Edit a Map, then select Auto-Match fields to columns.
- Click OK -> Next -> Finish.
Note: After this pass, the library contents will show all the content files under the root and no folders or subfolders will be available.
Step 4: Migrate ContentDocumentLink object
The content documents can be associated with the libraries or other object types as explained before. The association with the library being migrated is created automatically
when you created the Content Versions. In this step you will take care of the associations with other libraries and other object types.
Reference SOQL 1 (Main SOQL):
SELECT Id, LinkedEntityId, ContentDocumentId, IsDeleted, ShareType, Visibility
FROM ContentDocumentLink
WHERE ContentDocumentid in <List of unique Ids from the Reference SOQL 2>

Reference SOQL 2:
SELECT ContentDocumentId
FROM ContentDocumentLink
WHERE LinkedEntityId IN (
	SELECT id
	FROM contentworkspace
	WHERE name = <Library Name>)
- Export fields from object ContentDocumentLink from source Salesforce Org to a csv file and apply the following transformations:
| Source Object | Field Name | Transformation Logic | Target Object | Field Name | Target Filter |
| ContentDocumentLink | Visibility | Direct Map | ContentDocumentLink | Visibility | LinkedEntityID != NULL |
| ContentDocumentLink | ShareType | Direct Map | ContentDocumentLink | ShareType | |
| ContentDocumentLink | ContentDocumentID | Lookup ContentVersion object of target Salesforce Org Match <External ID> with ContentDocumentID Return ContentDocumentID | ContentDocumentLink | ContentDocumentID | |
| ContentDocumentLink | LinkedEntityId | 1. If First 3 characters of LinkedEntityId is ‘058’ Then find the name of the ContentWorkspace in the source org. Else go to step 3. 2. If the name reveals its a different library then Lookup on ContentWorkspace of target Salesforce Org, match Name Return Record ID. Go to Step 5 3. Lookup the table provided in the URL – http://www.fishofprey.com/2011/09/obscure-salesforce-object-key-prefixes.html?m=1 For the Objects in scope, match Key Prefix with first 3 characters of LinkedEntityId return Object Type (Account, User etc) 4.Find the matching Record ID in target Salesforce Org. 5. Map the Record ID to LinkedEntityId | ContentDocumentLink | LinkedEntityId |
- Open Data Loader and click Insert.
- Select the Show all Salesforce objects box.
- Select ContentDocumentLink.
- Browse to your CSV file.
- Click Create or Edit a Map then select Auto-Match fields to columns.
- Click OK -> Next -> Finish.
Step 5: Migrate ContentFolder and ContentFolderMember
Now that we have migrated all the library files with their version history the next thing to do is to migrate the folder structure and link the folder association so that it is in sync with the source Salesforce Org.
You can achieve this in three simple passes.
Pass 1:
In this pass, we will migrate all the content folders (and subfolders too) that belong to the library.
Reference SOQL’s:
Run the following three SOQL’s in source org to prepare the source data
SOQL #1:
SELECT id
FROM ContentWorkspace
WHERE name = <Library Name>   => WID
SOQL #2:
SELECT id
FROM ContentFolder
WHERE name = WID => List of top level Folder IDs (TF)
SOQL #3 (Final):
SELECT name, ParentContentFolderid, parentContentFolder.ParentContentFolderid,
ParentContentFolder.ParentContentFolder.ParentContentFolderid
FROM ContentFolder
WHERE ParentContentFolderid in ('<TF>') OR ParentContentFolder.ParentContentFolderid in ('<TF>') OR ParentContentFolder.ParentContentFolder.ParentContentFolderid in ('<TF>')Note: We are assuming that the maximum depth of folder structure is three. Customize SOQL #3 if the depth is more by specifying ore ParentContentFolder references.
- Using the reference SOQLs, export records from object ContentFolder from the source Salesforce Org to a csv file and apply the following transformations:
| Source Object | Field Name | Transformation Logic | Target Object | Field Name | Target Filter |
| ContentFolder | Name | Direct Map | ContentFolder | Name | None |
| ContentFolder | N/A | 1. Lookup on ContentWorkspace in the target Salesforce Org and match the Name with the Library Name; Return ID (WID) 2. Lookup ContentFolder in the target Salesforce Org, match the Name with WID; Return ID and map | ContentFolder | ParentContentFolderid |
- Open Data Loader and click Insert.
- Select the Show all Salesforce objects check box.
- Select ContentFolder.
- Browse to your CSV file.
- Click Create or Edit a Map, then select Auto-Match fields to columns.
- Click OK -> Next -> Finish.
Note: After this pass, the library contents will show all the content files under the root. All folders and (subfolders too) will be visible all under root level.
Pass 2
In this pass, we will link the library files to their parent folders.
Reference SOQL:
SELECT id, ParentContentFolderId, ParentContentFolder.Name, ChildRecordId, ChildRecord.Title
FROM ContentFolderMember
WHERE ChildRecordId in (
      SELECT contentDocumentId
      FROM ContentWorkspaceDoc
      WHERE contentworkspace.name = <Library name>
      )
- Using the reference SOQLs, export records from object ContentFolderMember in the source Salesforce org to a csv file and apply the following transformations:
| Source Object | Field Name | Transformation Logic | Target field | Target Object | Field Name | Load Type |
| ContentFolderMember | ChildRecordId | Lookup the ContentVersion object in target Salesforce Org; Match SRCID__c with ChildRecordId And VersionNumber with “1”; Return ContentDocumentId (CDID) Lookup the ContentfolderMember object in target Salesforce Org; Match ChildRecordid with CDID; Return ID | ID | ContentFolderMember | ID | UPDATE |
| ContentFolderMember | ParentContentFolder.Name ChildRecordId | Lookup the ContentWorkspace object in target Salesforce Org; Match Name with <Library Name>; Return ID (WID) Lookup on ContentFolder object in target Salesforce Org; Match Name with WID Return ID (FID) lookup on ContentFolder object again; Match Name with ParentContentFolder.Name and ParentContentFolderId with FID; Return ID and Map | ParentContentFolderId | ContentFolderMember | ParentContentFolderId |
- Launch and Configure Data Loader to use a ‘Batch Size’ of 1.
- Select Update and select ’Show all Salesforce objects’.
- Select ContenFolderMember.
- Browse to your CSV file.
- Click Create or Edit a Map, then select Auto-Match fields to columns.
- Click OK -> Next -> Finish.
Note: After this pass, the library contents will show all the content files under their parent folder but folders and (subfolders too) will still be visible all under root level.
Pass 3:
In this final pass, you are going to re-align the subfolders and make the folder structure exactly same as source Salesforce Org
Reference SOQL’s:
Run the following three SOQL’s in source org to prepare the source data
SOQL #1:
SELECT id from ContentWorkspace
WHERE name = <Library Name>   => WID
SOQL #2:
SELECT id from ContentFolder
WHERE name = WID => List of top level Folder IDs (TF)
SOQL #3 (Final):
SELECT name,ParentContentFolderid,parentContentFolder.ParentContentFolderid,
ParentContentFolder.ParentContentFolder.ParentContentFolderid
FROM ContentFolder
WHERE ParentContentFolder.ParentContentFolderid in ('<TF>')  or ParentContentFolder.ParentContentFolder.ParentContentFolderid in ('<TF>')
Note: Assume that the maximum depth of folder structure is three. Customize SOQL #3 if the depth is more. SOQL #3 selects the folders in level 2 and level 3.
Level 1 folders are already aligned.
- Using the reference SOQLs, export records from object ContentFolderin the source Salesforce org to a csv file and apply the following transformations:
| Source Object | Field Name | Transformation Logic | Target Object | Field Name | Load Type |
| ContentFolder | Name | lookup the ContentWorkspace (Target Org); Match Name with Library Name Return ID Lookup the ContentFolder(Target Org); Match Name with ID Return ID (TFID) Lookup the ContentFolder (Target Org); Match Name with Name and ParentContentFolderID with TFID; Return ID and Map | ContentFolder | ID | UPDATE |
| ContentFolder | ParentContentFolder.Name Name | lookup the ContentWorkspace (Target Org); Match Name with Library Name Return ID Lookup the ContentFolder(Target Org); Match Name with ID Return ID (TFID) Lookup the ContentFolder(Target Org); Match Name with ParentContentFolder.Name and ParentContentFolderID with PID; Return ID | ContentFolder | ParentContentFolderID |
- Open Data Loader and click Update.
- Select the Show all Salesforce objects check box.
- Select ContentFolder.
- Browse to your CSV file.
- Click Create or Edit a Map, then select Auto-Match fields to columns.
- Click OK -> Next -> Finish.
Note: The ContentDocumentLink will share the documents to the workspace and automatically create ContentFolderMember records. To push those records into a sub-folder within the workspace,
you have to query and update those existing records. Creating new ContentFolderMember records will result in a duplicate error.
Note: After this final pass, the library contents will show all the content files under their parent folder and folders and (subfolders too) will be aligned too
Conclusion and Acknowledgement
Library migration is a complex activity that needs a lot of close attention to small details. It is a multi step process and each step should follow thorough validation. One can migrate all or selected libraries from one Salesforce Org to a new Salesforce Org by following the steps documented in this Blog.
My sincere thank you to my mentor Brian Waterworth for his tips and guidance while I was writing this article.


Nice Article