
This blog is focused on Apex Integration, specifically on how to make rest callouts using Apex. This following blog extends that by teaching you how to develop your own REST endpoint, a Node.js and express server, and how to deploy it on Heroku so as to test it in real time using your own Salesforce Org. Even though, the server’s code is a pretty basic piece of code that’s available on a wide array of resources online, the following blog aims to compile the whole process of how to develop, deploy and integrate it with your salesforce org. Lets learn about Integrate Salesforce with Node.js endpoint.
Once a developer understands the fundamental concepts laid down in this blog post, they will be able to easily extend their learning and incorporate all of it in their own applications, right off the bat, a very simple example would be, in an LWC Datatable, there might exist an action button for each row, clicking on that button would send that particular row’s record to a preconfigured rest endpoint for further processing.
PREREQUISITES
- Read up on Http requests and methods.
- Download the latest node.js from http://nodejs.org/
- HEROKU CLI
- If you don’t have an account, head over to signup.heroku.com and create one.
- Once you have an account, the next thing to do is install Heroku’s CLI tools, which are used for deployment.
- Heroku provides installation instructions at The Dev Center.
- Download Git for Windows:
- Browse to the official Git website
- Click the download link for Windows and allow the download to complete. Extract and Launch Git Installer
- Browse to the download location (or use the download shortcut in your browser). Double-click the file to extract and launch the installer.
- Follow The steps and install it
YOU SHOULD BE LOGGED IN HEROKU CLI AND GIT CLI BEFORE YOU FOLLOW THE STEPS GIVEN BELOW
It’s recommended that you should know how to push a repository on GitHub and commit changes to it. If you face any errors during this blog refer to Stack overflow or Google the.
Create Node.js Endpoint URL
- Create a new folder in your pc, name it as endpoint or give it any name that you want.
- Open the folder in VS code.
- Create a new file and name it index.js. Leave it empty for now.
- Open a terminal window in the vs code project, type in this command, press enter for default values:
- >npm init
- Next, install the necessary dependency packages, type in these commands:
- >npm install –save express
- >npm install –save body-parser
- We need to add this code to our index.js file.
const express = require('express');
const app = express();
const bodyParser= require('body-parser');
const PORT = process.env.PORT || 3000 ;
app.use(bodyParser.urlencoded({ extended: false }));
app.use(bodyParser.json());
app.get('/', (req, res) => {
    const str="I AM AN ENDPOINT FOR YOUR SALESFORCE APPLICATION";
    res.send(str);
});
app.listen(PORT, () => {
    console.log(`Listening on ${ PORT }`);
});- Open the terminal and run the file using the command, this will start your server and it will listen on port 3000:
- >node index.js
- Open localhost:3000 on your browser to access your newly created server.
- In vs code terminal, use ‘CTRL+C’ to stop the server
- Let’s add a post request to this server, just above app.listen() (Line 14), add the following code:
app.post('/', (req, res) => {

    console.log(req.body);
    const data=req.body;
    if(JSON.stringify(data) != '{}'){
        res.send(data);
        //echoing the request data back as response
    }
    else{
        res.send('No data Received');
    }
});- Run the server again (node index.js) to check for errors.
- Let’s get started on deploying this on Heroku, assuming you have an account on Heroku and you’ve installed and logged in Heroku cli, if not please refer to the prerequisites of this blog.
- CREATE A NEW FILE CALLED ” Procfile ” in your project.
- IT’S CONTENTS, just one line-
- web: node index.js
Procfile placed in the root of your application that lists the process types in an application.
Deploy changes
- Git needs to be initialized for your repo, run this command:
- >git init
Add a. gitignore file because we don’t want the node_modules directory to be committed. It should be generated by npm upon deployment rather than committed to source control. In your .gitignore file, simply add: node_modules
- Next steps, commands:
NOTE: If these don’t work, please type them instead of copying and pasting them. Errors might occur on copying pasting. error like-error: pathspec ‘commit” did not match any file(s) known to git.
>git add .
>git commit -m “Initial Commit”
- Run the Heroku commands for deploying your node server on Heroku:
NOTE: Choose an app name for your Heroku deployment and add it to your Heroku create command, you can just use ‘Heroku create’ and it will assign any available name to your app.
>heroku create <appname>
>git push heroku master
>heroku open
- We will use the Heroku URL of the newly created node app as a remote site, and add it to our Salesforce org
- Open your salesforce org, From Setup, enter Remote Site Settings in the Quick Find box, then click Remote Site Settings.
- Click New Remote Site.
- For the remote site name, enter “ HerokuEndpoint ”, for the remote site URL, enter your Heroku app URL. This URL authorizes requests made to the endpoint,
- Click Save.
Test You Node.js Endpoint in Apex
- In your SALESFORCE ORG, Open Dev console, execute
- anonymous window, add the following code:
//GET REQUEST TO HEROKU ENDPOINT
//USE YOUR ENDPOINT INSTEAD OF MINE.
//DON'T FORGET TO REPLACE IT IN YOUR OWN CODE.
Http http = new Http();
HttpRequest request = new HttpRequest();
request.setEndpoint('https://endazaroth.herokuapp.com/');
request.setMethod('GET');
HttpResponse response = http.send(request);
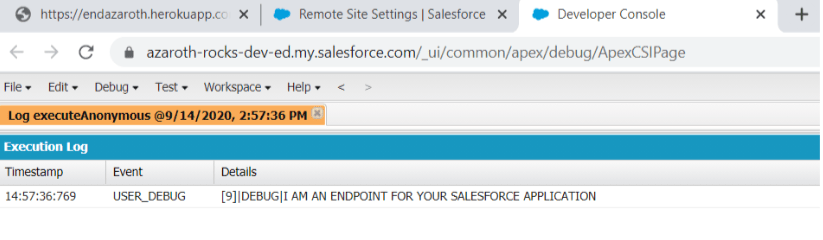
System.debug(response.getBody());You will something like this:- (This means you have successfully hit your own rest endpoint with a GET request).
Let’s try to send a POST request, open another anonymous window and paste the code below:
//POST REQUEST TO HEROKU ENDPOINT
//USE YOUR ENDPOINT INSTEAD OF MINE.
//DON'T FORGET TO REPLACE IT IN YOUR OWN CODE.
Http http = new Http();
HttpRequest request = new HttpRequest();
request.setEndpoint('https://endazaroth.herokuapp.com/');
request.setMethod('POST');
request.setHeader('Content-Type', 'application/json;charset=UTF-8');
// Set the body as a JSON object
request.setBody('{"name":"FirstName LastName"}');
HttpResponse response = http.send(request);
System.debug(response.getStatusCode() + ' ' + response.getStatus());
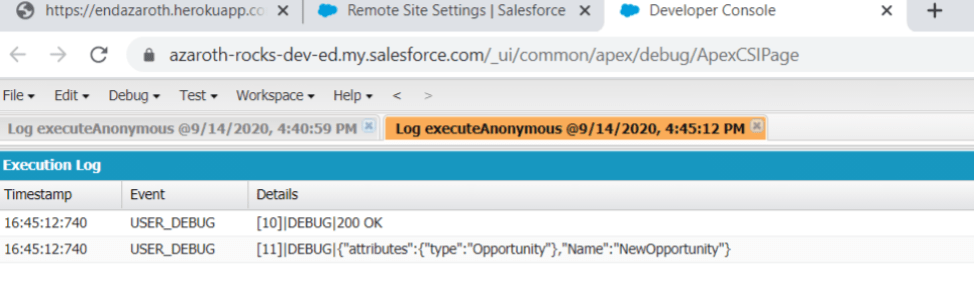
System.debug(response.getBody());Let’s try hitting the server with a POST REQUEST again but this time our request body will contain a SObject record, refer to this code:-
//POST REQUEST TO HEROKU ENDPOINT
//USE  YOUR ENDPOINT INSTEAD OF MINE.
//DON'T FORGET TO REPLACE IT IN YOUR OWN CODE.
Http http = new Http();
HttpRequest request = new HttpRequest();
request.setEndpoint('https://endazaroth.herokuapp.com/');
request.setMethod('POST');
request.setHeader('Content-Type', 'application/json;charset=UTF-8');
// Set the body as a JSON object
Opportunity op=new Opportunity(Name='NewOpportunity');
request.setBody(JSON.serialize(op));
HttpResponse response = http.send(request);
System.debug(response.getStatusCode() + ' ' + response.getStatus());
System.debug(response.getBody());
The output should be something like this:-


Hello,
In the above example, I had a quick question do we need to have any authentication needed to be added for the endpoint or there will no security concerns if anyone try to access the URL.
Thanks