
In this post, we will learn about what email-to-case is, how to setup email-to-case in Salesforce, On Demand email to case and the limitations of email to case in Salesforce.
What is Email-to-Case?
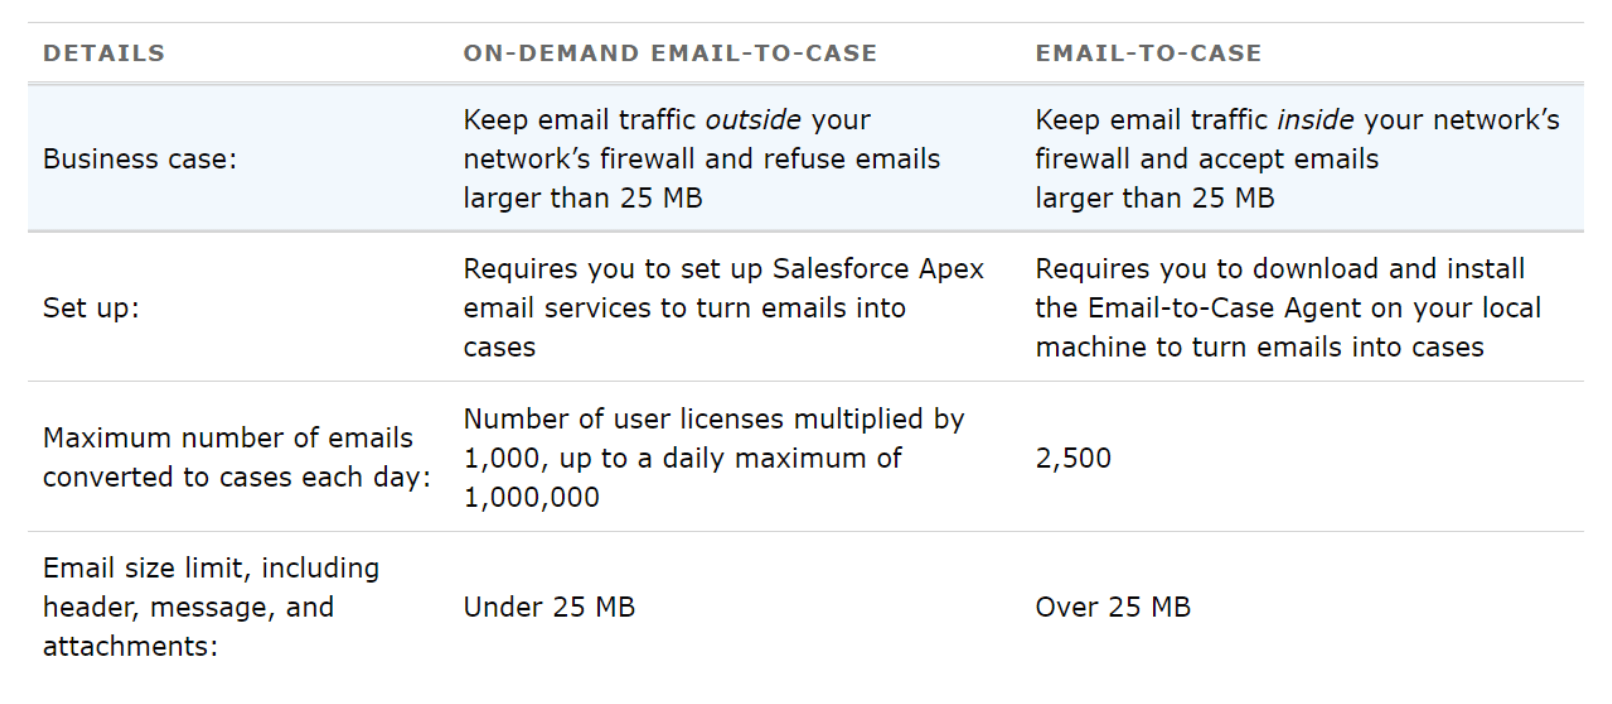
Email-to-Case enables us to automatically create cases and auto-populate case fields when customers send messages to the email addresses you specify. Email-to-Case on-demand service keeps email traffic outside your network’s firewall and refuses emails larger than 25 MB.
Key features and benefits for Email-To-Case
- Customer responses regarding a case are automatically associated with the original case, including any attachments the customer sends.
- Case reporting measures both inbound and outbound emails by case to see how many emails are exchanged before an issue is resolved.
- Routing addresses allow you to create multiple email addresses from which the contents of customer emails can be converted to case fields.
- Assignment Rules, Escalation Rules, Workflow Rules, and Auto-Response Rules all work seamlessly with Email-to-Case.
Setup Email to Case in Salesforce
Let’s see a Step by Step process for setting up Email-To-Case in Salesforce.
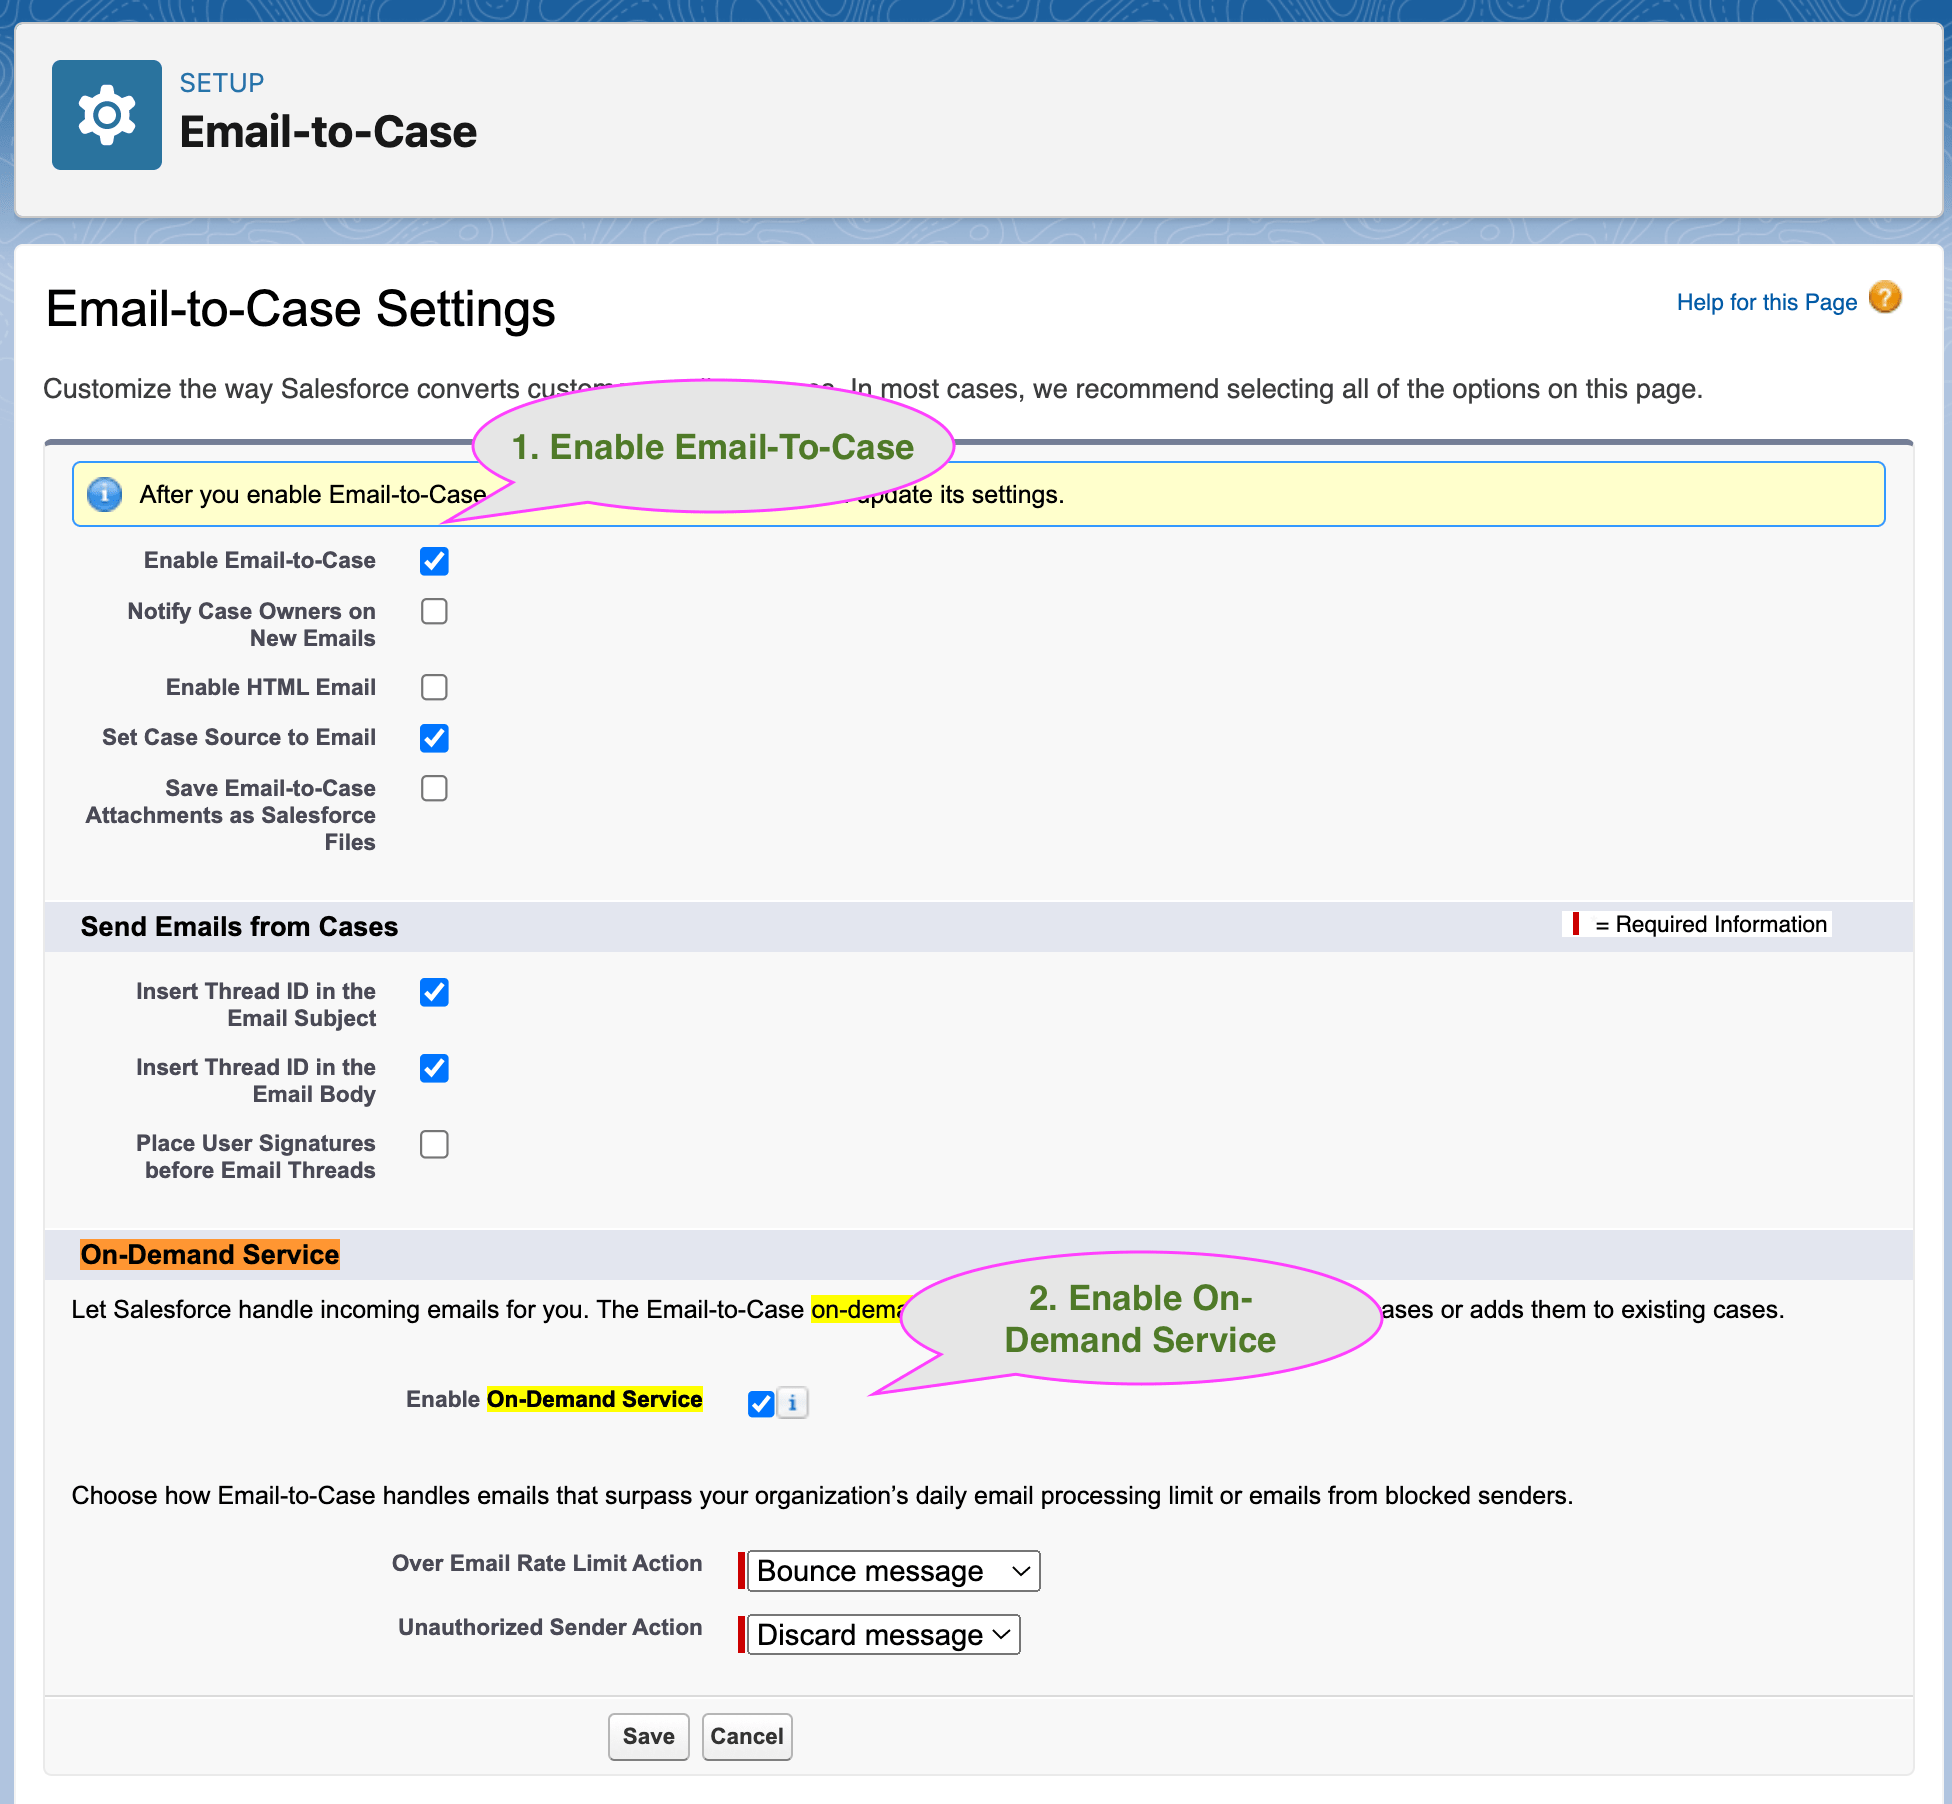
1. Enable on Email-to-Case
The first step to configuring email-to-case is to enable it. Follow the steps below to enable the email-to-case in Salesforce.
- Click on Setup and then enter Email-To-Case in Quick find.
- Then, select Email-to-Case and click on the edit button.
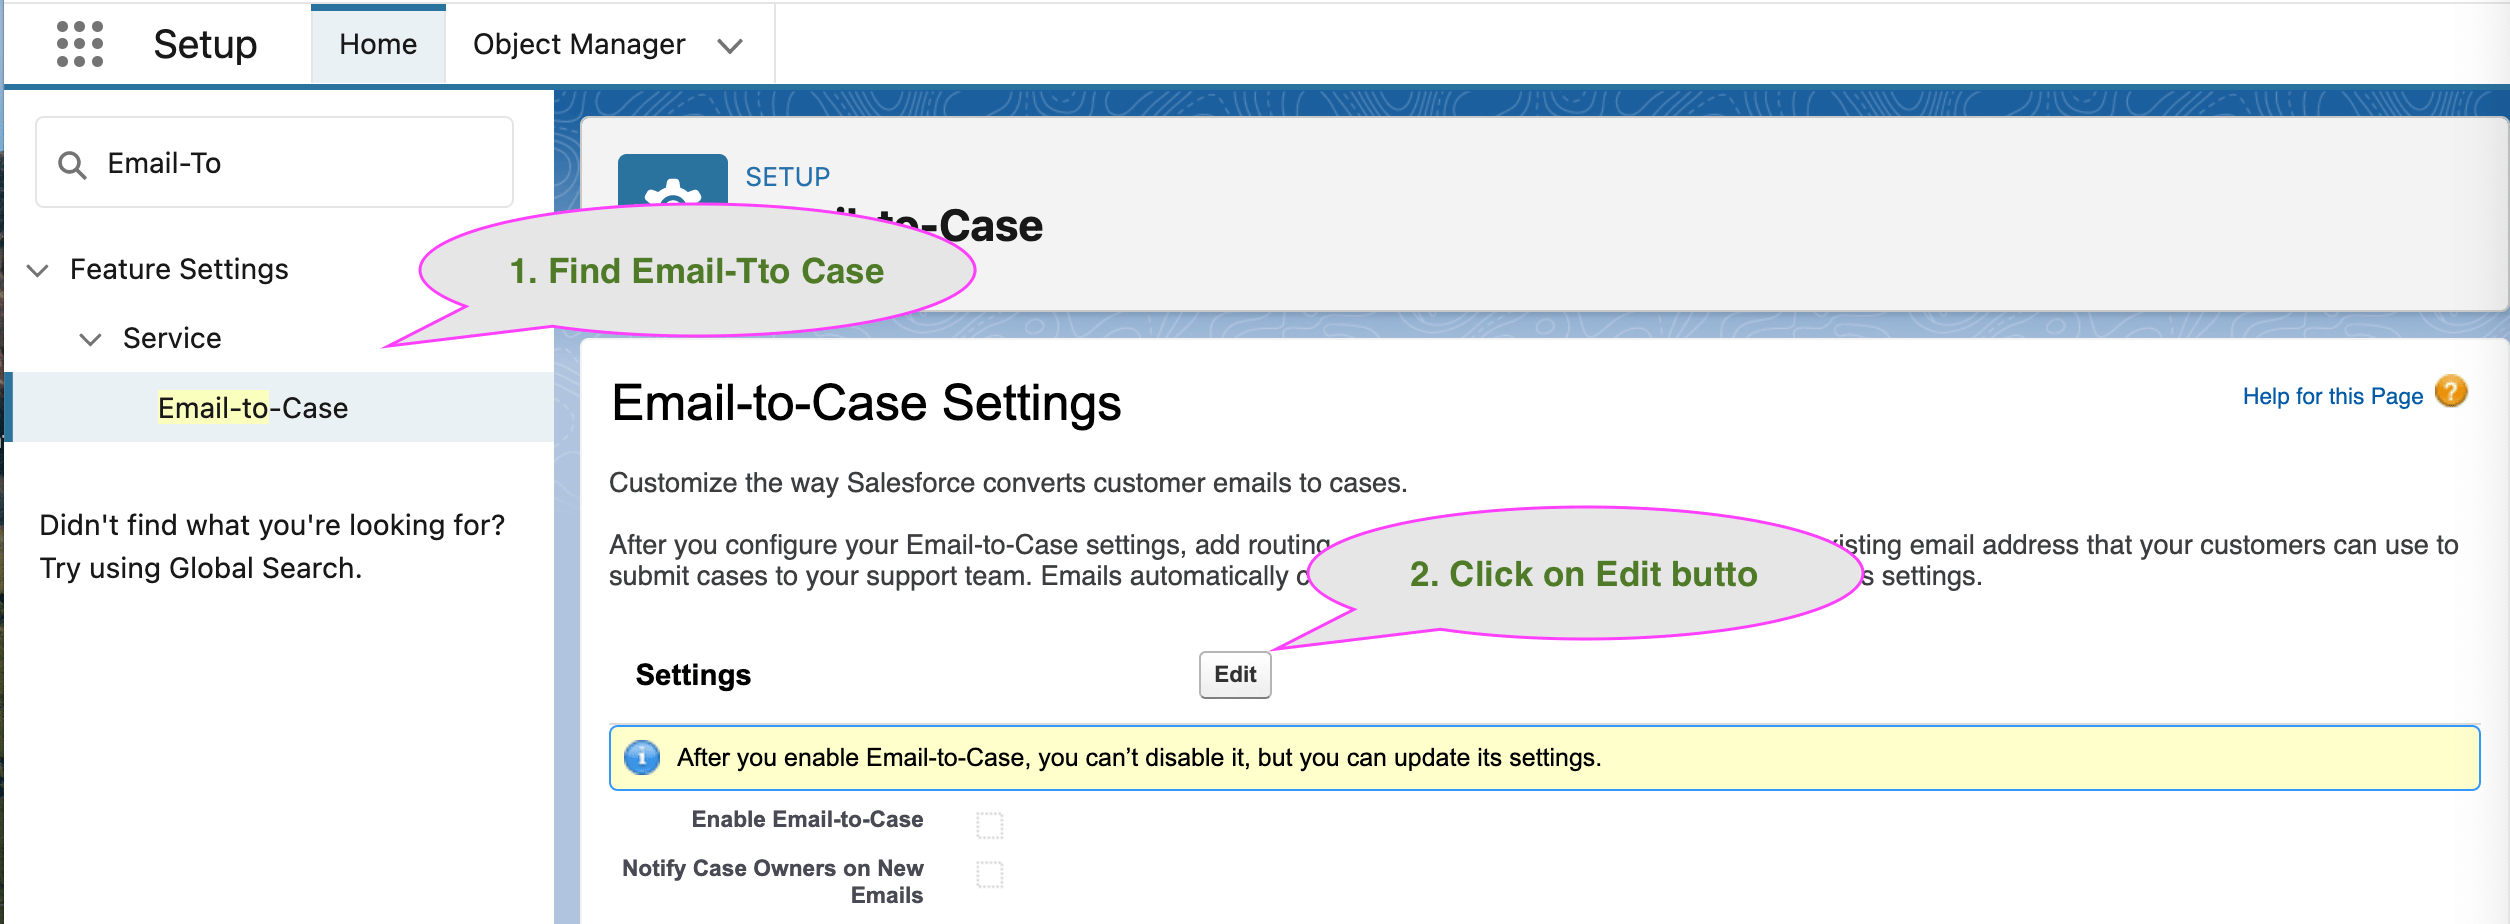
- Select Enable Email-To-Case and On-Demand Service then click on Save.
2. Routing Addresses for Email-to-Case
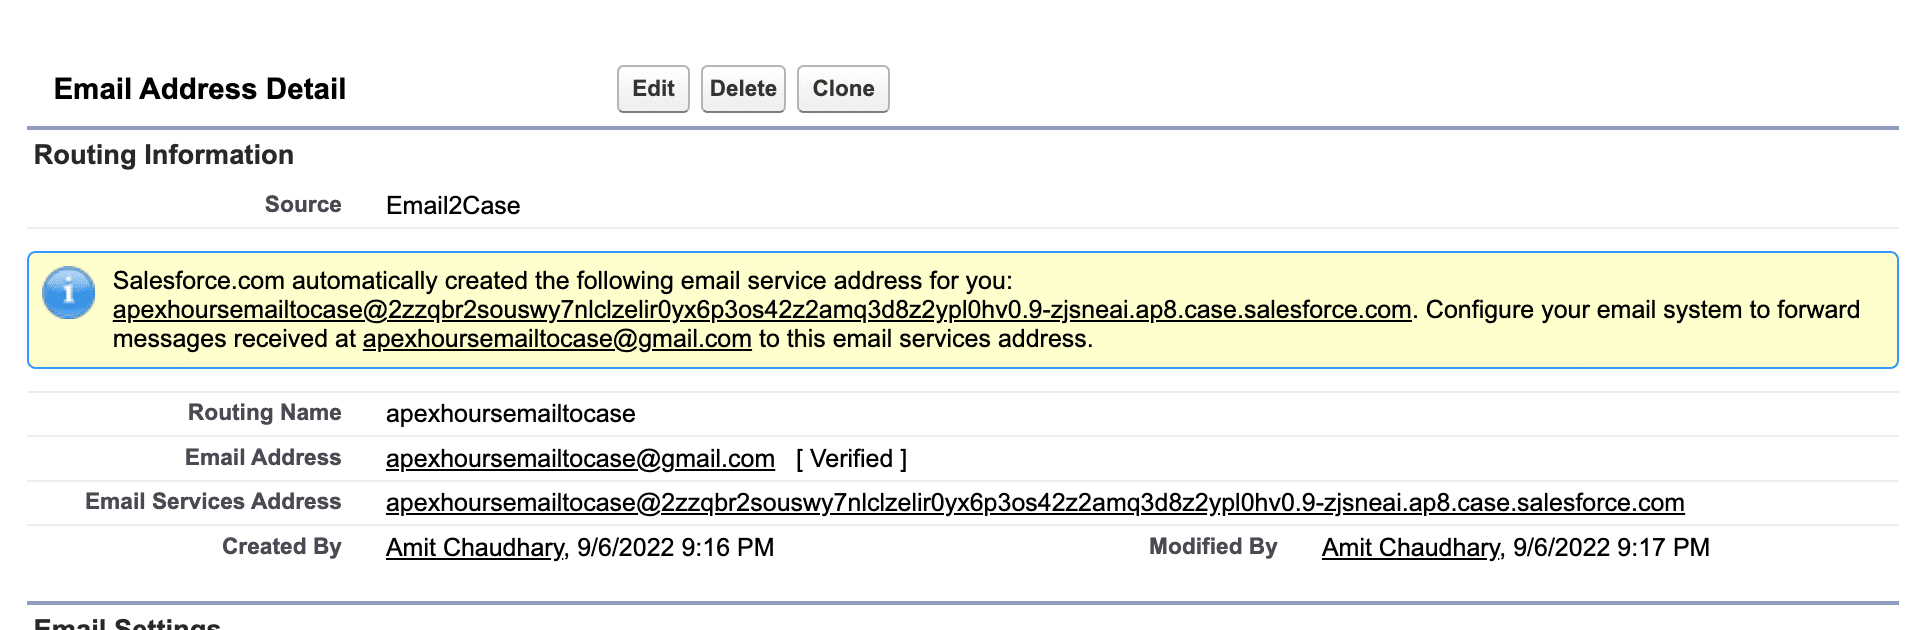
- Click on the New button from the Routing Addresses related list.


- Provide all required fields and configure verification email and case settings.
- Then click on Save.
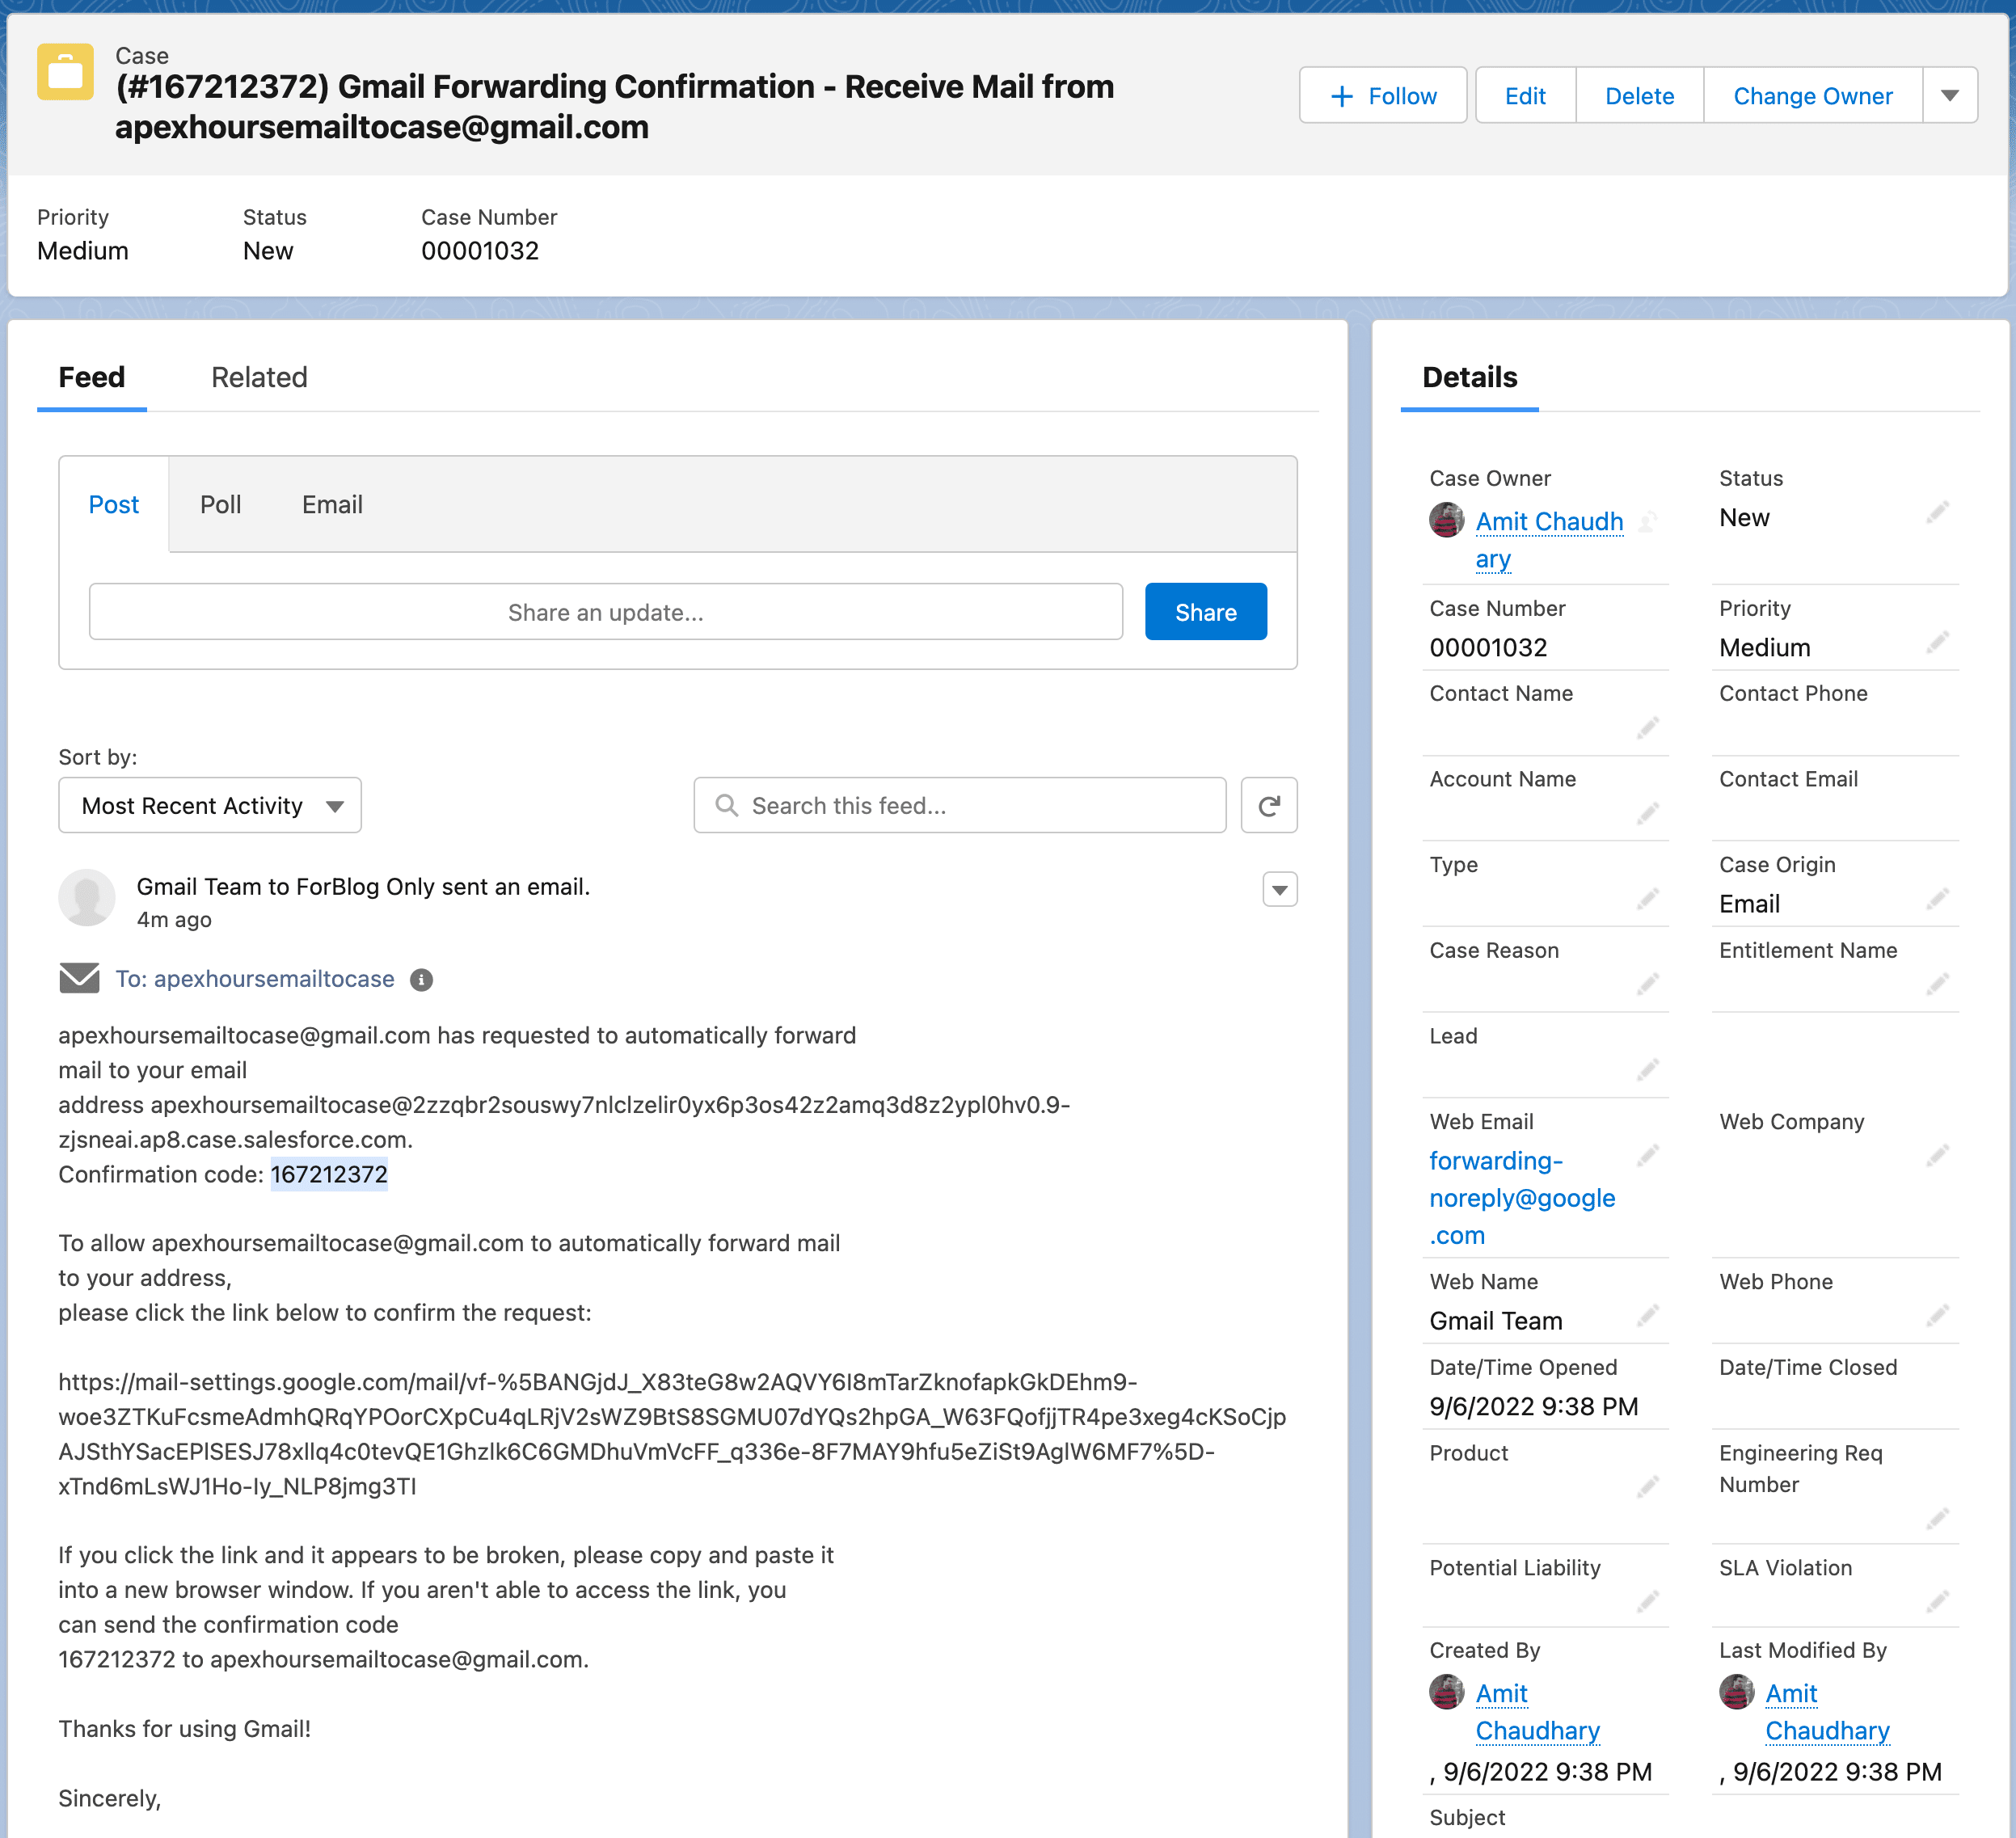
- Once done then, Salesforce will send you one email to your Email Address to verify the email ID.
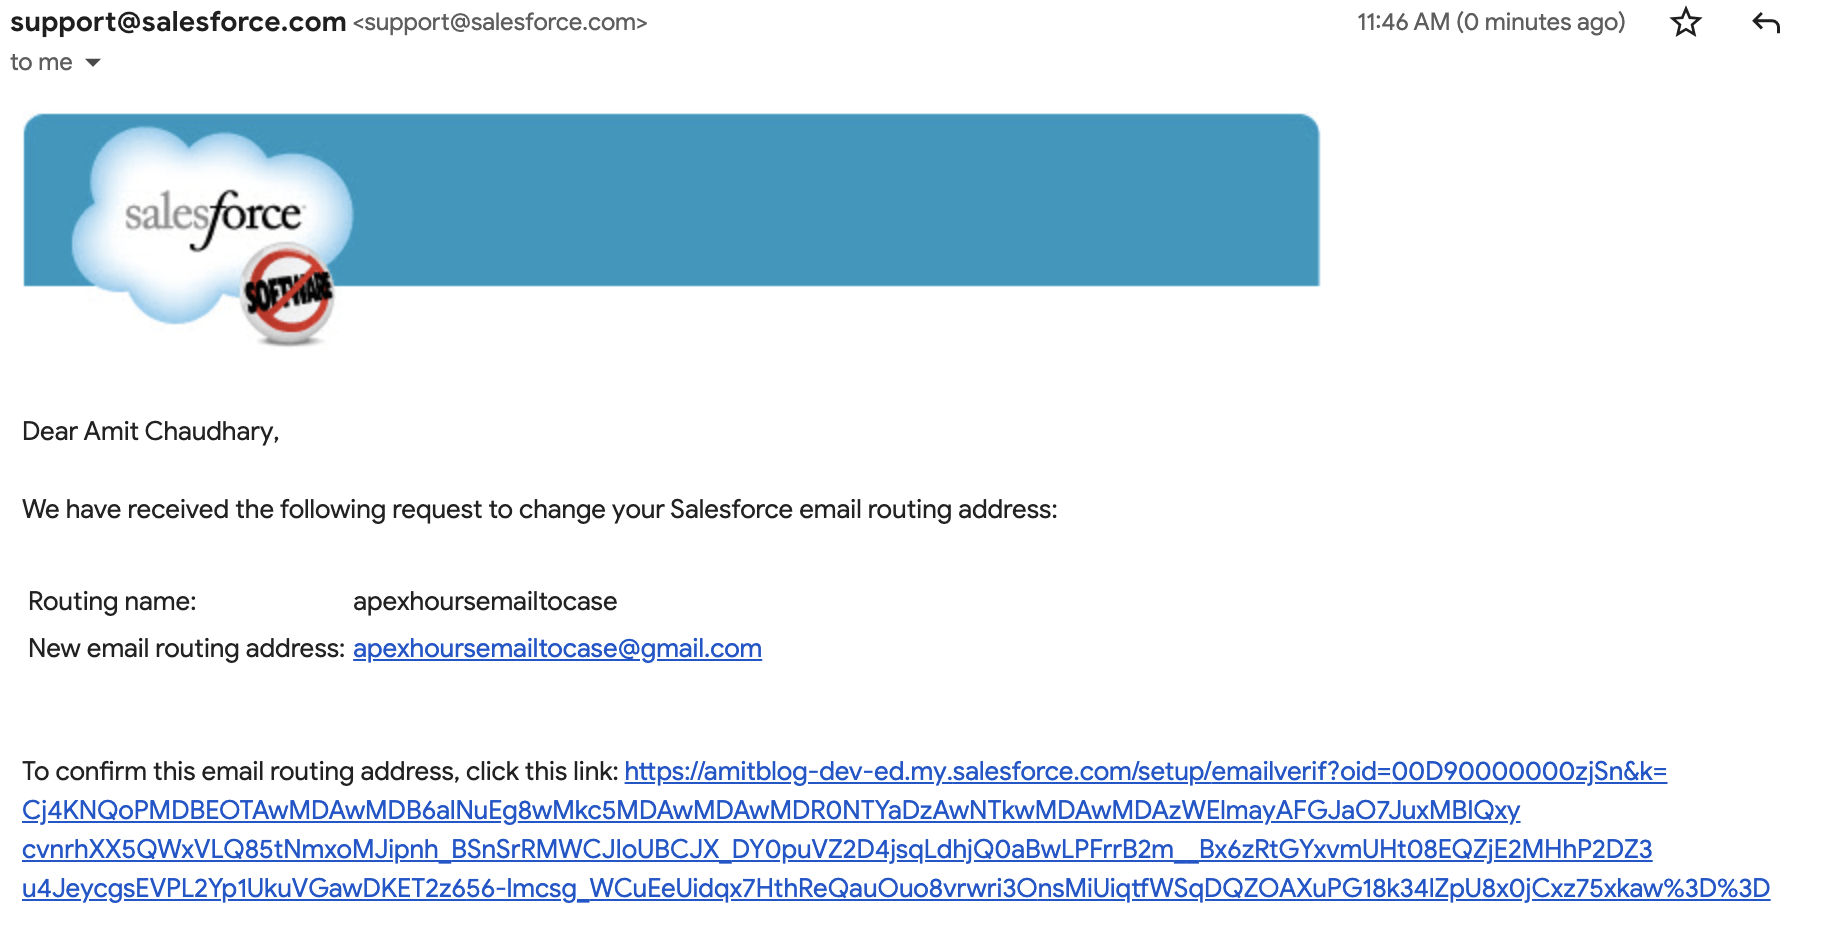
- Salesforce.com will automatically create the email id like below for you
3. Setting Up Routing/Forwarding Rules
Now it is time to configure our email forwarding setting at our outlook, Gmail, or email provider. Configure your email system to forward messages received at apexhoursemailtocase@gmail.com to auto-generated service addresses.
As we are using Gmail for the demo. User Gmail Article for Automatically forward Gmail messages to another account.
- Login to your Gmail id and then click on the setting icon.
- Then Click on Forwarding and POP/IMAP tab.
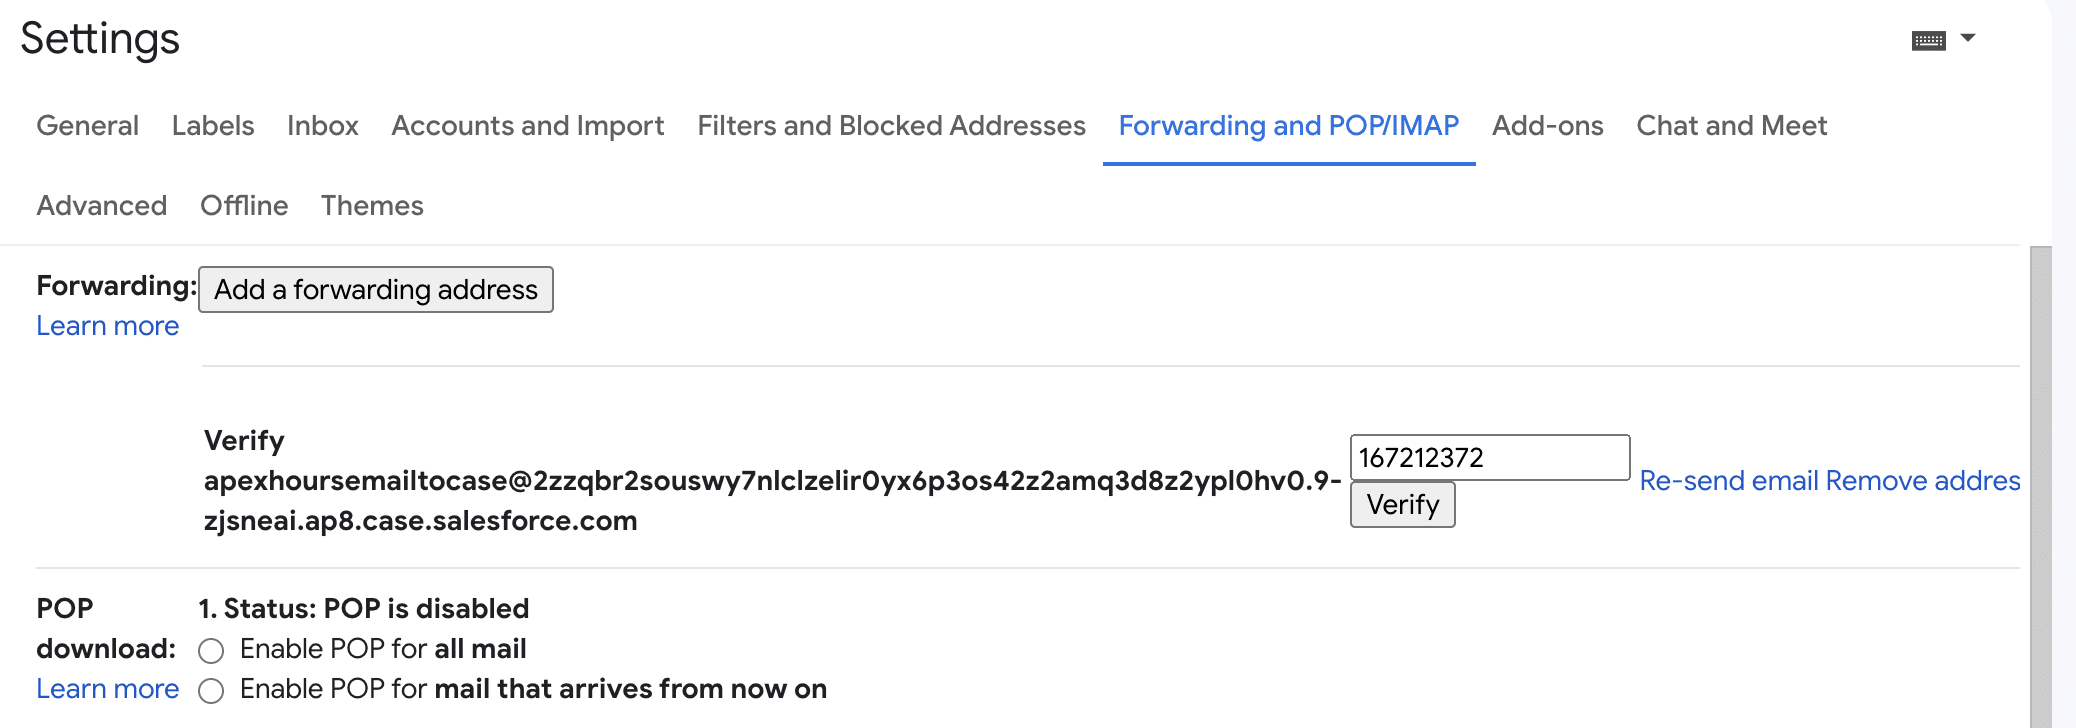
- Then click on the “Add a forwarding address” button.
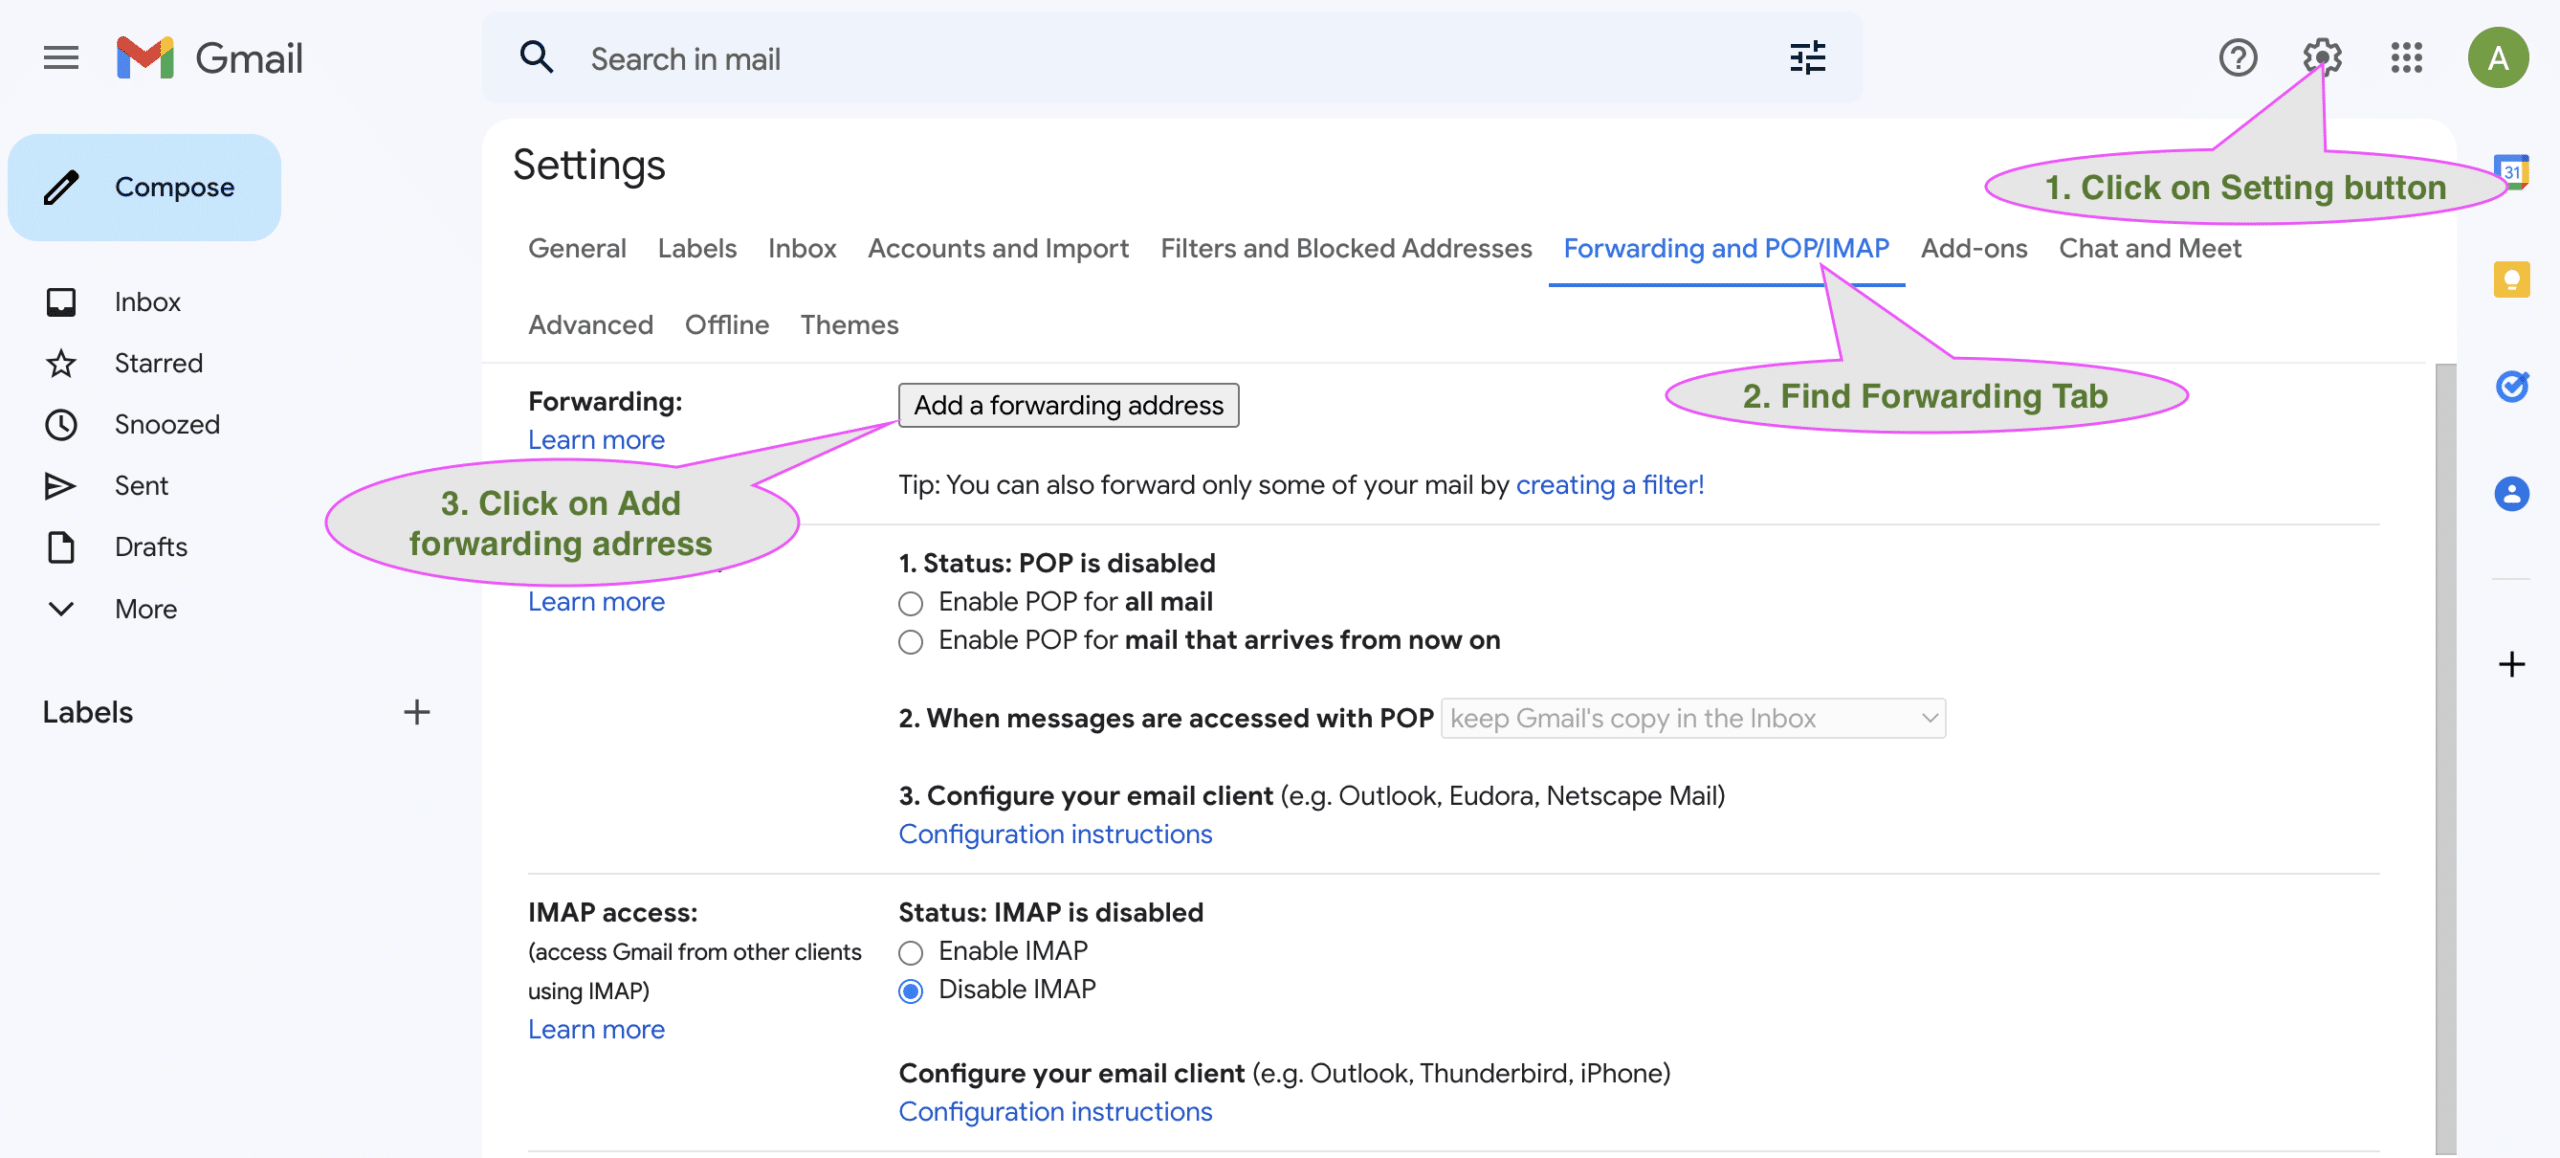
- Add forwarding address as email provided by Salesforce.
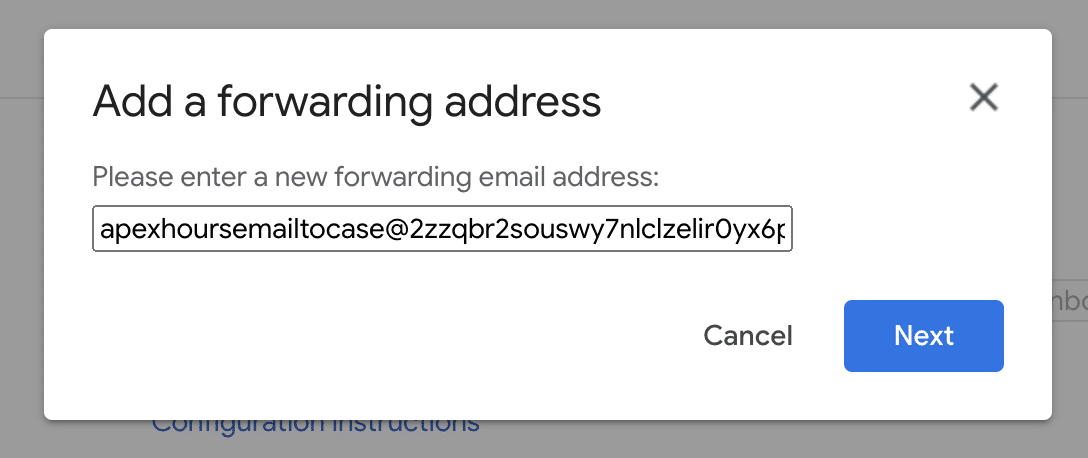
- Once you add email. It will show a confirmation screen saying forwarding email to auto-generated Salesforce email-to-case email ID.
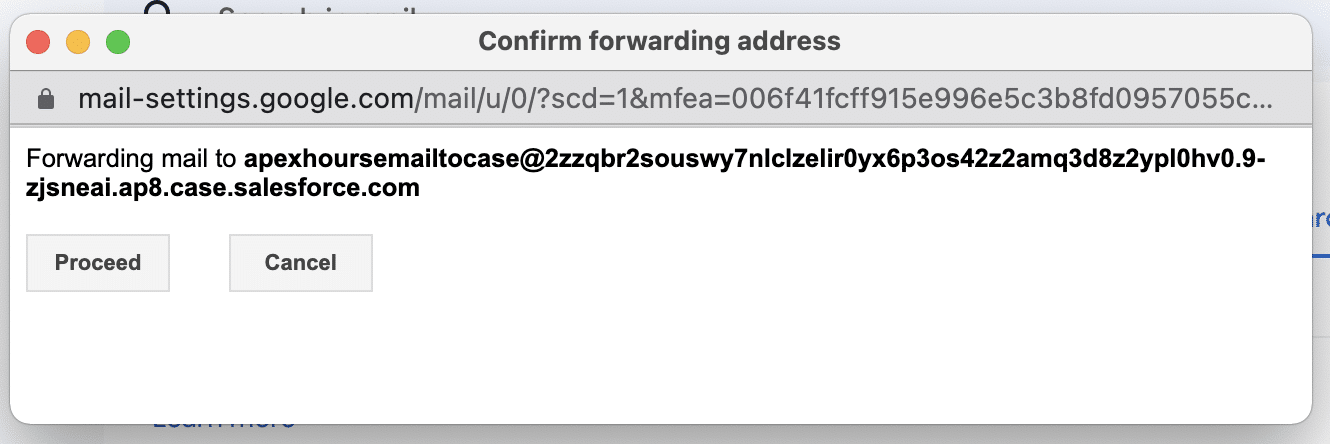
- When a verification code is sent to Salesforce Email-To-Case address. Then a new case will be created in Salesforce. Open the Salesforce case and copy the confirmation code. This means our email-to-case is working :).
- Now it is time to add the Confirmation code in Gmail and click on verify button.
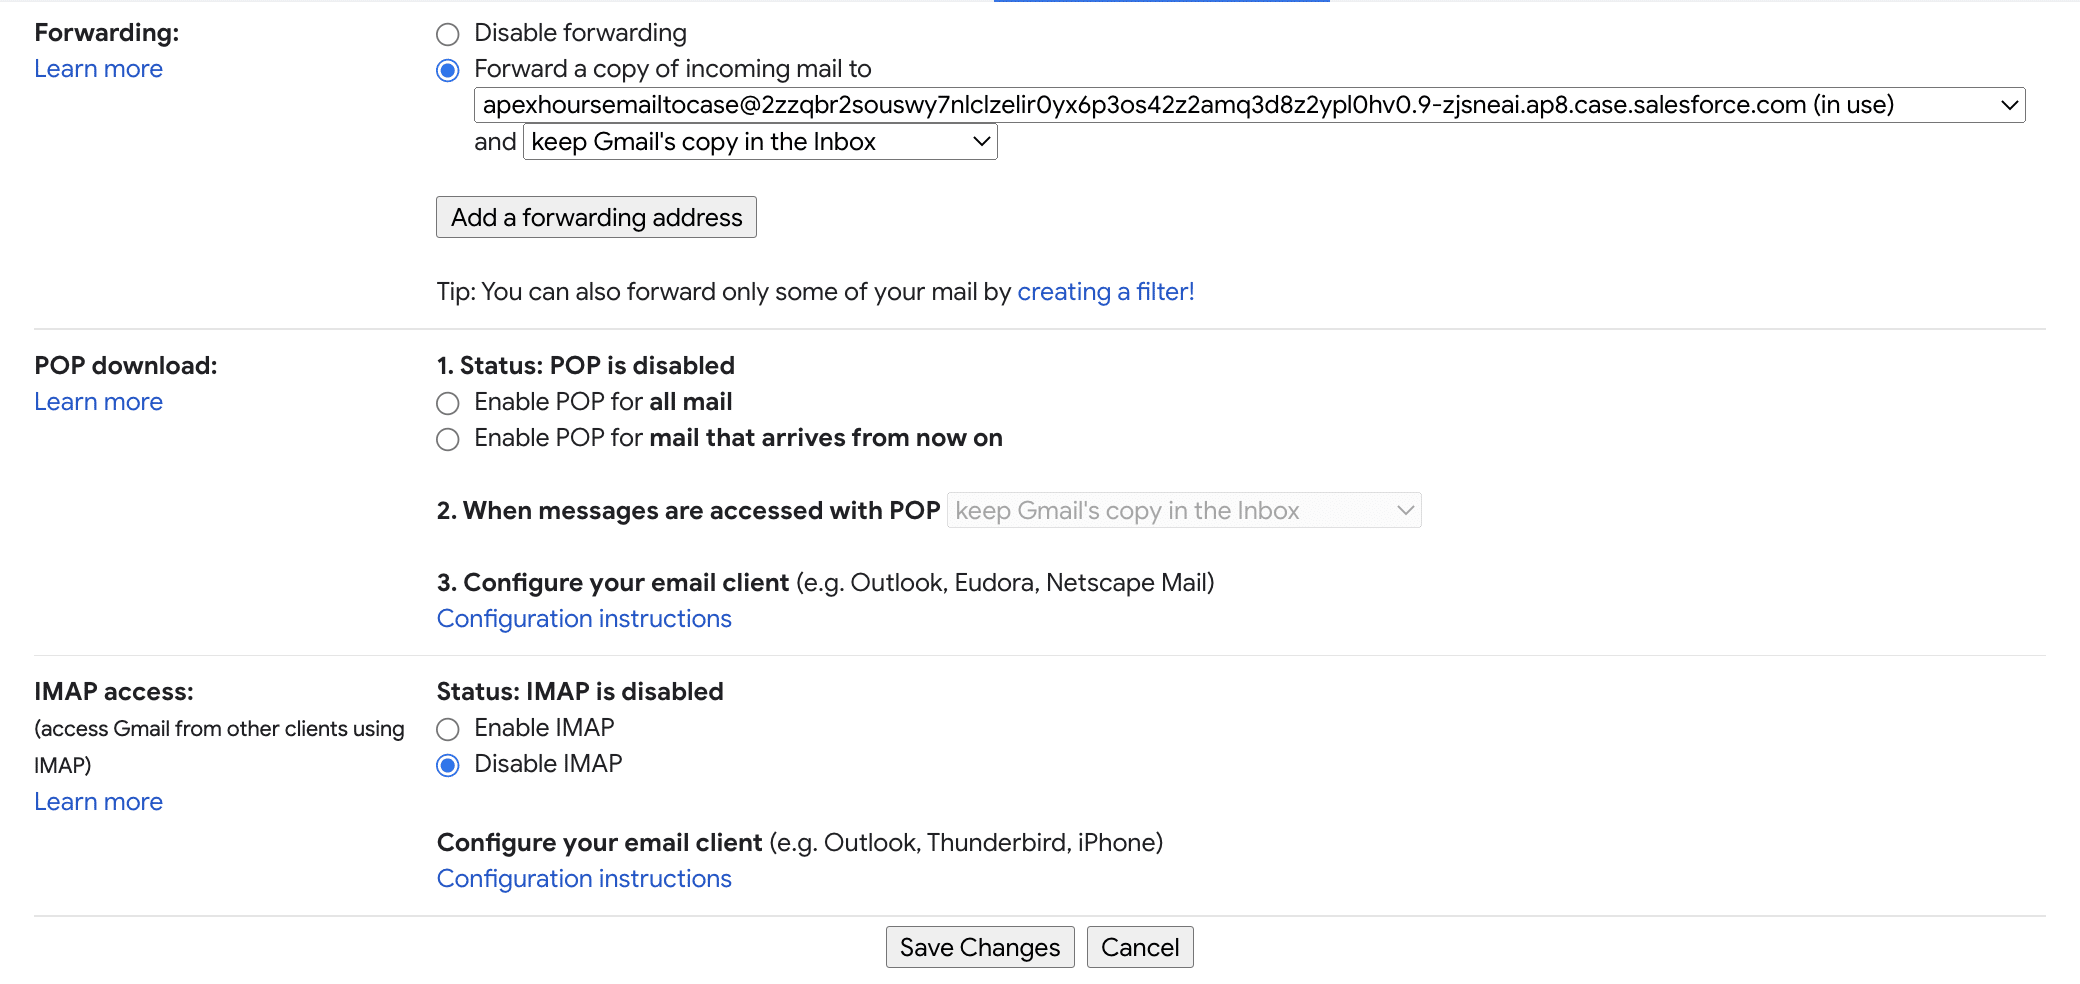
- On the last step is select Forward a copy of incoming email Email-To-Case email and click on Save Changes.
Congratulation this time we are all good to test our hard work.
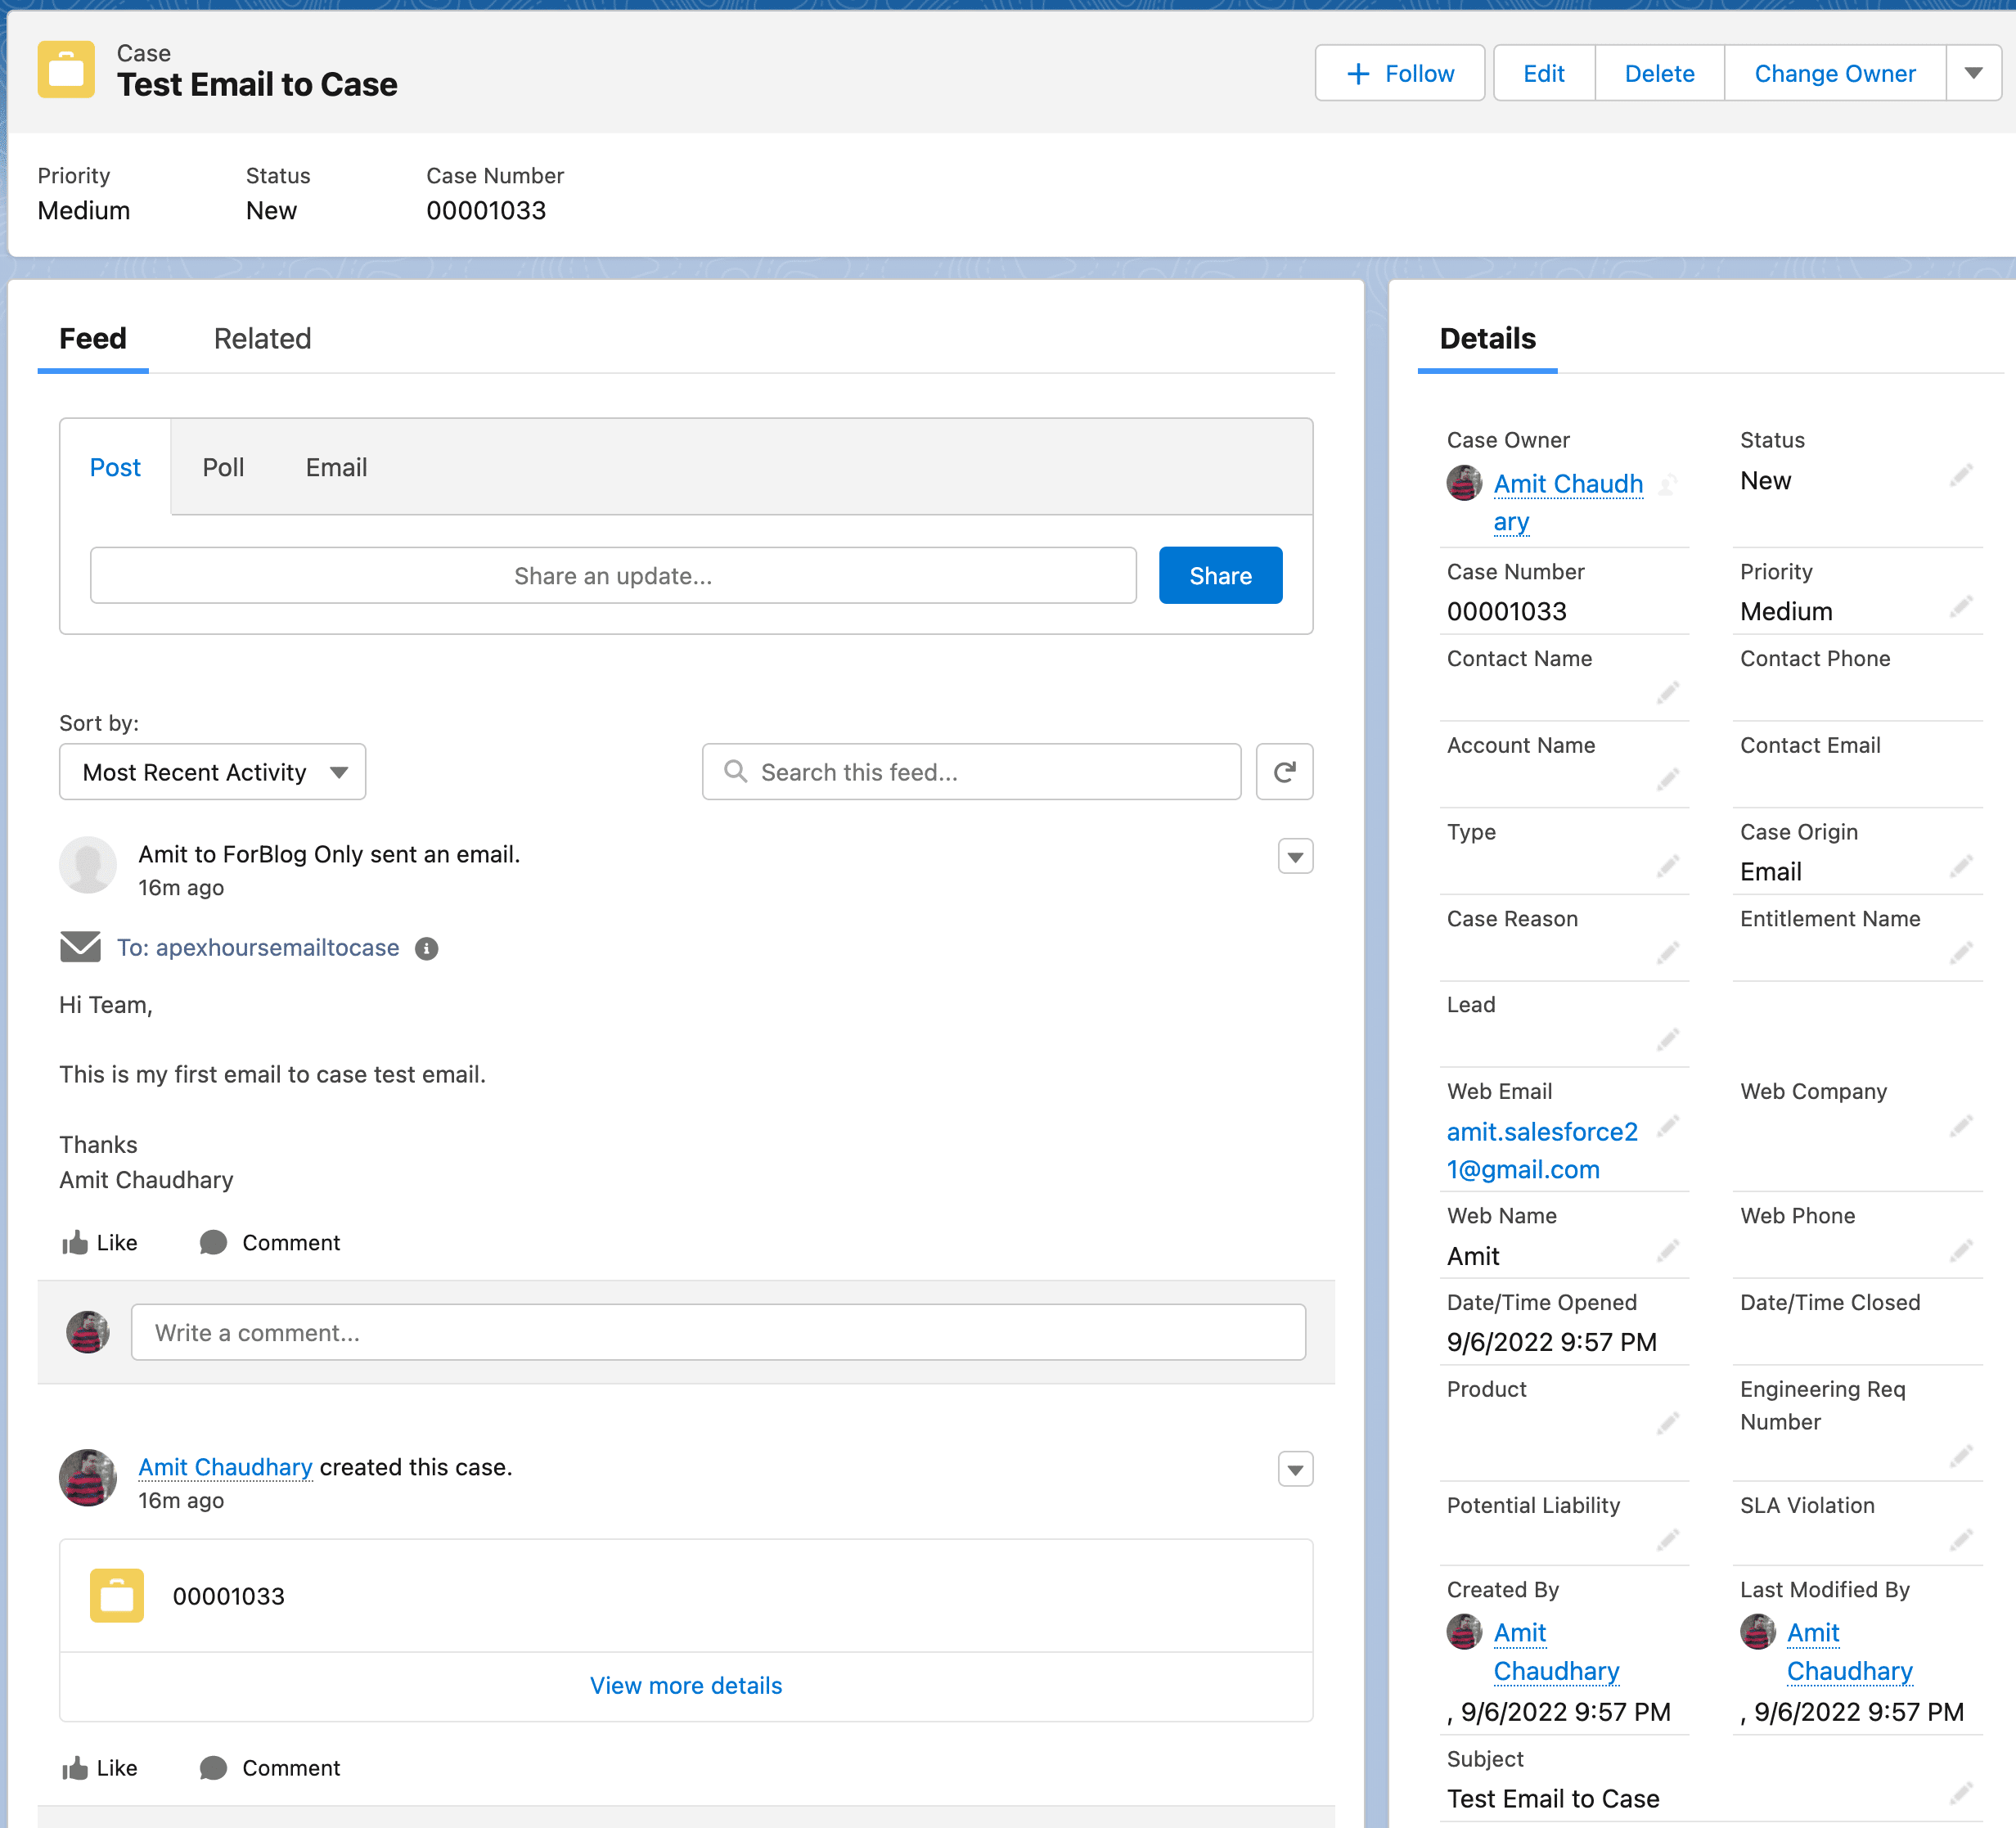
4. Test Email-To-Case
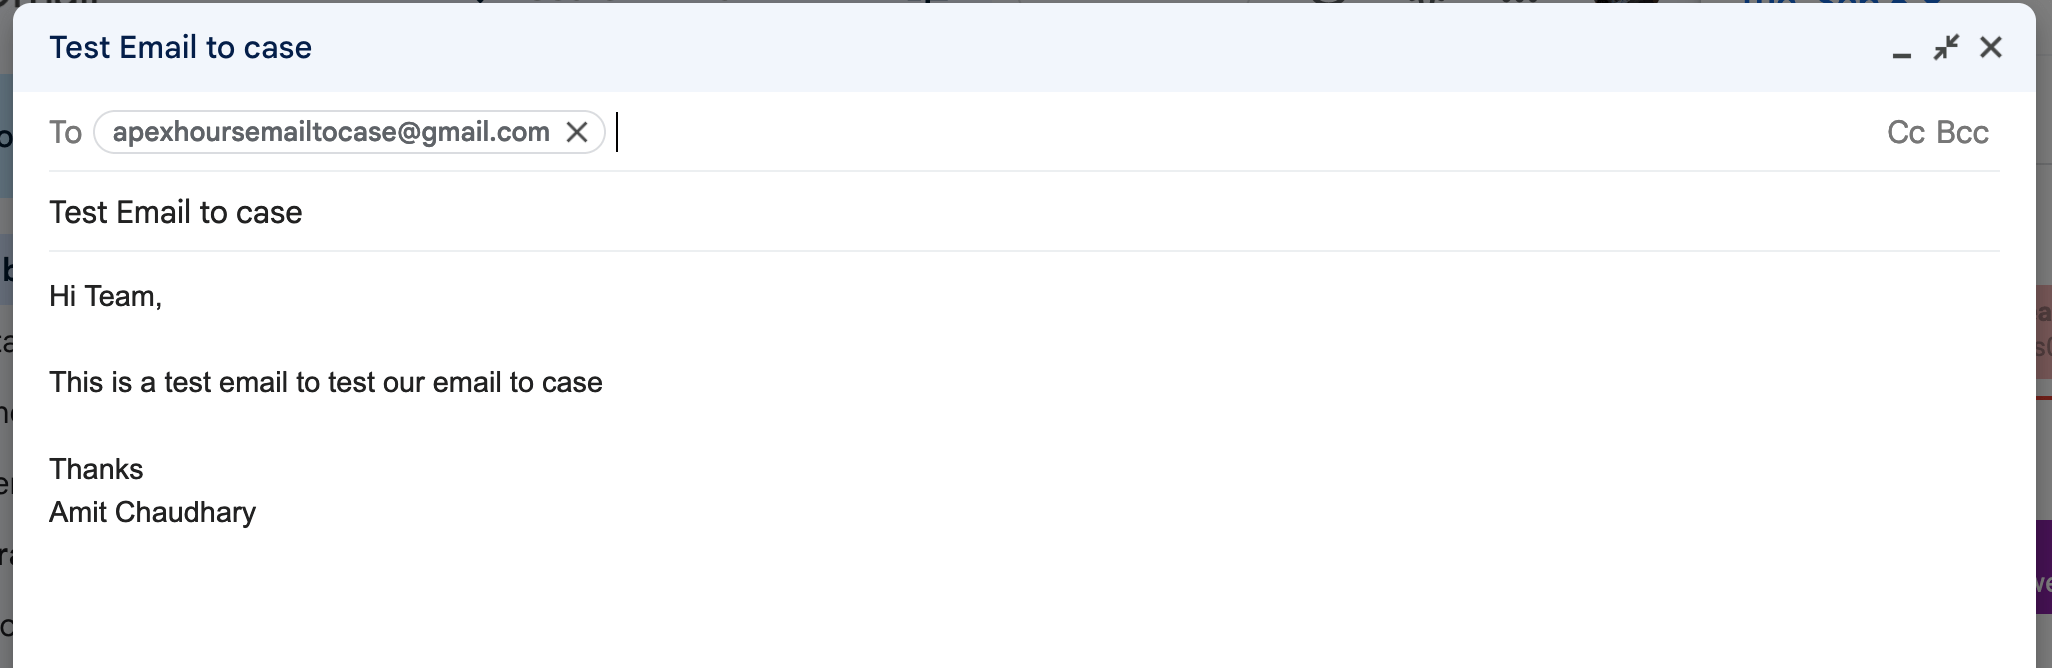
- Now it is time to test our email-to-case flow. Send an email to your support email “apexhoursemailtocase@gmail.com“.
- Now check in the Salesforce case tab for a new case record.
Some important Functionality
- It automatically populates the contact and account if the contact is in Salesforce with the same from email address.
- If contact is not available with the Same email id then the contact and Account field will be blank on the case object.
Email-to-Case Limitation and Considerations
How Email-to-Case Treats Long Emails: Email-to-Case automatically shortens email headers and email body text to 32,000 characters each. Contact Salesforce if you’d like your organization’s email body text limit raised to 131,000 characters.
How Email-to-Case Treats Inbound Auto-Response Emails: Inbound auto-response emails from Salesforce aren’t attached to cases.
Tips for Sending Emails: When sending an outgoing email, the subject line and body should be different. If the Email Subject and Email Body Text are identical, Email-to-Case creates an infinite loop of emails related to each case.
Email to case Video

Summary
Set up Email-to-Case to efficiently resolve customer email inquiries. When customers send messages to your support email addresses, Salesforce automatically creates cases and auto-populates case fields. You can also perform these steps by completing the Connect Your Support Email guided flow.


Thanks again Amit!
Another great article once again. This was very helpful and I appreciate how you keep the topics fresh.
Thanks,
Paul
Glad you like it. I hope you are able to implement email-to-case in salesforce
Perfect, thanks!
Inbound Auto-Response Emails : we are facing a challenge for Inbound Auto-Response Emails . It is creating case for UNDELIVERABLE Emails as well. Please suggest .
Yes OOB email-to-case setting creates the case with a blank account and contact.
Thanks you so much for sharing an affecting method. It will be helpful for You have written very Good Post Man
Glad you like our email-to-case post.
Hi, We have a Email to Case setup that was working perfectly fine. All of a sudden the email to case is assigning the first contact in the contact list to the new cases. what could be the reason for this. We had a flow but its been disabled.
Hi Amit, Thanks for this useful article.
I have a question: if I implement the Messaging.InboundEmailHandler instance, what happened with the already implemented Email-to-Case?
Thanks,
Pedro
Can we setup different auto response for different email-to-case/email address setup?
Hi Amit,
Is there any way to map Case fields in more readable format and more structured way in EMail to Case functionality as it is known that for example – Case description looks very cluttered whenever the text is quite long and it becomes difficult for user to read many a times
The headers on the final table are the other way round. Email-to-case doesn’t require additional software downloads.
The documentation was always very confusing regarding the size of the message.I was never sure if the refer to the inflated size or not. It looks like the total size was increased recently to 35MB https://help.salesforce.com/s/articleView?id=000386265&type=1
how to capture sender’s email address in case
You have Out of box field Web email(Supplied email)on case object
1field on case object Web email there you can get sender’s email address
Hi Shital,
I am getting “To email address” in Web email(Supplied email) instead of “Customer email(from email address)”. Do you know why this is happening.
When case is created from email to case ,If conatct email exist in org then it will map the contact and suppose that contact is changed ,,not changing the email To address under activity Tab in salesforce.
I have custom automation to create new related case if customer sent an Email over old case email communication after old case got Archived/Locked. So I populate the old case communication in the description of new case but I want to populate this on Email section of new case also, Anyone please help
How to configure Company MS outlook functional mailbox to forward the incoming emails to Salesforce email service address
I am getting a disclaimer along with my email body in description field. Can you help in getting only the email body in description field.
How do I capture bcc address from email to case. When ever I sent an email by keeping cc and bcc. Cc address is capturing but not bcc. Can anybody pls help
How can I recreate an Email Service Address in Sandbox if it’s gone after the refresh?
Great post! The step-by-step instructions for setting up Email-to-Case in Salesforce were incredibly helpful. I appreciate the detailed explanations and examples provided. Thanks for sharing your expertise!
Hi,
I have enabled email-to-case with gmail.
The forwarding to SF works.
The case gets created.
Web Mail (SuppliedEmail) does not get populated however.
Do you have any advice?