
In our first session of Case management in Salesforce, we talk about different way to create case like email to case, web to case and manual. In this session we talk about case lifecycle and resolution process. We will learn about Case Escalation Rule in Salesforce and case assignment rules.
Case Life Cycle
Cass can be created from multiple channel in Salesforce Service cloud like log a case online, Case Support (CTI), Email Support and Email Support. Once Case is created then next step is to assign the case to Sales agent or Queue. Another key feature of service cloud is Entitlements Management to verify the SLA. Then sales agent can use Salesforce Solution to suggest solution to client and communicate solution by email, phone or customer portal.
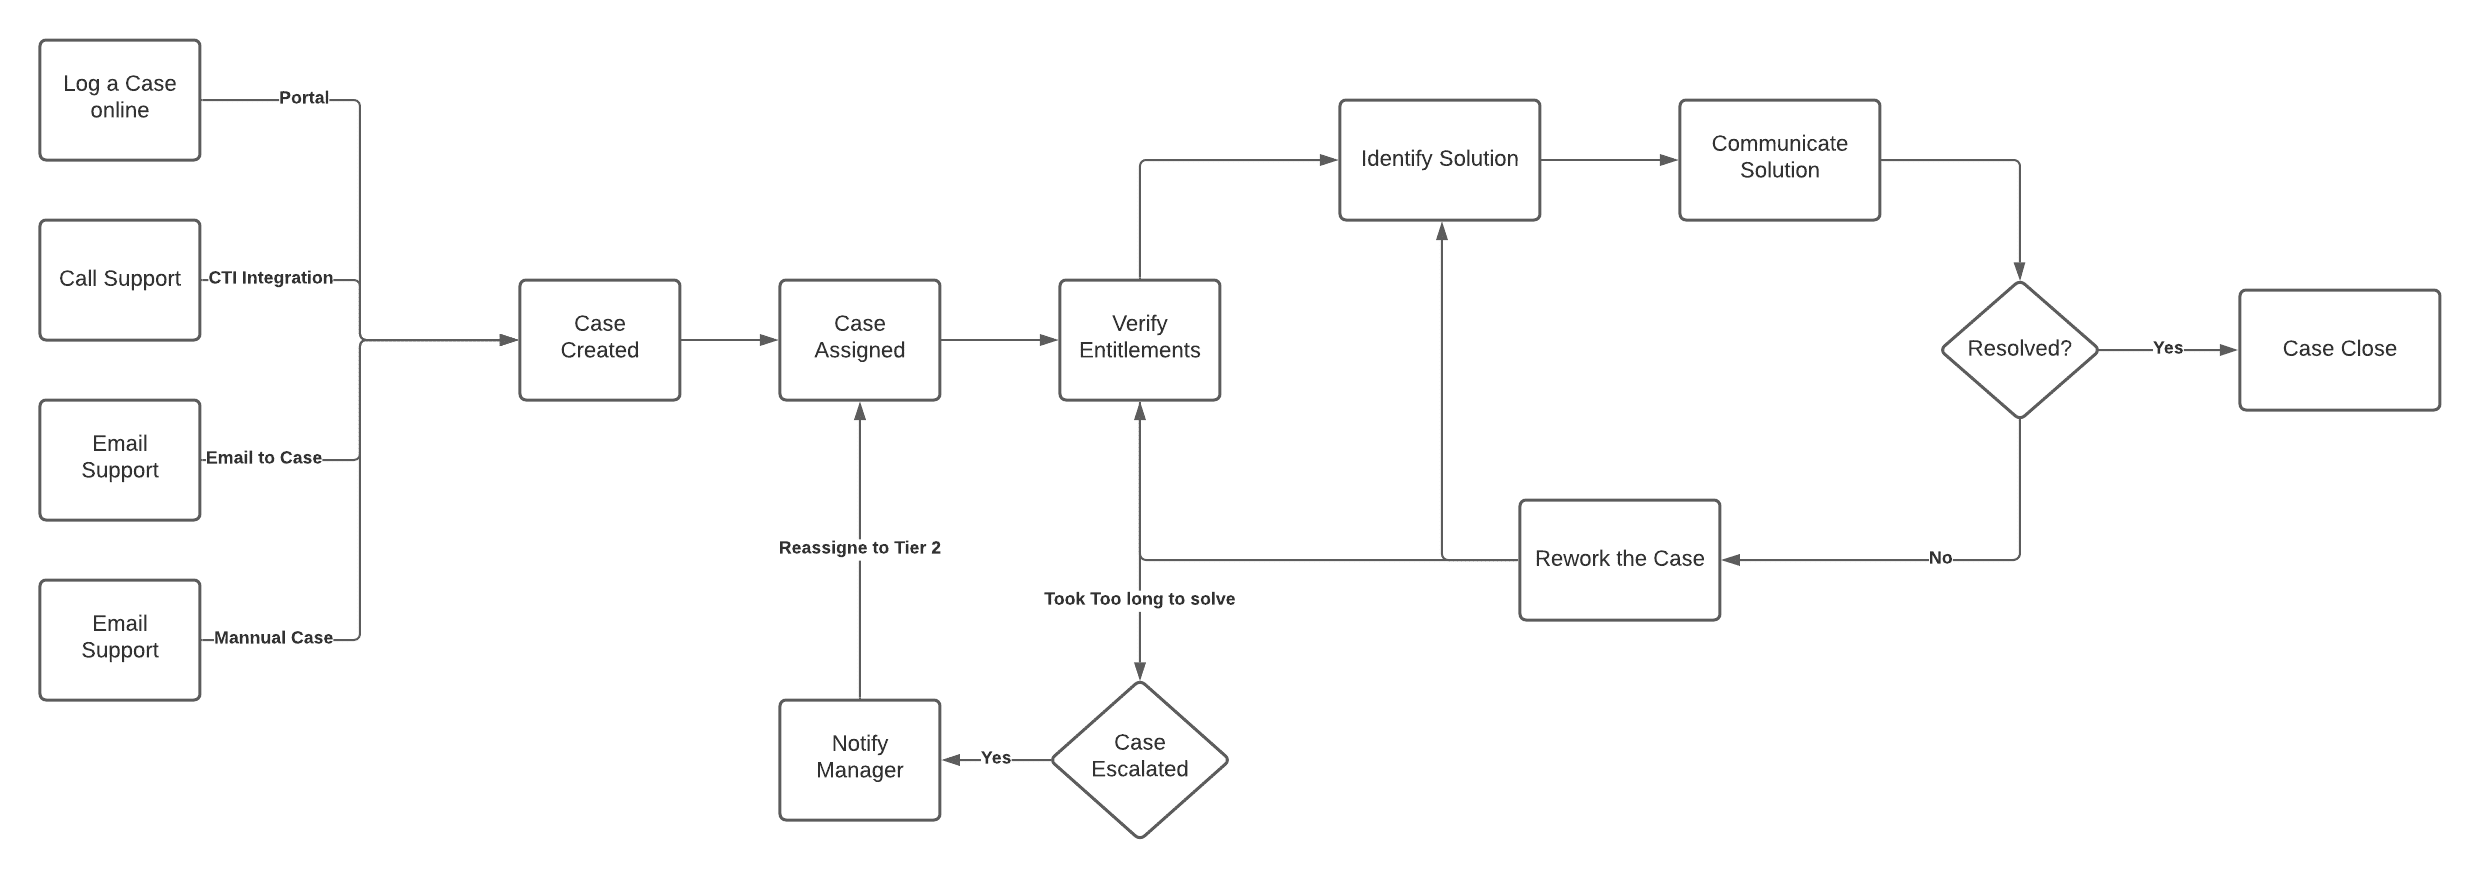
Once Solution is provided, It time to check case is resolved or not? If resolved on time then close the case. Else reassign it to another agent. We can also check the SLA as well base on that case can be escalated to manager ans assigned to tier 2 for help.
Assignment Rules
Case assignment rules are use to Automate Support Process. Cases can be assigned to Users or Queues based on Criteria.
Auto Response rules
- Send email response based on criteria
- Multiples rules can be created based on criteria
- Email send only on creation
- Best practice – default alert without criteria
- Works for Cases created through:
- Self-Service portal
- Customer Portal
- Web-to-Case form
- Email-to-Case message
- On-Demand Email-to-Case message
Case Escalation Rule in Salesforce
Escalation rules automatically escalate cases when the case meets the criteria defined in the rule entry. You can create rule entries, which define criteria for escalating a case, and escalation actions, which define what happens when a case escalates.

How to Setup Case Escalation Rule in Salesforce
Check below step by step process to setup Case Escalation Rule.
1. Create Case Queues
Create a support queues to rules. Go to setup-> Queues then click on new button.

Then provide name and select Object as case and assign user to queues.

2. Create Case Escalation Rule
Now it time to create new Escalation Rules. To go setup search for “Escalation Rules” then click on new button

Then provide the name and activate it like below

After that it will deactivate the standard rule and activate your one. Only one rule can be activated.
Now click on Rule and Profile Rule Entries. like below
- Set the order in which this rule entry will be processed
- Select the criteria for this rule entry
- Specify the business hours criteria for this escalation rule
- Specify how escalation times are set

Then click on Save button

3. Setup Escalation Actions
Not it time to create a Escalation Action. Click on New button from Escalation Action section.

4. Test your Escalation Rule
Now create a case with high priority. Then you can monitor it from “Case Notification”

Case Escalation Rule Video

Check video from 24.35 for case escalation Rule. Please check this post for our old and upcoming session on Service Cloud.


Thank you so much amit and meera for wonderful session
Thanks a lot for the visualizations ,does help a lot.
Great explanation and thanks again Amit and Meera
Good session and informative. These sessions help us updating ourselvs with latest salesforce features.
Vey well explained
Thank you for session. auto response rules section was very helpful.
Thanks for insightful session . it is really helpful for Service Cloud Consultant preparation .. Case management, Queue & rule configuration
Thanks so much Meera nair and Amit for wonderful session. Really Awesome and great content.
Thanks for a detailed session on case escalation rules.
Thanks for sharing the basic knowledge…
Thank You Meera Nair and Amit Bhaiya.
Very informative And Real Time use case are explained in this session Really Enjoyed while I learning. After completion of this I tried 4-5 Different Use cases Related Escalation Rule.
It’s Really helps me To crack Service Cloud consultant Certification.
https://trailhead.salesforce.com/en/content/learn/projects/set-up-case-escalation-entitlements
Thank You Amit Sir and Meera Ma’am, For this real time Explanation.
Thank you for a detailed walkthrough. Hoping would be able to go through all the sessions by eod as a part of my revision.
It is usefull to me and it has many advantages and disadvantages and in my future it has many scope .