
Modern business processes demand user interfaces that adapt in real time to the choices our users make. Screen Flows in Salesforce offer a powerful, no‑code way to build guided, step‑by‑step experiences but left to their own devices, they render every screen in sequence, even when much of the content is irrelevant. By leveraging Conditional Visibility, we can craft truly dynamic flows that only show the right fields, at the right time, for the right scenario. In this blog, we will walk through a hands-on example complete with toggles, dynamic screens and success messaging and share best practices.
Business Scenario
Imagine a support team at an electronics retailer. Agents log incoming case details via a Screen Flow. Based on whether the customer’s product is a Laptop, Smartphone or Tablet, only the relevant troubleshooting fields should appear. To keep the interface tidy:
- We use four Screen elements:
- Select Product Category
- Product Details
- Case Information
- Success
- One Create Records element (to insert the Case).
- A Toggle component on Screen 1, visible only once a category is picked.
- All visibility controlled with Set Component Visibility no custom code required.
Post implementing the requirement or going through this blog flow will look like as below:
Need of Conditional Visibility requirement
By default, a Screen Flow waits for users to click Next on every screen. Even if fields are blank or irrelevant, agents must click through each step wasting time and causing confusion. Conditional Visibility lets us:
- Hide or show individual components based on variable values.
- Reduce clicks by collapsing irrelevant sections.
- Maintain a single flow rather than dozens of specialized versions.
This yields a cleaner, more intuitive experience and significantly fewer development artifacts.
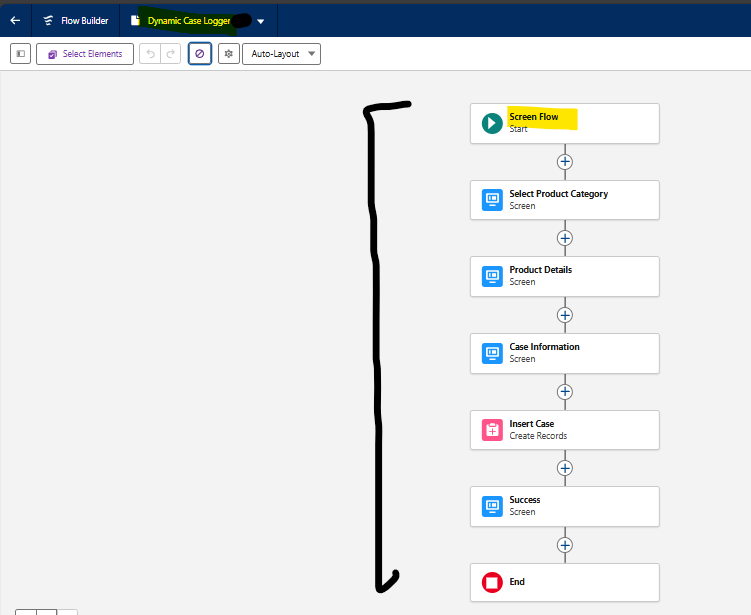
Overall Flow Architecture
Here’s the high‑level layout of our Flow, named “Dynamic Case Logger”:
- Select Product Category
- Picklist: Product_Category__c (Laptop, Smartphone, Tablet)
- Toggle: appears only after a category is chosen
- Product Details
- Fields for all three categories, each set to display conditionally
- Fields for all three categories, each set to display conditionally
- Case Information
- Priority picklist (High, Medium, Low)
- Case Description (Long Text)
- Create Case
- Inserts a new Case record with all collected values
- Inserts a new Case record with all collected values
- Success
- Shows a confirmation message including the new Case ID
- Shows a confirmation message including the new Case ID
Throughout, Set Component Visibility wiring ensures only relevant fields or screens appear.
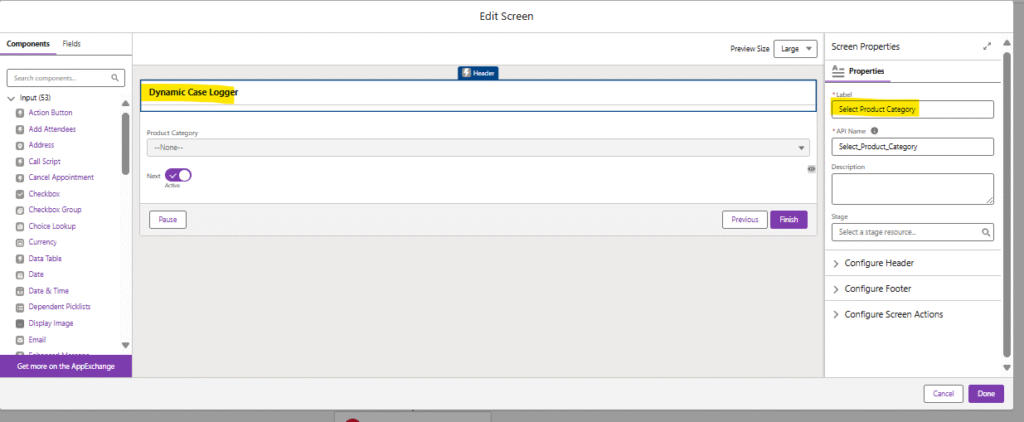
Screen 1: Select Product Category
- Drag a Screen element onto the canvas; label it “Select Product Category.”
- Add a Picklist component:
- API Name: productCategory
- Choices: Laptop, Smartphone, Tablet (manual choice set or global value set)
- Add a Toggle component:
- API Name: categorySelectedToggle
- Label: “Proceed to Details”
- Default Value: false
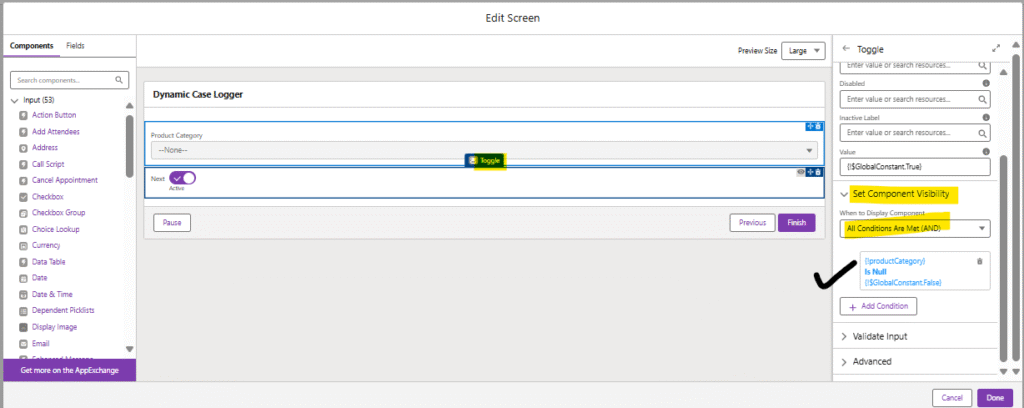
Set Component Visibility on the Toggle so that it shows only when
{!productCategory} Is Not Null
- This means the moment an agent picks any category, the toggle appears otherwise it stays hidden. It acts as a visual cue and gating mechanism: you can’t advance until we click, an example of dynamic behavior.
Advancing from Screen 1
Although standard flows require clicking Next, our toggle serves as an extra confirmation step. When the toggle is activated:
- The Next button becomes enabled (we can optionally configure the Finish Behavior to require the toggle).
- Agents feel a sense of control—“I have picked my category, now I’m ready” rather than mindlessly progressing through empty screens.
Note: In the screen’s Configure Footer settings, we can disable the Previous button if we want strictly forward navigation.
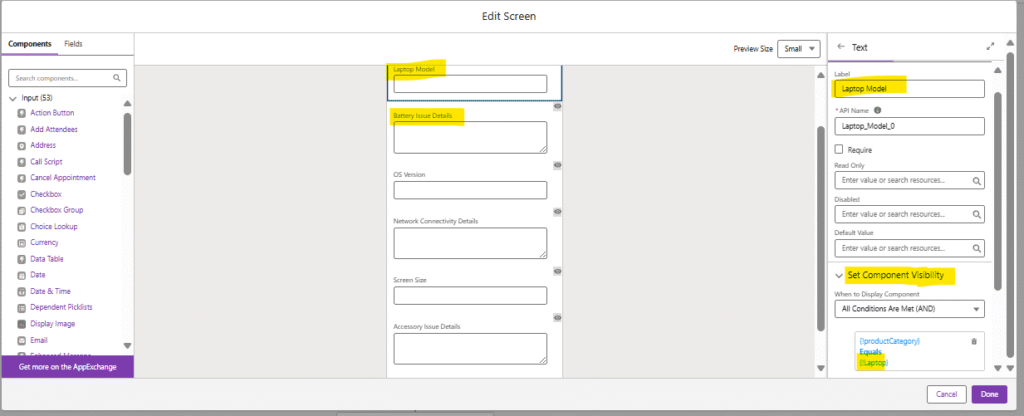
Screen 2: Product Details
Instead of three separate screens for Laptop, Smartphone and Tablet. We consolidate into one screen with six components, each controlled by its own visibility rule:
| Component | Visibility Rule |
| Laptop Model | productCategory = ‘Laptop’ |
| Battery Issue Details | productCategory = ‘Laptop’ |
| OS Version | productCategory = ‘Smartphone’ |
| Network Connectivity Details | productCategory = ‘Smartphone’ |
| Screen Size | productCategory = ‘Tablet’ |
| Accessory Issue Details | productCategory = ‘Tablet’ |
- Drag a Screen element; label “Product Details.”
- Add six input components, matching the fields above.
- For each, under Set Component Visibility, reference the Flow variable productCategory and require equality to the matching picklist value.
This way, when the flow moves here, agents see exactly two fields appropriate to their earlier pick and nothing more.Below Set Component Visibility condition for visibility of Laptop picklist value similar will be used for other picklist values accordingly:
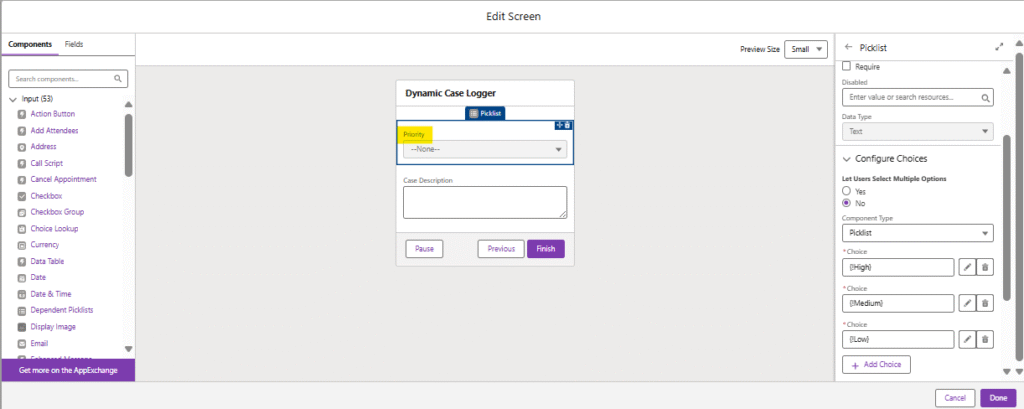
Screen 3: Case Information
Next, we gather the common case metadata:
- Drag a Screen element; label “Case Information.”
- Add a Picklist with proper values for Priority like High, Medium, Low as per user requirements.
- Add a Long Text Area for Case_Description__c.
No visibility rules needed here all agents fill these out for every category
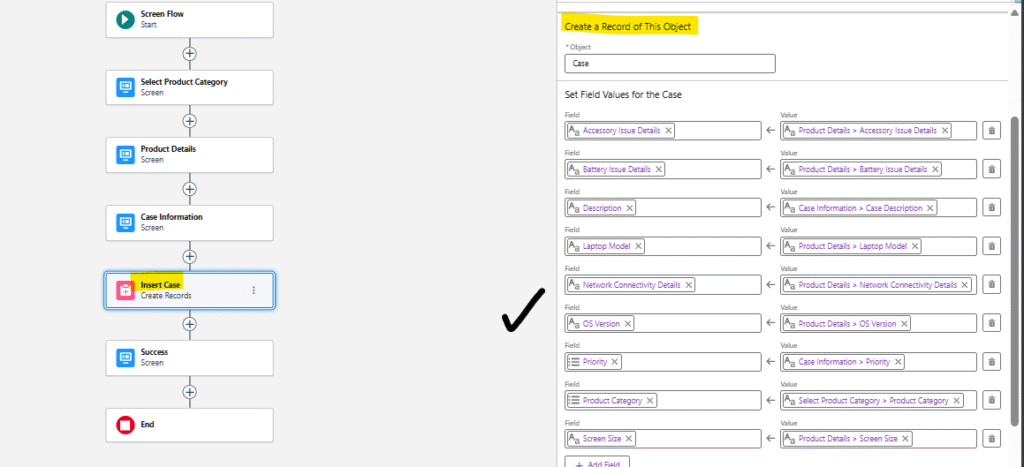
Create Records: Insert Case
With all data captured, we insert the Case:
- Drag a Create Records element; label “Insert Case.”
- Choose “Use separate resources, and literal values.”
- Map each Case field to its corresponding Flow variable:
- Product_Category__c ← {!productCategory}
- Laptop_Model__c ← {!laptopModel} (blank if not laptop)
- …and so on for all six detail fields
- Priority ← {!priority}
- Description ← {!caseDescription}
- Store the new Case ID in a variable, e.g. {!newCaseId}.
Because only two of the detail variables contain values, the rest remain empty Salesforce handles that gracefully.
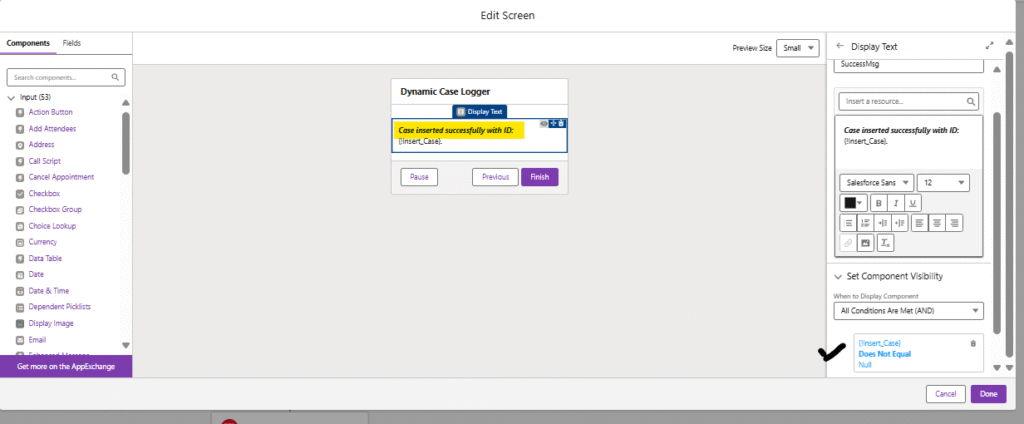
Screen 4: Success Confirmation
Finally, we wrap up with feedback:
- Drag a Screen element; label “Success.”
- Add a Display Text component with content like:
Success!
Your case has been logged successfully with ID: {!newCaseId}.
Under Set Component Visibility, show this entire screen only when
{!newCaseId} Is Not Null
- If for any reason the record insert failed (and {!newCaseId} stayed null), this screen stays hidden and the flow simply ends without a message giving you a chance to add an error path later.
Additional Best Practices
- Naming Conventions: Prefix all our screens and elements with clear, consistent names (Screen_SelectCategory, Screen_ProductDetails, etc.) so that maintenance is straightforward.
- Validation: On our detail fields (especially picklists), consider adding Input Validation rules at the component level to enforce correct formats (e.g., battery issue length).
- Error Handling: Create a separate Fault Path on the Create Records element to capture DML errors, and send agents a helpful message or email if something goes wrong.
- Testing: Always test each branch, select each category in turn to verify only the intended fields appear, and the Case record is created with the right values.
- Performance: Minimize unnecessary lookups or Get Records calls if we are only writing data. Our example requires none, which makes it lightning‑fast.
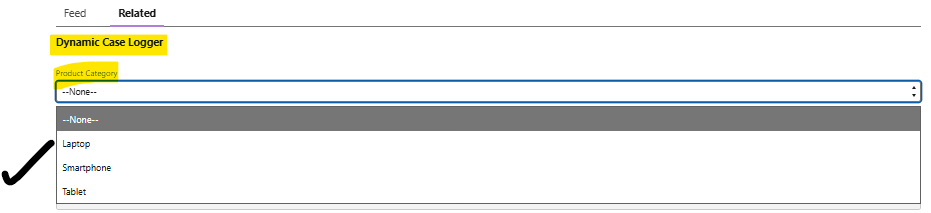
Below are the screenshots with actual testing of our implementation post adding screen flow on page:
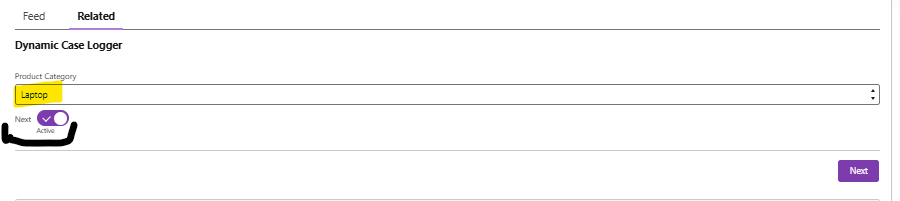
Select any ‘Product Category’ as requirement->
We will be able to see toggle instantly once we select any value->
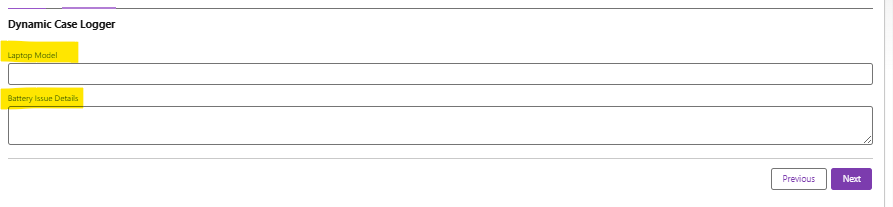
Once click on next based on value we selected it will show us screen->
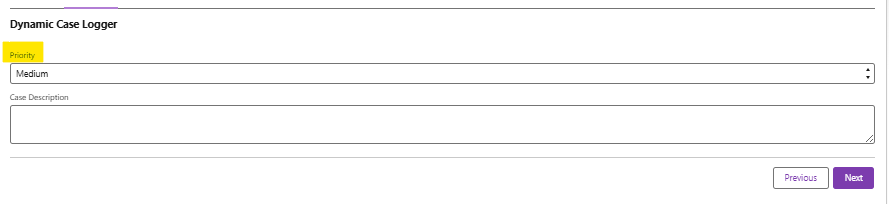
After that we can select priority for the case->
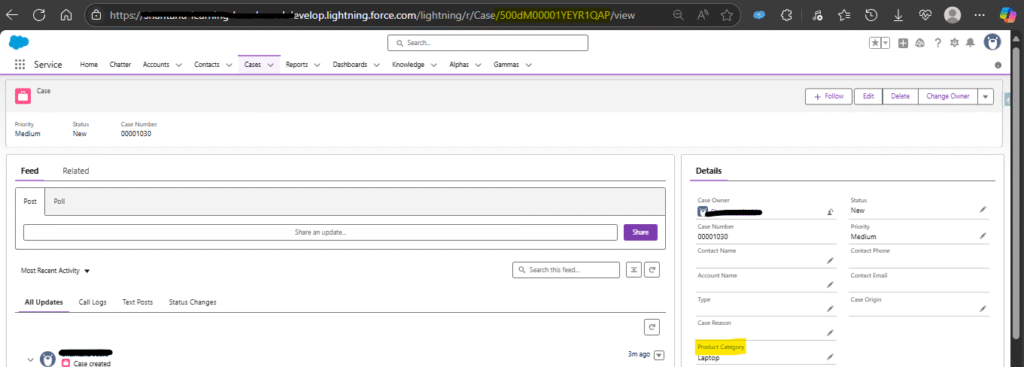
Once everything completed successfully we can see case created with the case id->

By combining Conditional Visibility with toggles and proper screen implementation, we have created a lean, adaptive flow that will:
- Only shows relevant fields: cutting down on agent overwhelm.
- Minimizes clicks: since irrelevant screens never appear.
- Requires zero code:all logic lives in the Flow builder.
- Provides clear feedback:with a success message tied to the actual record ID.
Conclusion:
By using Conditional Visibility and proper configuration of screens and toggles, we can build a fully dynamic Screen Flow in Salesforce that guides users through only the fields they need without writing any code and finishes with a clear success message that confirms the new record’s creation or any other business requirements.
With these declarative tools knowledge, we are ready to build Screen Flows that feel as smooth, polished and intuitive as any custom‑built UI without writing a single line of code. Happy Flow building and learn Salesforce flow best practices.