If you’ve ever connected Salesforce to another system, you already know that integration users can make or break your org’s security. Many admins still fall into the old habit of assigning the System Administrator profile to every integration just to “make it work.” It’s easy, sure — but also the fastest way to give away way more access than necessary.
Here’s the thing: integrations don’t need keys to the entire kingdom. What they need is just enough access to do their job — nothing more, nothing less. Let’s break down how to do that properly.
1. Start with the Principle of Least Privilege
This is your foundation. The idea is simple — every user (including integrations) should have only the permissions required for their role.
When applied to integrations, this means:
- Don’t reuse an existing user.
- Don’t assign admin-level profiles.
- Don’t give access to objects or data that the integration never touches.
If the integration only needs to read and update contacts, give it exactly that — Read and Edit access to Contacts — and stop there.
2. Use a Dedicated Integration User for Every App
One integration, one user. That’s the cleanest, safest setup. Using a single Salesforce integration user across multiple tools might save a few minutes today, but it creates blind spots in the long run. You’ll never know which app caused an update, who triggered a record change, or which credentials were compromised.
By giving each app its own user, you make monitoring, auditing, and troubleshooting way easier. If something fails or gets compromised, you can isolate and fix it fast without affecting the rest of your systems.
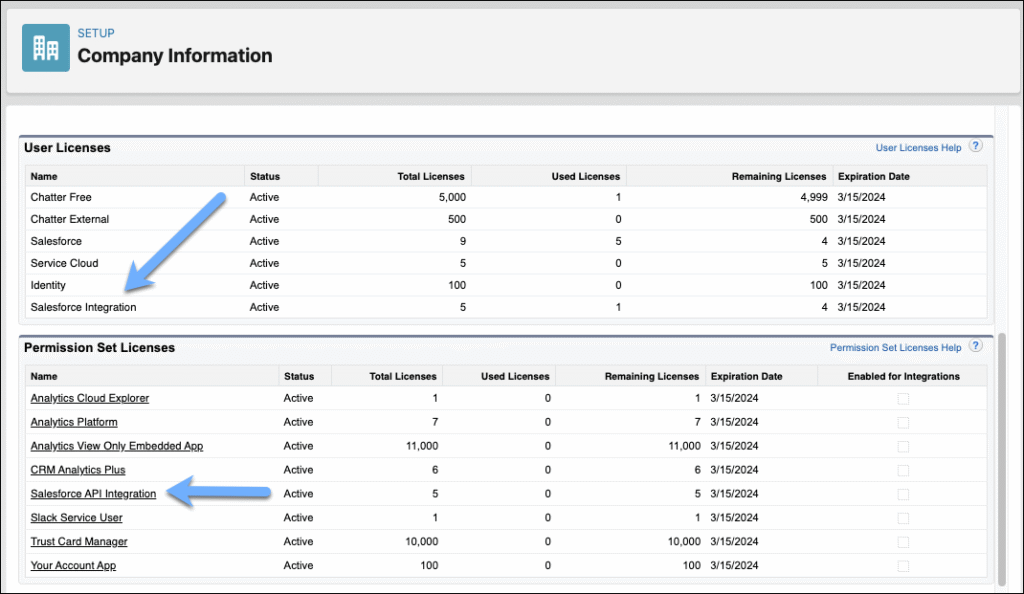
3. Meet the “Salesforce Integration User License”
Salesforce now provides a Salesforce Integration user license — designed specifically for API-only access. This license automatically creates the profile called Minimum Access – API Only Integrations.
Here’s what you need to know:
- The user can only log in via REST, SOAP, or Bulk API — not through the UI.
- It’s meant for machine-to-machine communication, not humans.
- Enterprise and higher editions get five licenses free; Developer Edition gets one.
- If you need more, your Account Executive can help you purchase them.
Once you create this user, you’ll notice that when you verify it, Salesforce shows a message: “Access Restricted for API Only Users.” That’s expected — it confirms the setup is API-only.
4. Keep the Profile Minimal
Your integration user’s profile should do only a few things:
- Define login hours and IP ranges (if needed).
- Include the API Only permission.
Everything else — object access, field access, app access — belongs in permission sets or permission set groups.
Think of profiles as the skeleton and permission sets as the muscles. Profiles define the basic shape; permission sets give flexibility.
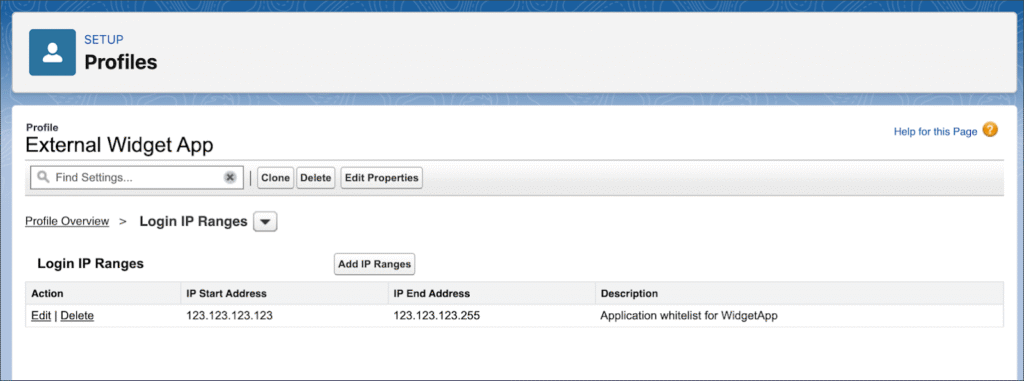
5. Clone the Profile for Each Application
Once you confirm the base profile is clean, make a copy for every application. For example:
- Marketing Cloud Integration Profile
- WidgetApp Integration Profile
- Slack Sync Integration Profile
This gives you granular control. Each profile can have its own Login IP Ranges and connected app settings. If one app gets compromised or changes IPs, it won’t affect the others.
This separation also helps in audits — you can instantly see which integration has which level of access.
6. Assign the Salesforce API Integration Permission Set License
Next, assign the Salesforce API Integration permission set license (PSL) to your integration user.
Here’s how to think of it:
- A PSL gives additional rights that aren’t part of the user license.
- A permission set grants specific permissions within the PSL.
Let’s say your integration needs to create Contacts and update Accounts. The PSL gives it the technical ability, while the permission set defines which objects and fields it can touch.
Without assigning the PSL, you’ll get an error when trying to give API-level access through a permission set.
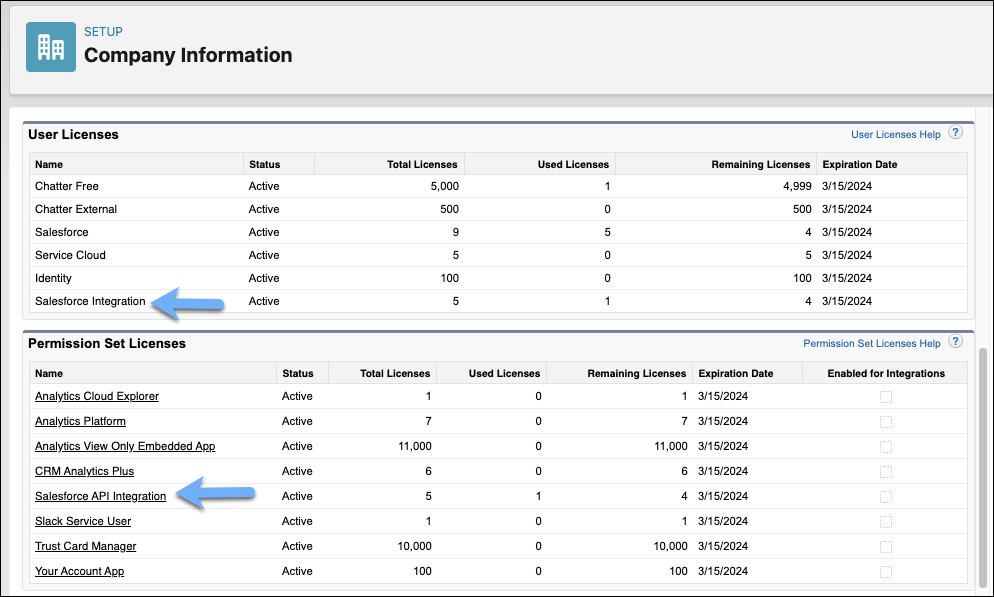
You can review all permissions included in this PSL under Setup → Company Information → Permission Set Licenses → Salesforce API Integration.
7. Lock Down the IP Range
Security doesn’t stop at permissions. Add an IP range restriction for each integration.
Ask your vendor for their published whitelist IPs or ranges. If they don’t share them publicly, request them directly. This small step adds a serious security layer — even if credentials get leaked, no one can log in from an unauthorized IP.
8. Build Permissions with Permission Sets and Groups
Create permission sets that match what the integration actually does — for example:
- Read_Contacts_PS
- Update_Accounts_PS
- Create_Activities_PS
Then, bundle them into a permission set group so you can manage everything in one place. If you ever need to remove or tweak access, mute specific permissions inside the group instead of editing multiple sets.
This structure is clean, scalable, and easy to maintain.
9. Test Thoroughly in a Sandbox
Never skip this part. Set up and test your integration user in a sandbox before production.
Start with the absolute minimum permissions and test every operation — record reads, writes, updates, and deletes. If something fails, review logs, identify the missing permission, and add only what’s required.
Testing this way ensures your production org stays protected and clutter-free.
10. Deploy, Monitor, and Adjust
Once you’re confident everything works as expected, move the setup to production. Monitor it closely for the first month.
Check login history, API usage, and integration logs regularly. If you notice unexpected behavior or access errors, adjust the permission sets in sandbox first, test again, and then redeploy.
If you’re replacing an old integration user, keep the old one temporarily as a backup. Once the new one runs smoothly for a few weeks, clean up the obsolete access.
Why This Approach Works
When you follow these steps, you’re doing more than just securing an integration. You’re:
- Protecting your data from unnecessary exposure.
- Making your org easier to audit and manage.
- Building a scalable structure that works for future integrations.
Admins often underestimate how powerful small configuration habits can be. Giving every integration its own license, locking down IPs, and using permission sets properly might sound tedious, but it’s what separates a “working setup” from a secure one.
Final Thoughts
Setting up integration users isn’t glamorous, but it’s one of those areas where good habits pay off for years.
Start small. Keep access tight. Document every permission you assign. And remember — integrations don’t need superpowers; they just need clarity and control.
Once you nail that, your org runs smoother, your data stays safer, and troubleshooting becomes a lot easier.