Salesforce will be retiring Salesforce Chat in February this year. This will mark our farewell to all of the legacy products under the legacy Chat umbrella (Live Agent, Salesforce Chat, Embedded Chat, and Service Chat) in favour of Salesforce Enhanced Chat, formerly known as Salesforce Messaging for In-app and Web (MIAW).
Salesforce MIAW was introduced in the Summer ‘22 update and got renamed to Enhanced Chat in June 2025. It has considerable advantages over the Legacy Chat functionality, such as persistent conversation history, native Agentforce integration, omni-channel flow based routing, the capability to estimate wait times for customers among others, which is why it is useful for us to acquaint ourselves with this new tool and establish a smooth transition from Legacy Chat.
Further information about the retirement process can be found here.
Before you start
First of all, you need to ensure that you have the Digital Engagement add-on. Pricing can vary based on your Service Cloud edition, while Unlimited Edition and Agentforce 1 Edition include Digital Engagement out of the box.
It is not possible to host a Legacy and Enhanced Chat deployment on the same page. Therefore if you have a chat widget, remove it.
It is also not possible to host Enhanced Chat on Salesforce Classic. Make sure that you are using Lightning Experience before following the procedure below.
Omni-Channel needs to be enabled in your org. You can enable Omni-Channel by going to Setup → Omni-Channel Settings and ticking the Enable Omni Channel checkbox.

Every agent who will be chatting with customers needs two specific modifications done under their User record: Service Cloud User License which should be activated by ticking the Service Cloud User checkbox, and Messaging for In-App and Web User Permission Set License which should be assigned under the Permission Set License Assignments list.
If you are migrating from Legacy Chat, Salesforce also provides a reporting tool to assess your org’s readiness for a transition to Enhanced Chat, for which more information can be found here.
Migrating from Legacy Chat
Luckily, Salesforce provides a tool (albeit still in Beta) to help with the migration process if you are transitioning from Legacy Chat. You can access this tool by going to Setup → Legacy Web Chat Migration (Beta). Once that is done, click Get Started and select whether you are using Embedded Service or not.
If you select Yes, add your Embedded Chat Deployment. Under Deployment Type, if you select New Enhanced Web Chat Deployment, name your deployment, give it an API name, and add your domain. (You can also paste the domain of your Salesforce org to this field.) To map it to a new messaging channel, give it a name and developer name. To map it to an existing messaging channel, search for and select the channel. If you instead select Existing Enhanced Web Chat Deployment under Deployment Type, select your deployment and then choose a single language for your migrated custom labels. To migrate eligible Legacy Chat custom labels in more than one language, run through the migration tool again for each additional language.
If you select No, add your Chat Deployment and Chat Button. Fill the name and domain fields. API name will be filled automatically afterwards. If you want to map it to a new messaging channel, give your channel a name. To map it to an existing messaging channel, search for and select the channel. Salesforce will create a new Embedded Service Deployment during migration.
Once that’s done, click Next, which will open the Next Steps page with the information you provided. If you are satisfied, click Save. Do not click away from the next page with the progress indicator as the migration will be done through that page. The process will take several minutes. After the migration is done, you will be taken to the Embedded Service Deployment Settings page.
Most custom labels will be migrated for you by the tool. However, things such as your reports regarding Chat sessions, Apex code/triggers and Lightning Web Components will have to be adapted to Enhanced Chat manually. You will need to use the new Enhanced Chat objects and fields for this. For example, the Enhanced Chat equivalent of the LiveChatTranscript object, which stores your Chat history, is MessagingSession.
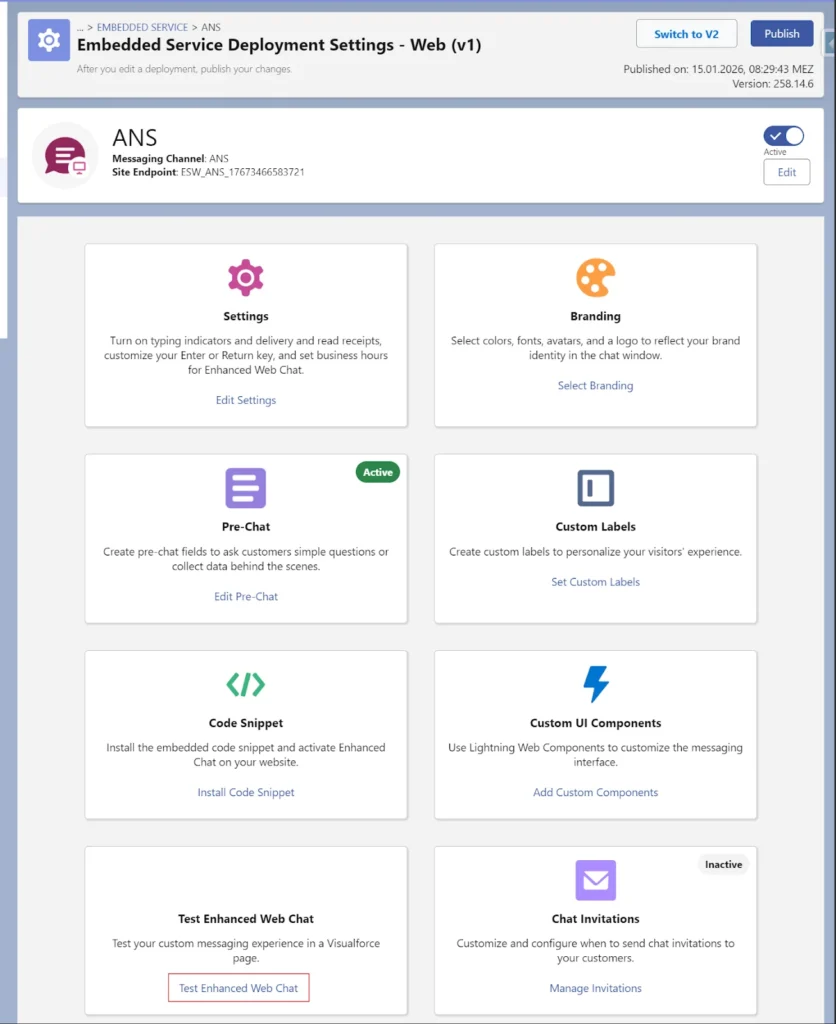
Embedded Service Deployments
The migration will most likely lead you to the Embedded Service page, but you can also access it via Setup Setup → Embedded Service Deployments.
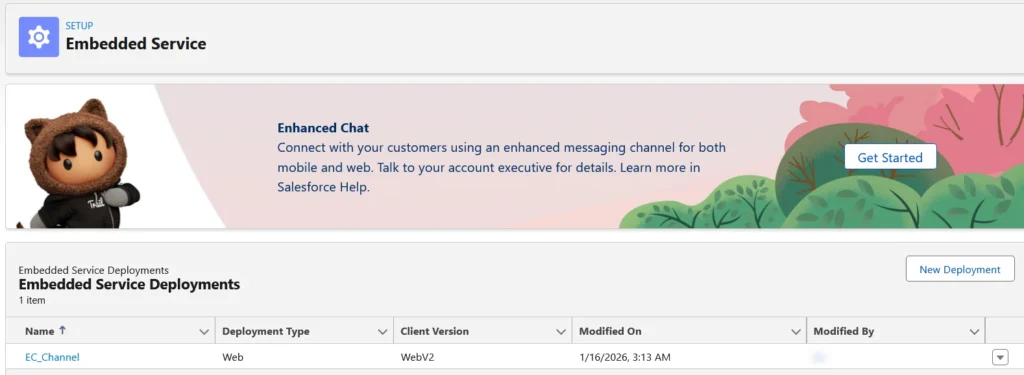
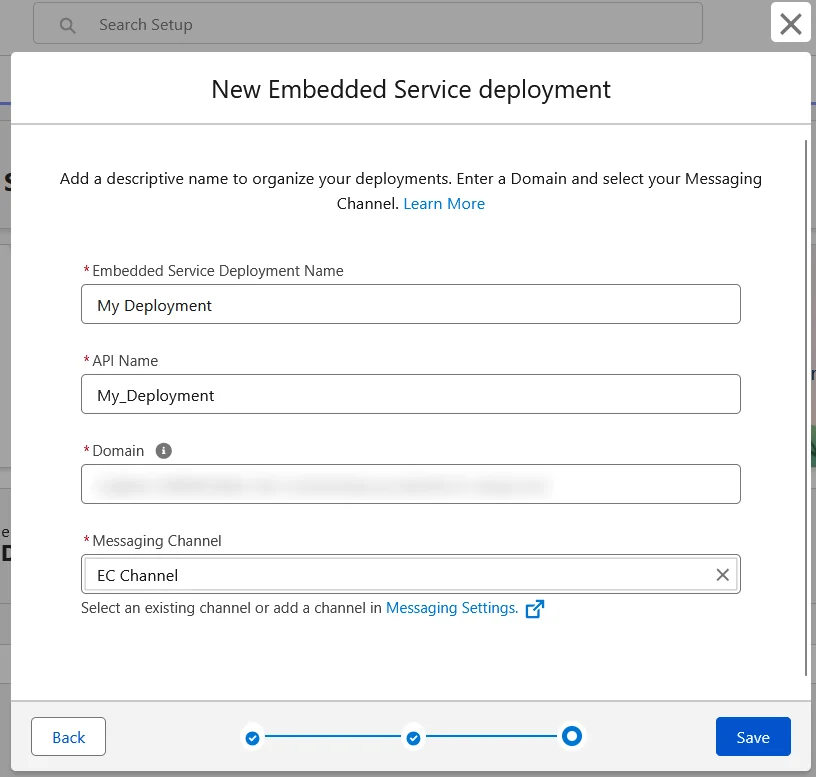
Click on New Deployment. Pick the Enhanced Chat option, then pick the Web option in the next page. Enter the name you wish, your domain and your messaging channel. The fields should look like the image below. Once you’re satisfied, click Save. This will form the basis of your Enhanced Chat instance.
Regardless of whether you are migrating to Enhanced Chat or setting it up from scratch, you will need to test your deployment. Click Test Enhanced Web Chat in the deployment menu, which will open the conversation window. It will open a new Visualforce page from which you can test the user experience. If your Flow fails, you will receive an error email just as usual.

Setting up Enhanced Chat from scratch
If you are starting from scratch, the process will be somewhat different.
Even if you are not using a full Salesforce Community/Portal, you must Enable Digital Experiences in Setup → Digital Experiences → Settings. This creates the secure infrastructure (Salesforce Sites) required to host the chat deployment, which is required to create a new Embedded Service Deployment to undertake the later steps. Note that once Digital Experiences are enabled, they cannot be disabled and the domain name of your Salesforce org cannot be changed, so make sure that you are okay with your domain name beforehand.
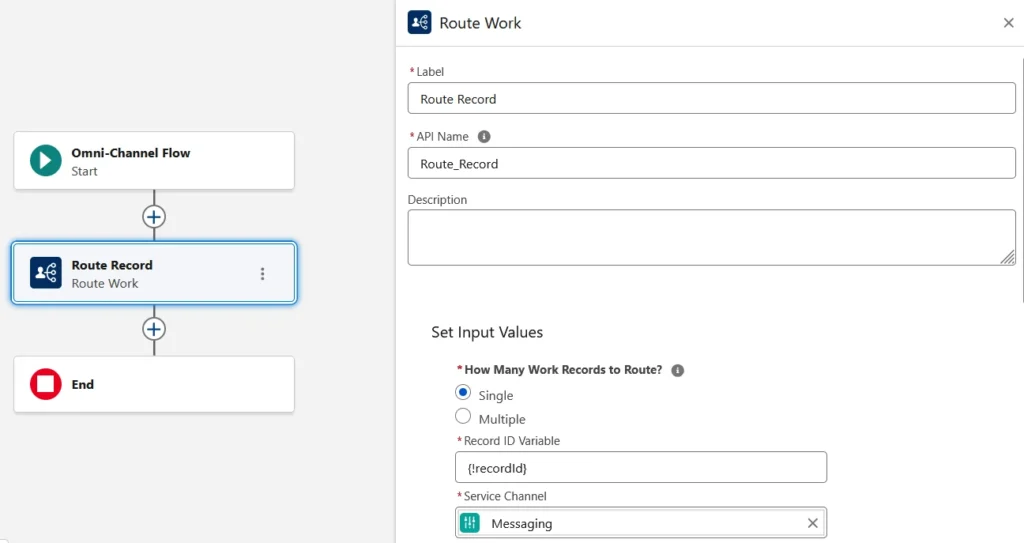
You will need an Omni-Channel Flow to configure Enhanced Chat. Go to Flows and create a Flow with the Omni-Channel Flow template. You only need two things here:
- a Text variable named recordId (case sensitive) which is available for input. This will be the ID of the record that will be passed from the messaging session to the Flow.
- a Route Work action between the start and end of the Flow. Its input value will be recordId (single variable) and its Service Channel will be Messaging. You can choose whether you want to route to a Queue, an Agent, an Enhanced Bot or a Skill Requirement List.
Save and activate the Flow with any name you want. Your Flow should look like this:
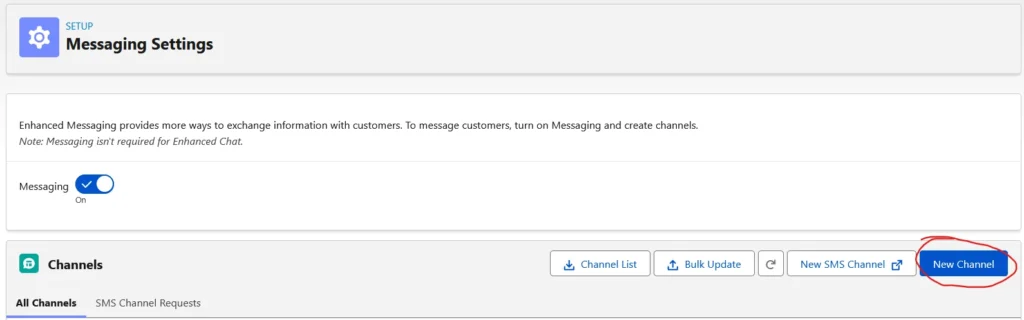
When that is done, it’s time to create a new Enhanced Chat channel. Go to Messaging Settings and click New Channel. Pick the Enhanced Chat option and then enter the required fields (name of the channel and the related domain). In the next page, you will be prompted to select your routing type. Choose Omni-Flow. Search for and select the name of the Flow you created in the previous step for the Flow Definition field. Select a fallback queue just in case the routing fails. Click Save and wait until the window with the progress indicator is closed automatically. The process can take several minutes.
Once that is done, you will have an Embedded Service Deployment automatically created for you. If you don’t, you can defer to the Embedded Service Deployments section. The testing requirements will be the same.
Conclusion
Transitioning to Salesforce Enhanced Chat represents a critical shift towards a more robust, feature-rich support environment which will undoubtedly be at the front lines of customer service from now on. Whether you are migrating from a Legacy Chat system or setting it up from scratch, rolling out Enhanced Chat will prove useful to both you and your customers at the cost of a few clicks.
That’s all there is to it. See you in the next one!