The Utility Bar serves as one of the most underappreciated yet incredibly useful tools in Salesforce’s many features that make users’ lives easier. You may have noticed a thin bar at the bottom of the page if you have ever worked with a Salesforce Lightning app. This is the Utility Bar, a section created to allow you to quickly access frequently used tools with a single click by not even leaving the page you’re working on. Handy icons like Notes, History, Recent Items, and even custom utilities that your admin configures are frequently included. Consider the Utility Bar as the quick access menu on your smartphone: always accessible, always visible, and fully customizable to meet the specific requirements of your team. For instance, you can launch the Notes tool directly from the bar to quickly take notes on an Opportunity record rather than having to navigate away from it. Alternatively, the History tool is only a click away if you need to review your most recent activity.
Modifying the Utility Bar is an easy yet powerful way for Salesforce administrators to increase user productivity. This blog will examine:
- What is the Utility Bar and why is it important?
- Detailed instructions for personalizing it.
- Examples of practical tools you could include.
- A straightforward real-world situation with just the most basic features.
- Best practices to remember.
By the end, you’ll know how to create a Utility Bar experience that helps users work smarter, not harder.
What is Salesforce’s Utility Bar?
A Lightning app’s Utility Bar is a fixed section at the bottom that provides users with easy access to frequently used tools. Regardless of the record, page, or tab the user is on, it is always present.
Increased Productivity and Efficiency: The most significant benefit is that it saves users from having to navigate away from their current page to perform common tasks. You can locate what you need without having to switch out of your current record.
Context-Aware Access: It provides a way to access relevant tools and information in a single, fixed location. For example, a sales rep can quickly take a note while talking to a customer or capture a new Customer support case without navigating to any other page.
But as an Admin, you can add more based on what your team actually needs.
Step 1: Determine the Needs of Your Users
Consider this before you start setting up, What do my users usually do that requires too many clicks?
A few instances are:
- In order to record updates while on the go and remain up to date on their most recent encounters, sales representatives frequently require instant access to notes and recent items. They can work more quickly without losing context because of this.
- Tools like History and Utility for Macros help service agents by streamlining repetitive tasks and effectively tracking past actions. This guarantees that they can consistently and swiftly resolve cases.
- Since dashboards and reports offer real-time visibility into team performance and business metrics, managers place a high value on having easy access to them. They can decide more quickly and intelligently if they have the appropriate information at their disposal.
Step 2: Go to App Manager
To customize the Utility Bar, you work within Lightning App Manager.
- Go to Setup.
- In the Quick Find box, type App Manager.
- Select App Manager.
- Find the Lightning app you want to customize (e.g., Sales or Service Console).
- Click the dropdown arrow → Edit.

Step 3: Access the Utility Bar
Once inside the App settings:
- Navigate to the Utility Bar tab on the left-hand side.
- Here, you’ll see a list of utilities already available in that app (if any).
- You can add, remove, or reorder utilities to customize the user experience.
Step 4: Add a Utility
Click Add Utility Item. Salesforce will show you a list of standard utility components you can choose from, such as:
- Chatter Feed: Use the utility bar to work together in real time with your team. Collaboration is smooth because users can comment on records, share files, and post updates all without leaving their workflow.
- History: Offers a rapid method of viewing and reopening recently visited pages, objects, or records. When alternating between several records throughout the day, this saves a significant amount of time.
- Notes: Notes is a simple yet effective note-taking tool that enables users to record crucial information on the fly while going over documents. To guarantee that context is never lost, notes are automatically connected to the pertinent record.
- Recent Items: This feature allows users to quickly return to the accounts, opportunities, or cases they deal with regularly by providing quick access to frequently used objects or records.
- Open CTI Softphone: Integrating a phone system directly within Salesforce is made possible by Open CTI Softphone. To increase service efficiency, agents can log activities, make and receive calls, and even use click-to-dial straight from the utility widget.
- Visualforce Pages: To ensure consistency when utilizing Lightning, your company’s specialized or legacy Visualforce apps can be directly integrated into the utility bar for easy access.
- lightning components: Admins and developers can create custom Lightning components and add them to the utility bar for more complex use cases. These could include dashboards, KPI trackers, and third-party apps that are integrated, providing teams with tools that are specifically suited to their business procedures.
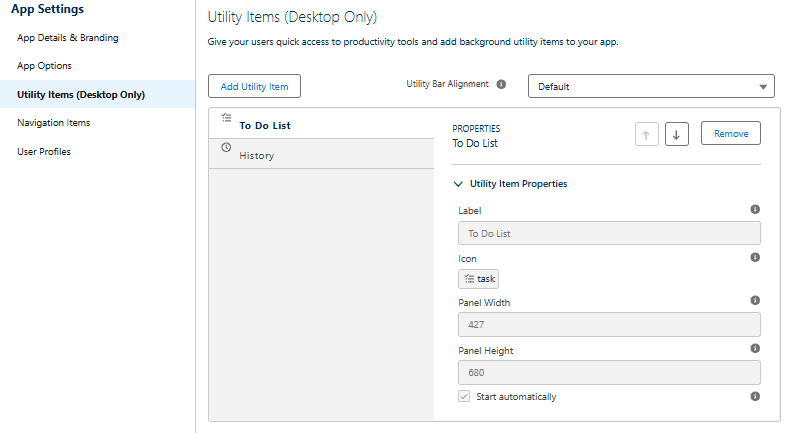
Step 5: Configure the Utility
Salesforce allows you to customize its settings after you choose a utility.
For Example:
- Label: What should the utility’s name be?
- Icon: To make it immediately identifiable, select an icon.
- Panel Width/Height: Indicate the ideal size for the utility’s pop-up panel.
Example: If you add Notes, you could set:
- Label = History
- Icon = Clock Icon
- Panel Height = 480 px
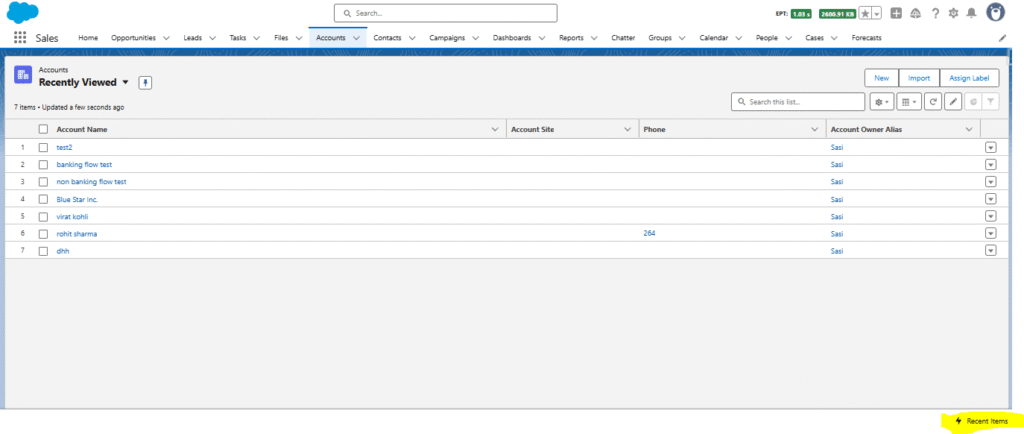
Step 6: Save and Test
Once you’ve added utilities:
- Click Save and Finish.
- Switch to the Lightning app you modified.
- Look at the bottom of the screen the Utility Bar should appear.
- Test the utilities by clicking their icons.

No more hunting through navigation menus or losing context.
Note:If you want a utility item to appear on the right side of the screen, set the Utility Bar Alignment property to Mirrored. This ensures that instead of showing on the default left side, the utility bar is displayed on the right, giving flexibility in layout based on user preference or design needs.

Extra Ideas: Useful Utilities for Different Teams
Admins can add the following utilities to help users’ lives:
For Sales Teams
- Notes: Sales reps can quickly log brief call notes while speaking with clients, ensuring no key details are missed and helping with accurate follow-ups.
- Recent Items: They can instantly return to the last ten records they worked on, saving time during back to back client calls or meetings.
- Chatter Feed: Real time collaboration allows them to loop in coworkers or managers on deals, share updates, and resolve queries without email delays.
- Dashboard Viewer: Provides immediate access to pipeline dashboards, enabling reps to track their targets and focus on high value opportunities.
For Service Teams
- History: Agents can see a list of recently viewed cases, making it easy to switch between multiple open cases without losing context.
- Macros: Automates repetitive steps like sending standard responses or updating status fields, which speeds up resolution time for high-volume cases.
- Omni-Channel Utility: Distributes workload automatically by routing cases, chats, or calls to available agents, ensuring balanced assignments and quicker responses.
- Knowledge: Allows agents to access and read relevant help articles without leaving the case record, ensuring faster and more accurate customer resolutions
For Supervisors:
- Dashboards: Supervisors can monitor team performance in real time, such as case closure rates or sales pipeline health.
- Reports: Provides quick access to detailed metrics like SLA breaches, revenue trends, or backlog volume, helping in data-driven decision-making.
- Notes: Supervisors can jot down coaching comments during team reviews and share feedback directly with team members for improvement.
Step 7: Communicate with Users
Remember to inform users of any updates after customization. If no one uses a utility bar, it is useless!
Suggestions for introducing it:
- A brief post on Chatter: Hey team! Your utility bar now includes Recent Work and Quick Notes. At the bottom of your screen, give it a try.
- Tutorial: A two-minute tutorial or screenshot guide.
- Get input: Find out if they want additional tools added.
The Best Ways to Customize Utility Bars
- Keep it simple: Don’t overwhelm users with too many utilities; instead, keep things simple. Begin modestly.
- Use standard features first: Prioritize using standard features over custom ones. Notes, Recent Items, and History should be used first.
- Prioritize speed: Put speed first. Common too many clicks issues should be resolved by utilities.
- Test on different profiles: Verify that it is accessible to all pertinent users by testing it on various profiles.
- Get user feedback: The best utilities are those that people genuinely want to use.
- Document changes: Changes should be documented. To help future administrators understand, note which utilities you added and why.
Final Thoughts
The Salesforce Utility Bar has a big impact on productivity and user experience, even though it seems like a small feature tucked away at the bottom of your page. By combining note-taking, collaboration tools, quick navigation, integrations, and even personalized components into a single, always-available panel, it ensures that users spend less time clicking around and more time focusing on what really matters: closing deals, resolving cases, and enhancing customer relationships.
Regardless of your role in Salesforce sales, service, or management a well-designed Utility Bar functions as your personal command center. It is simple, intuitive, and incredibly effective, proving that sometimes the most overlooked features can result in the biggest efficiency gains.