The loading indicator is an important part of the user interface of any web application. They tell users that an action is in progress and prevents confusion or repeated clicks. In terms of salesforce lightning web components (LWC), <Lightning-Spinner> Better that will make data or provide proper visuals during any long running operation. Join us to learn about How to use Lightning spinner in LWC.
This blog post shows how to build a simple LWC:
All this can be applied within 15 minutes and requires only three files: a top class, a LWC HTML template, and LWC JavaScript controller. Let’s dive.
A spinner is a visual indicator used to show that a process or operation is in progress. This is especially helpful during slow or asynchronous operations such as:
Spinners help prevent confusion and reduce the risk of users clicking buttons multiple times out of impatience. They act as a fine way of saying, “Please wait while your request is being processed.”
Learn about lazy loading in LWC.
Salesforce provides a built-in base component for spinners:
| <lightning-spinner></lightning-spinner> |
It supports several attributes:
<lightning-spinner size="small" alternative-text="Loading small..." />
<lightning-spinner size="large" variant="brand" alternative-text="Processing..." />
By default, these spinners are circular and simple, but they’re very effective for most cases.
First, create an Apex class named AccountController. This class exposes a single method, getAccounts(), which returns the 10 most recently created Account records.
public with sharing class AccountController {
    @AuraEnabled(cacheable=true)
    public static List<Account> getAccounts() {
        // return 10 Accounts (adjust fields as needed)
        return [
            SELECT Id, Name, Industry, Phone
            FROM Account
            ORDER BY CreatedDate DESC
            LIMIT 10
        ];
    }
}
Key points:
Deploy this class to your org before moving on to the LWC.
The HTML template uses conditional rendering (if:true and if:false) to control when each element is displayed:
<template>
    <!-- If loading, show spinner -->
    <template if:true={isLoading}>
      <lightning-spinner alternative-text="Loading accounts" size="medium"></lightning-spinner>
    </template>

    <!-- If not loading and we have data, show table -->
    <template if:false={isLoading}>
      <template if:true={accounts.length}>
        <lightning-datatable
          key-field="Id"
          data={accounts}
          columns={columns}>
        </lightning-datatable>
      </template>

      <!-- Otherwise, show the Load button -->
      <template if:false={accounts.length}>
        <lightning-button
          label="Load Accounts"
          onclick={handleLoad}
          variant="brand">
        </lightning-button>
      </template>
    </template>
</template> This approach will make sure that only one of these three elements (spinner, button, or table) is visible at any time.
In the JavaScript file, state variables and the data-fetch logic are defined:
import { LightningElement, track } from 'lwc';
import getAccounts from '@salesforce/apex/AccountController.getAccounts';

export default class AccountTableWithSpinner extends LightningElement {
  @track isLoading = false;
  @track accounts = [];

  columns = [
    { label: 'Name',     fieldName: 'Name'     },
    { label: 'Industry', fieldName: 'Industry' },
    { label: 'Phone',    fieldName: 'Phone'    }
  ];

  handleLoad() {
    this.isLoading = true;
    const spinnerMinTime = 13000; // min spinner duration in ms
    const startTime = Date.now();

    getAccounts()
      .then(data => {
        this.accounts = data;
      })
      .catch(error => {
        console.error('Error fetching accounts', error);
        // optionally show toast
      })
      .finally(() => {
        const elapsed = Date.now() - startTime;
        const remaining = spinnerMinTime - elapsed;
        // if data returned quickly, wait the remaining time
        setTimeout(() => {
          this.isLoading = false;
        }, remaining > 0 ? remaining : 0);
      });
  }
}Using an imperative call instead of @wire provides fine-grained control over when data is fetched and when the spinner appears or disappears.
Finally, ensure the component is exposed so it can be added to Lightning pages:
<?xml version="1.0" encoding="UTF-8"?>
<LightningComponentBundle xmlns="http://soap.sforce.com/2006/04/metadata">
    <apiVersion>63.0</apiVersion>
    <isExposed>true</isExposed>
    <targets>
        <target>lightning__AppPage</target>
        <target>lightning__RecordPage</target>
        <target>lightning__HomePage</target>
    </targets>
</LightningComponentBundle>
Place this file in the same folder as your HTML and JS files under force-app/main/default/lwc/accountTableWithSpinner.
Upon loading the page, only the Load Accounts button is visible. Once we click on it will display the spinner for at least 13 seconds, after that it will show Lightning Datatable with the 10 Account records.
Below is the screenshot before clicking on button and displaying spinner:

Below is the screenshot post clicking on button and displaying spinner it will better user experience and we will be able to add some text as well as the accounts are loading based on user requirement:

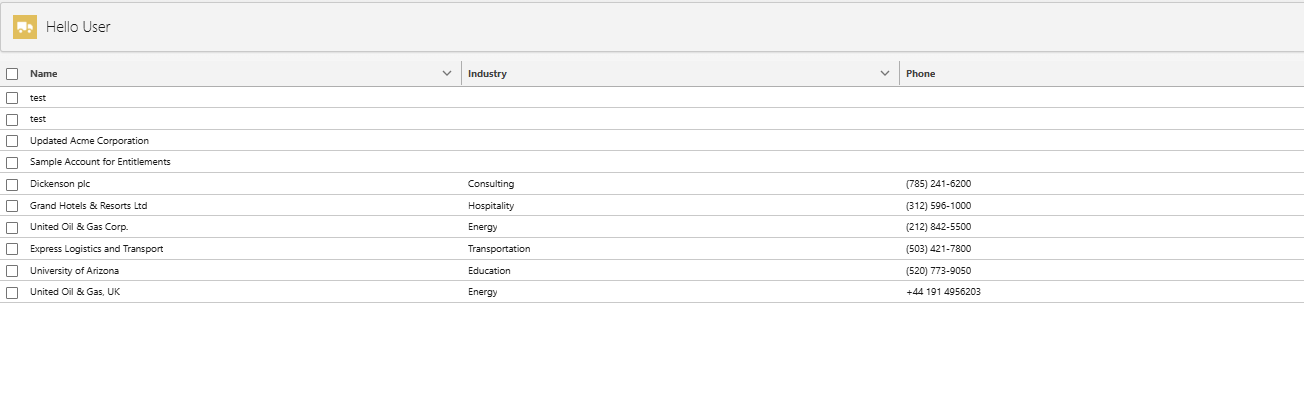
Now accounts are displayed post wait of 13 seconds as specified in our code:
This simple scenario can be extended in various ways:
Each of these enhancements builds on the same core principles: control the loading state, fetch data imperatively, and render results conditionally.
Developing and building a proper and user-friendly user interface in LWC is easy and straightforward when combining conditional rendering, the <lightning-spinner> component and imperative Apex calls. This blog shows how to develop a button-triggered data fetch that will make sure that users always see a loading spinner for a required duration before displaying results for better user interface.
By using the spinner duration, query logic and UI structure, these ways will serve as the foundation for more complex data loading scenarios in Salesforce. Whether fetching records, calling integrations or uploading files, providing clear feedback with a loading spinner enhances the end-user experience and reduces doubt during wait times.
Feel free to build upon this example, tailor it to your use cases and integrate it into larger Lightning pages. Happy coding:)