
Enabling users to upload files and instantly preview them is a powerful way to improve UX in Salesforce Lightning apps. In this blog, we will learn about the need we might want for this feature, our org and user stories before we start, steps to build it step by step (with full code), actual use cases of using this approach and the way to extend it beyond images. Let’s move forward and check on this blog to learn about File Upload with Preview in LWC & Apex.
Actual User Requirements
Before writing a single line of code, gather below core requirements as per any business:
- Record Context:
Users must be on a specific record (e.g. Account, Case) so uploaded files attach to that record. - Instant Preview:
For images especially, users expect to see what they have chosen before moving forward to “Upload” in Salesforce. - File Size & Type Limits:
We need to decide the maximum size like 2 MB and acceptable file types like PNG, JPG. - Security & Permissions:
Running users need to create rights on ContentVersion and ContentDocumentLink. - Graceful Feedback
Disable the Upload button until a file is selected, show “Uploading…,” and handle errors cleanly or as per business requirement we can add any messages.
With these in hand, our dev plan becomes straightforward: a small Apex controller to save the file and a Lightning Web Component (LWC) for the UI.
Prerequisites
- API Version ≥ 50.0
(The example uses 64.0 in metadata, but any modern org will do.)
User Permissions
Ensure profiles or permission sets grant:- Create on ContentVersion
- Create on ContentDocumentLink
- Record Page
We will deploy the LWC to a Record Page so that @api recordId is populated automatically.
Below are the steps for programs that we need to write as part of implementations:
Step 1: Apex Controller
Create a simple, @AuraEnabled Apex method that:
- Decodes the Base64 file data from the client
- Inserts a ContentVersion
- Finds the resulting ContentDocumentId
- Links it to the parent record via ContentDocumentLink
// File: FileUploadController.cls
public with sharing class FileUploadController {
    @AuraEnabled
    public static Id uploadFile(Id parentId, String base64Data, String fileName) {
        String base64Content = base64Data.substringAfter('base64,');
        ContentVersion cv = new ContentVersion(
            Title       = fileName,
            PathOnClient= fileName,
            VersionData = EncodingUtil.base64Decode(base64Content)
        );
        insert cv;
        Id docId = [SELECT ContentDocumentId FROM ContentVersion WHERE Id = :cv.Id].ContentDocumentId;
        insert new ContentDocumentLink(
            ContentDocumentId = docId,
            LinkedEntityId    = parentId,
            ShareType         = 'V'
        );
        return cv.Id;
    }
}Why ContentVersion + ContentDocumentLink?
- ContentVersion holds the file itself.
- ContentDocumentLink attaches it to any record.
Step 2: LWC Component
This LWC handles file selection, preview generation, and the upload call.
Markup (fileUpload.html)
<template>
  <lightning-card title="File Upload with Preview">
    <div class="slds-p-around_medium">
      <!-- 1) File input -->
      <lightning-input
        type="file"
        label="Choose Image"
        accept="image/*"
        onchange={handleFileChange}>
      </lightning-input>

      <!-- 2) Preview -->
      <template if:true={filePreviewUrl}>
        <div class="slds-m-top_medium">
          <b>Preview:</b><br/>
          <img src={filePreviewUrl} alt="preview" style="max-width:200px; max-height:200px;"/>
        </div>
      </template>

      <!-- 3) Upload button -->
      <lightning-button
        class="slds-m-top_medium"
        label="Upload to Salesforce"
        onclick={uploadFile}
        variant="brand"
        disabled={isUploadDisabled}>
      </lightning-button>
         <!-- 4) Status -->
      <template if:true={status}>
        <p class="slds-m-top_small">{status}</p>
      </template>
    </div>
  </lightning-card>
</template>JavaScript (fileUpload.js)
import { LightningElement, api, track } from 'lwc';
import uploadFileApex from '@salesforce/apex/FileUploadController.uploadFile';

export default class FileUpload extends LightningElement {
  @api recordId;

  @track fileData;
  @track fileName;
  @track filePreviewUrl;
  @track isUploading = false;
  @track status;

  // Getter for disabling the button
  get isUploadDisabled() {
    return this.isUploading || !this.fileData;
  }

  handleFileChange(event) {
    const file = event.target.files[0];
    if (!file) {
      this.fileData = undefined;
      this.filePreviewUrl = undefined;
      return;
    }
    this.fileName = file.name;

    const reader = new FileReader();
    reader.onload = () => {
      // full data URI: "data:image/png;base64,iVBORw0KGgoAAAANS..."
      this.fileData = reader.result;
      this.filePreviewUrl = reader.result; // this drives the <img> src
    };
   reader.onerror = (err) => {
      this.status = 'Error reading file: ' + err;
    };
    reader.readAsDataURL(file);
  }

    uploadFile() {
  // 1) Ensure recordId is present
  if (!this.recordId) {
    this.status = 'Error: No record context. Please add this component to a record page.';
    return;
  }
  if (!this.fileData) {
    this.status = 'Please choose a file first.';
    return;
  }

  this.isUploading = true;
  this.status = 'Uploading...';

  uploadFileApex({
    parentId   : this.recordId,
    base64Data : this.fileData,
    fileName   : this.fileName
  })
  .then((newVersionId) => {
    this.status = 'Upload successful! Version Id: ' + newVersionId;
  })
  .catch((error) => {
    console.error('Upload failed:', error);
    // Extract human message...
    let msg = (error.body?.pageErrors?.[0]?.message)
               || error.body?.message
               || error.message
               || 'Unknown error';
    this.status = 'Upload failed: ' + msg;
  })
  .finally(() => {
    this.isUploading = false;
  });
}
}
Metadata (fileUpload.js‑meta.xml)
<?xml version="1.0" encoding="UTF-8"?>
<LightningComponentBundle xmlns="http://soap.sforce.com/2006/04/metadata">
  <apiVersion>64.0</apiVersion>
  <isExposed>true</isExposed>
  <masterLabel>File Upload with Preview</masterLabel>
  <targets>
    <target>lightning__RecordPage</target>
  </targets>
</LightningComponentBundle>Tip: Limiting to lightning__RecordPage prevents users from adding it to App/Home pages (where recordId is unavailable).
Below is the actual screenshot from UI for Reference:

Post selecting file to upload our implementation will looks like:
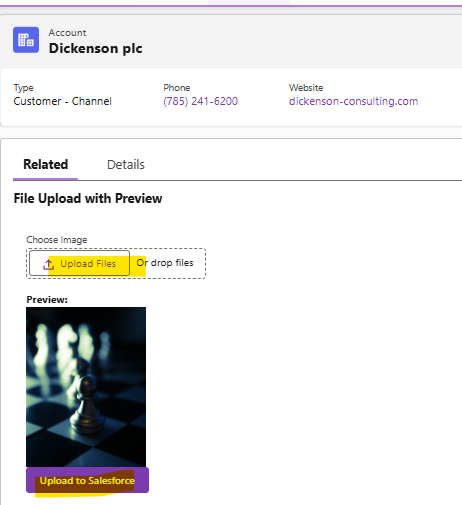
Once we hit on “Upload to Salesforce” button it will show as below and in above screenshot we can see once file added button got enabled:
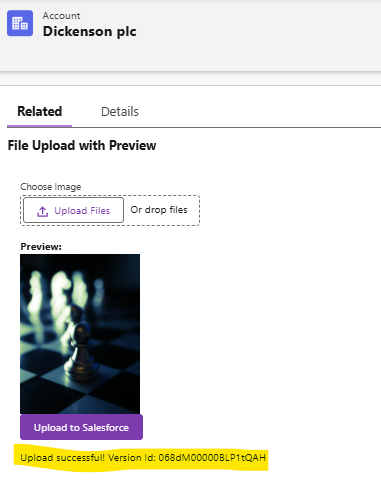
Once id of file created we can see it in Attachment section as below:

Advantages of above Implementation
- Responsive UX
Instant client‑side preview builds user confidence. - Server‑Side Safety
Apex handles file storage, respects sharing rules, and leverages standard ContentVersion APIs. - Reusability
We can drop this LWC on any record page Accounts, Cases or custom objects. - Extensible
Simply tweak acceptedFormats to support documents, spreadsheets, or PDFs. - Minimal Footprint
No third‑party libraries are pure LWC + Apex so it will be lean and easy to maintain.
Extending Beyond Images
Right now, acceptedFormats = ‘.png,.jpg,.jpeg’ and we preview only images. To support other file types:
Allow more extensions
acceptedFormats = ‘.png,.jpg,.jpeg,.pdf,.docx,.xlsx,.csv’;
- Remove or conditionally render the <img>
For non‑image files we could show a generic icon instead of preview. - Validate file sizes
Add a check in handleFileChange for file.size before reading.
With these tweaks, the same pattern lets us upload PDFs, Word docs, Excel sheets or any file Salesforce supports as per user or business requirements.
Points to Remember
- Always wrap JS expressions in {…} and keep attribute names lowercase in our HTML.
- Deploy both Apex and LWC in the same API version (≥ 50.0).
- Grant CRUD/FLS on ContentVersion and ContentDocumentLink to our users.
- Use the Record Page target so @api recordId isn’t empty.
- Test in Dev Console or with browser DevTools to inspect errors and object permissions.
Conclusion
Implementing file upload with preview in LWC is straightforward once we break it into two parts as :An Apex service to persist files via standard Content objects and A lightweight LWC for file selection, preview and status updates.With the help of this implementations we will be able to achieve any customized business requirements.
By following the steps above and remembering permissions, metadata exposure and user experience tips we will have a reusable component that improves productivity and delight. And when our business needs change, simply adjust the acceptedFormats or add file‑size checks to meet new requirements.
Happy coding:)


I like the concept.
Worth noting, however, that since you handle the upload directly, sending the base 64 encoded data to Apex, you have a maximum file size implied due to heap limits. Since you have both the base 64 data and its decoded data in the same synchronous transaction scope, these both together must fit in 6Mb (suggesting a maximum of around 3-4Mb, give or take). This is something worth explicitly stating as a disadvantage of this approach.